
Category: Learn About Tea
Small Batch Kombucha: A Complete Australian Guide

Most advice about small batch kombucha starts with romance: handmade, raw, alive, and somehow automatically healthier. That framing misses the part that decides whether a bottle is safe, consistent, and legally sold. In Australia, fermentation changes acidity, sugar, carbonation and alcohol content, so the brewer's real work happens in the measurements, records and cold storage, not just in the attractive label.
Australia's kombucha story has deep roots. The drink appeared in Australian press as a “mysterious medicine” from Mongolia and eastern Siberia in 1945, while Mojo in South Australia is identified as the country's first commercial producer, with Anthony Crabb beginning sales at the Willunga Farmers' Market in 2009 (Australian Food Timeline). That path from home brewing and farmers' markets to broader retail helps explain why craft-style fermentation still matters, but it doesn't excuse loose process control.
What Small Batch Kombucha Actually Means
“Small batch” doesn't automatically mean better. It describes a way of producing kombucha, not a guarantee about sugar, live cultures, flavour or safety.
A small-batch brewer usually ferments limited volumes in individual vessels, monitors those vessels by hand and accepts that one batch may taste slightly different from the next. The producer may work with a shorter supply chain, buy tea and botanicals in smaller quantities, and bottle closer to the place of brewing. Those choices can create a more distinctive drink, but they also create more variables.
A factory can use filtration, pasteurisation, controlled carbonation and tightly standardised inputs to make every bottle taste familiar. A small producer may preserve more of the living fermentation, which can mean more sediment, changing acidity and a shorter stability window. Neither format deserves a halo by default.
The Australian boundary that matters
The phrase also carries a regulatory consequence. Queensland guidance says fermented foods should reach a pH of 4.6 or lower, ideally within 24 hours, and that final alcohol content must not exceed 0.5% ABV for general food classification (ABC News). Queensland guidance also identifies 1.15% ABV as the maximum for brewed soft drinks under the Food Standards Code, while products at 0.5% ABV or above require alcohol declaration on the label.
That means “small batch” isn't merely a visual style or a farmers' market story. Fermentation can continue after bottling, particularly when residual sugar, yeast and warmth are present. A brewer needs to control the batch before packaging and understand what happens during transport and storage.
Practical rule: Treat every small batch as its own production event. Record its tea, sugar, fermentation conditions, pH, flavour additions, packaging date and storage conditions.
The rest of the buying decision follows from that reality. Taste may be more expressive, but the buyer should also ask whether the producer manages pH, alcohol drift, refrigeration and batch consistency with the same care given to branding.
How Small Batch Kombucha Is Brewed
A useful way to understand small batch kombucha is to follow one brew from sweet tea to finished bottle. The culture commonly called a SCOBY, or symbiotic culture of bacteria and yeast, works with starter liquid to transform sweetened tea into a tart fermented drink.
Start with filtered water, black or green tea, white or raw sugar, a healthy SCOBY and acidic starter liquid from a previous batch. The sugar feeds the culture during fermentation. It isn't poured into the finished drink for the consumer to consume, although fermentation doesn't guarantee that every gram disappears.
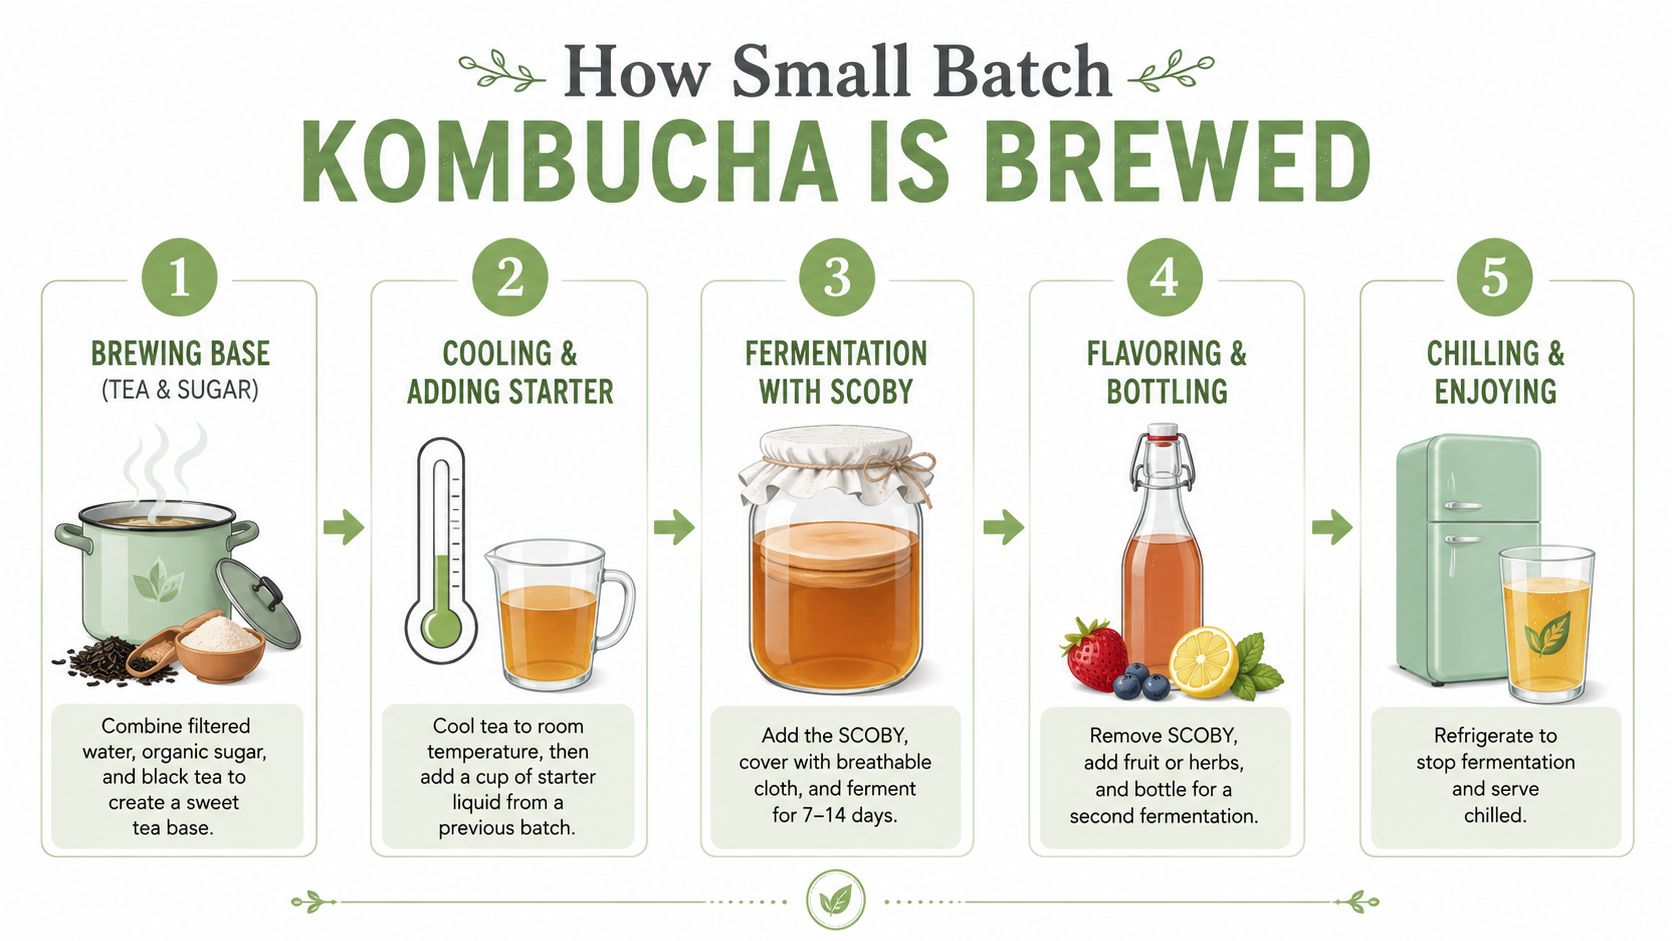
Building the primary ferment
Brew the tea base. Steep the tea in hot water, dissolve the sugar, then allow the liquid to cool fully. Hot sweet tea can damage the culture, so patience at this stage prevents trouble later.
Add starter and SCOBY. Transfer the cooled tea to a clean, food-grade vessel. Add starter liquid, then place the SCOBY into the brew. The starter helps lower the initial pH and gives the new batch a stronger beginning.
Cover and ferment. Use a breathable cloth or cover that keeps insects and debris out while allowing air exchange. A working temperature around 22 to 26°C is commonly used, with primary fermentation often taking 7 to 14 days, but taste and pH should guide the decision rather than a calendar alone.
Taste and measure. The brew becomes sharper as the culture consumes sugar and produces acids. Use a reliable pH meter, clean sampling technique and consistent records. A pleasant flavour isn't a substitute for a safety check.
Basic equipment includes a food-grade vessel, breathable cover, bottles, a pH meter and a hydrometer for tracking fermentation-related changes. Brewers also need a repeatable cleaning and sanitising routine. Commercial or serious home operations can benefit from learning about food industry lab solutions when designing a hygienic workspace, especially where wet areas, sampling and storage need to stay organised.
Why the second ferment changes the drink
After primary fermentation, remove the SCOBY and add fruit, herbs, spices or juice before bottling. This second fermentation lets remaining yeast work on fresh sugars, creating natural carbonation. It can also increase alcohol content, change acidity and produce pressure inside the bottle.
A SCOBY hotel is a separate container of SCOBYs and strong starter liquid, maintained so a brewer has reserve cultures available. It's useful for continuity, but it still needs clean handling and regular observation. For a practical home-brewing starting point, Pep Tea provides a home-brew kombucha guide that can help turn the broad process into a repeatable routine.
The safest habit is to chill bottled kombucha once the desired carbonation develops. Cold storage slows fermentation. It doesn't magically reverse it, so bottles should still be checked, handled carefully and kept within the producer's instructions.
Small Batch Versus Mass Produced Kombucha
Small-batch kombucha often shows more tea character, sharper acidity and visible sediment. Those features reflect how much of the fermented drink remains in the bottle, rather than proving superior health value. Mass-produced kombucha may be filtered, pasteurised or stabilised, which can create a cleaner appearance and a longer, more predictable retail life.
The practical difference is control versus variation. A small producer must manage pH, fermentation time, carbonation and alcohol drift across changing temperatures and cultures. Industrial production can apply tighter process controls, but the label and storage instructions still determine what reaches the customer.
Sugar also cuts through broad marketing claims. Retail kombucha products have been found with sugar levels from less than 0.1 g to 3.8 g per 100 mL, while the Australian Food Standards Code defines low sugar as 2.5 g or less per 100 mL, according to CHOICE. The word “kombucha” tells you very little about sweetness. Read the nutrition panel.
| Attribute | Small Batch | Mass Produced |
|---|---|---|
| Taste | More variation between batches, with tea, acidity and botanicals often prominent | More standardised flavour from controlled processing |
| Residual sugar | Can vary with fermentation time and flavour additions | Usually managed for a consistent labelled profile |
| Live cultures | May retain live cultures when sold raw and refrigerated | May be reduced through pasteurisation or filtration |
| Alcohol control | Requires close monitoring because fermentation can continue | Industrial controls can improve consistency, but the label still matters |
| Batch consistency | Natural variation is more likely | Repeatability is usually the commercial priority |
A live, unpasteurised bottle can keep changing in the fridge. That suits fermentation enthusiasts, but it also requires a reliable cold chain and a realistic best-before period. Warmer storage can speed fermentation, increase pressure and allow ABV to drift, so a producer needs records and repeatable handling rather than a promising label alone.
Shelf-stable kombucha is easier to distribute and store. Its processing may reduce culture activity, so buyers should not assume it behaves like raw kombucha. Small-batch producers can offer distinctive, flavour-forward drinks, while mass-produced brands usually prioritise consistent taste and supply. The better choice depends on fermentation character, storage convenience, sugar control and the serving context.
Safety, pH and Quality Standards in Australia
A small-batch brewer should treat safety as a sequence of checks, not a final paperwork exercise. The first question is whether the fermentation acidifies quickly and consistently enough to discourage harmful bacteria.
Australian food-safety guidance recommends a final pH below 3.0 for kombucha. If the brew hasn't fallen below 3.0 by day 10, it should be discarded, and guidance recommends measuring around day 7 before deciding whether fermentation should continue (Food Safety Australia). A weak starter culture, low temperature or contamination can all contribute to inadequate acidification.
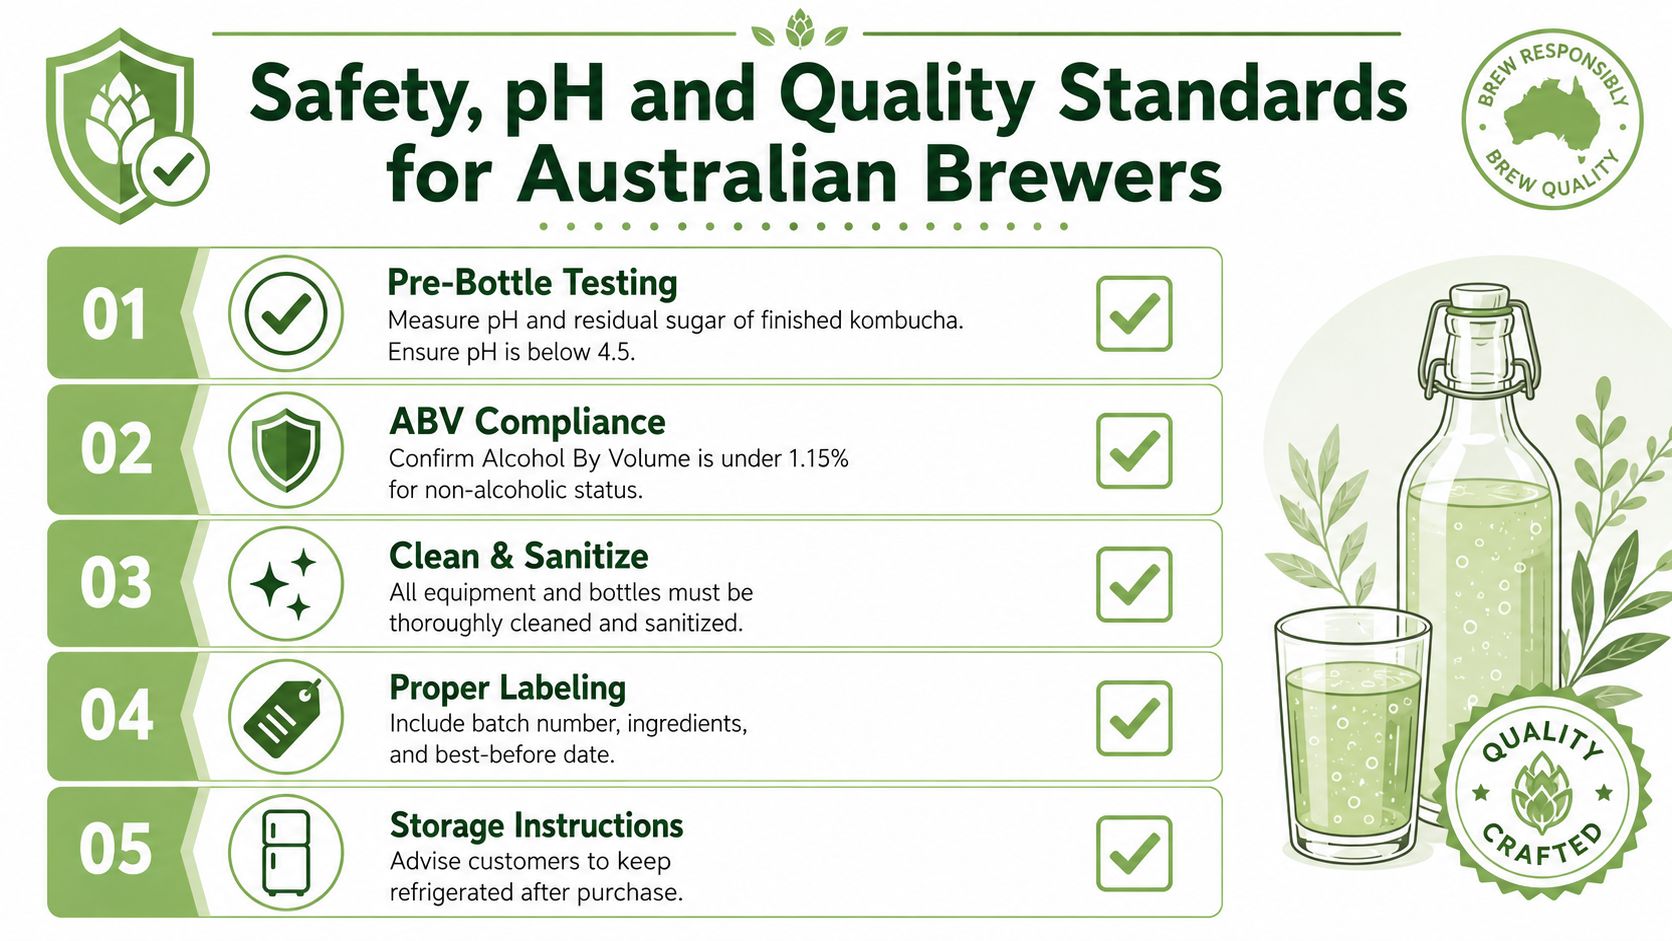
A brewer's control sequence
First, control the vessel. Clean and sanitise the fermentation vessel, utensils, bottles and sampling equipment. Handle the SCOBY with clean hands or suitable food-safe tools, and keep a batch record that identifies the date, tea, sugar, culture and observations.
Second, monitor acidification. Measure pH with a calibrated meter rather than relying only on taste. Queensland guidance uses 4.6 or lower as a fermented-food safety threshold, while kombucha-specific guidance recommends going below 3.0 and discarding a batch that hasn't reached that target by day 10.
Third, manage alcohol. NSW Health states that drinks above 0.5% ABV require alcohol-content labelling, while products above 1.15% ABV are considered alcoholic in NSW (NSW Health). The practical controls are sugar loading, fermentation time, temperature, flavour additions, packaging and refrigeration. A hydrometer can support production records, but producers may need more appropriate alcohol testing when compliance decisions depend on the result.
Finally, validate the finished product. Check pH and residual sugar before bottling, assess carbonation behaviour, and establish a shelf-life method through real-time and accelerated testing. Live, unpasteurised kombucha needs refrigerated distribution because cold slows, but doesn't eliminate, ongoing fermentation.
For label design and broader food-information obligations, producers can consult Australian food labelling requirements and confirm requirements relevant to their product, state and sales channel. A digital pH meter can also make routine acidity checks easier, provided the brewer calibrates, cleans and stores it correctly.
A basic HACCP approach helps identify hazards at each stage. The critical points include culture handling, sanitation, acidification, alcohol formation, bottle pressure, temperature control, allergen or ingredient declarations and recall records. Good process control isn't the enemy of craft. It's what lets a small producer keep making an honest product.
Flavouring, Second Fermentation and Recipe Ideas
Flavouring is where small batch kombucha becomes expressive, but it's also where a stable ferment can become unpredictable. Fruit sugars feed yeast, acidity shifts with juice and botanicals, and a sealed bottle can build pressure quickly.
Use small trials before committing a full batch. Keep the base kombucha, addition, dose, bottling date, refrigeration date and sensory result in a record. Never fill a bottle right to the top, and release pressure carefully when testing an active second ferment.
| Flavour Profile | Ferment Stage | Dose Rate | ABV Impact | Best Use |
|---|---|---|---|---|
| Ginger and lemon | Finish in primary ferment or short bottle conditioning | Fresh grated ginger with a modest amount of lemon juice | Low to moderate, depending on residual sugar and time | A sharp everyday serve |
| Berry and hibiscus | Second fermentation | A small amount of crushed berries and hibiscus infusion | Moderate potential because fruit sugars feed yeast | Colourful café bottle or brunch pairing |
| Cold-brew coffee | Flavour after primary fermentation | Strained cold-brew coffee blended into the finished kombucha | Variable, with coffee adding flavour rather than being the main fermentable | A bitter, grown-up alternative to sweet drinks |
| Cucumber and mint | Short second ferment or direct serve | Thin cucumber slices and a restrained mint infusion | Usually lower when no sugary fruit is added, though the base still matters | A light summer café pour |
Berry and hibiscus are visually dramatic, but they deserve close attention. Natural carbonation can increase as yeast consumes fruit sugar, while fruit acids can push pH lower. Cucumber and mint are gentler additions for a low-sugar serve, although they can lose freshness if held too long.
Coffee kombucha needs clean, well-filtered cold brew. Excess coffee solids can make the bottle muddy and may overpower the tea. Ginger and lemon are forgiving, but lemon juice can make the finished drink noticeably sharper, so taste before adding more.
Bottle warning: Carbonation is not proof of quality. A swollen cap, aggressive foaming or a bottle that hisses violently needs careful handling and should not be served casually.
Chill bottles as soon as the desired fizz develops. The colder environment slows yeast activity, protects the flavour profile and reduces pressure growth. Flavour additions also affect alcohol drift, so a producer who sells the drink commercially must test the finished, flavoured product rather than assuming the plain base tells the whole story.
Serving Small Batch Kombucha in Cafés and Retail
A café should buy small batch kombucha as a perishable fermented product, not as ordinary shelf-stable soft drink. The service plan starts with the format.
Kegs can support a fresh draft experience but require compatible equipment, clean lines and disciplined rotation. Bottles are simpler to display and sell, although they take more refrigerator space and still need clear handling instructions. Live product belongs in chilled storage. Ambient placement suits a pasteurised product only when the producer's label and process support that decision.
A working hospitality checklist
- Confirm the product status: Ask whether the kombucha is raw, live, pasteurised or filtered, and request storage and shelf-life instructions in writing.
- Check wholesale documentation: Review food-safety systems, insurance, organic certification claims and the supplier's recall procedure. If a producer claims Australian Certified Organic status, ask what the certification covers.
- Train the team: Staff should know the flavour profile, sugar information, alcohol declaration and whether sediment is normal. They shouldn't make medical promises about gut health or immunity.
- Plan the serve: A chilled glass that shows carbonation and aroma works well. Offer the drink beside sparkling water, cold-brew coffee and alcohol-free menu choices rather than hiding it in a vague “wellness” category.
- Rotate every delivery: Record the arrival date, best-before date, batch number and fridge location. Don't mix old and new stock without checking dates.
Tap lines need a cleaning schedule that matches the product and manufacturer guidance. Bottles should remain sealed until service, and staff should avoid shaking a warm bottle before opening. The producer's instructions take priority because live fermentation behaves differently across recipes.
For menus, describe the actual drink. “Raw ginger kombucha, brewed tea, chilled” tells a customer more than “detox fizz”. A clear description builds trust and helps people choose between kombucha, soda, coffee or wine without pretending that one drink suits every occasion.
Buying Small Batch Kombucha as a Consumer
Begin with the nutrition panel. Check sugar per 100 mL before being persuaded by phrases such as “naturally sweetened” or “crafted with fruit”. Retail kombucha can range from very little sugar to noticeably sweet, and Australian food labelling treats 2.5 g or less per 100 mL as low sugar. The number gives you a more useful starting point than the front label.
Then check the alcohol information. Drinks above 0.5% ABV require alcohol-content labelling in Australia, and live fermentation can continue during storage. Refrigeration, best-before dates and batch identification therefore matter. If any of these details are unclear, ask the retailer or producer before buying.
What the bottle can reveal
- Ingredients: Look for brewed tea, fruit, herbs or spices. “Natural flavours” may describe a broader formulation, so the ingredient list deserves a close read.
- Processing: Live, unpasteurised kombucha and shelf-stable pasteurised kombucha are different products. The first can continue changing in the bottle, while the second is processed for easier storage.
- Cold chain: Keep a refrigerated bottle cold from shop to home. Sediment can occur in a living drink. Mould, a leaking seal or damaged packaging means the bottle should stay unopened.
- Certification: Australian Certified Organic claims can provide useful information about the supply chain. Check which ingredients and production steps the certification covers.
Packaging also gives clues about how the product is handled. A 250 mL glass bottle, 330 mL can or growler-style refill involves different compromises around freshness, transport and price per litre. Smaller formats suit one serve. Refill formats can reduce packaging, but they require dependable refrigeration and quicker turnover.
Market growth does not make every health claim meaningful. The Australian functional beverage category has grown strongly, but it includes drinks such as coconut water, protein water and alkaline water rather than representing kombucha alone (6Wresearch). Read “probiotic”, “low sugar” and “non-alcoholic” as separate descriptions. They answer different questions about the drink.
Australian kombucha is also projected to grow substantially, with estimates reported by the Australian Beverages Council. That commercial interest makes production details more important, especially pH control, alcohol drift and consistent cold storage. A lively bottle can be appealing, but it still needs clear handling information.
For local purchasing options, see this guide to where to buy organic kombucha in Australia.
Pep Tea offers Australian-brewed sugar-free organic kombucha made with live cultures in the Hunter Valley, NSW, alongside organic Japanese Matcha for tea-based energy. Visit Pep Tea to explore kombucha flavours, matcha products and options for home, cafés and wholesale.
Matcha Bamboo Scoop: What It Is and How to Use It

Most advice treats a matcha bamboo scoop as a charming accessory and stops there. That misses the practical issue. A chashaku is a small portioning tool, and its output changes with the way you fill it, the density of the powder, and the moisture in the surrounding air. If you prepare matcha at home, that affects flavour. If you run a café, it affects recipe consistency, stock usage, and margin.
Australian guidance commonly places a full bamboo scoop at about 1 gram, while other Australian listings describe a serving at approximately 2 grams, so the scoop isn't a fixed-mass measuring instrument. One Australian product guide makes that variation clear, and another matcha scoop guide uses roughly 1 gram per full scoop as a practical rule.
The useful approach is simple. Learn the tool's shape, establish your own fill method, care for the bamboo properly, and keep a digital scale nearby whenever exact dosing matters.
Why a Matcha Bamboo Scoop Matters More Than You Think
A chashaku earns its place through repeatable handling, not decoration. Its slim body and curved tip let you lift matcha from a tin without pressing hard into the powder, which helps you transfer it neatly to a bowl or sifter. Used with the same fill level each time, it gives a familiar portioning rhythm that a teaspoon rarely provides.
That doesn't mean one scoop always equals exactly the same mass. Powder density, humidity, particle size and the difference between a level and heaped fill all affect the result. Australian retail guidance describes a single scoop as about 1 gram, while other local guidance places a serving at approximately 2 grams, so operators should treat the chashaku as a volumetric tool rather than a precision scale. Australian listings describe the scoop's approximate serving role, but they don't remove the need for calibration.
Practical rule: Use the scoop to transfer matcha, then use a scale to learn what your particular scoop and powder deliver.
At home, this distinction helps explain why the same latte can taste gentle one day and bitter or intense the next. In a café, small differences repeated across service can alter the drink's strength and the amount of powder taken from stock. The sensible workflow is to standardise one scoop style, record its result, and train staff to copy it.
By the end of this guide, you'll be able to identify useful chashaku geometry, dose more consistently, compare bamboo with other materials, protect the scoop in Australian conditions, and decide when a scale belongs beside it. The object has ceremony behind it, but its everyday value is practical.
What a Chashaku Actually Is and Where It Comes From
A chashaku, often called a matcha bamboo scoop, is the narrow utensil traditionally used to move powdered tea from its container into a matcha bowl. It belongs to the Japanese tea ceremony toolkit alongside the chawan and chasen. Unlike a teaspoon, it was shaped around the handling of a very fine powder and the controlled movements of tea preparation.
Traditional chashaku are carved from a single piece of bamboo. Australian tea retailers commonly preserve that description, along with a length of around 18.5 centimetres, which reflects the familiar long, slim form used in Japanese tea practice. Australian tea-ceremony listings describe handcrafted bamboo construction and traditional dimensions, connecting the utensils available today with the object's established design language.
From ceremonial object to Australian kitchen tool
In Japan, the chashaku carries cultural meaning as well as practical purpose. Its curve, finish and material invite careful handling, and individual pieces can be appreciated for their craftsmanship. Australian retailers have adapted that tradition for modern homes, tea counters and cafés, where the scoop may be used for a daily latte rather than a formal gathering.
That shift doesn't make the utensil meaningless. It shows how a specialised object can move between contexts while keeping its basic identity. A product page that labels the utensil chashaku rather than generic spoon is preserving that connection to tea ceremony.
For readers exploring the cultural background, PepTea's matcha tea ceremony guide provides a useful companion to the physical tool. The key point is to hold both ideas together. A chashaku is a cultural artefact, but it also has a clear job on a contemporary Australian preparation bench.
The Design Details That Change How It Performs
The chashaku's shape isn't arbitrary. Australian listings describe examples around 18 to 18.7 centimetres long, with one listing giving dimensions of 18.7 cm × 0.3 cm × 0.9 cm and another describing an 18 cm scoop weighing 6 grams. This Australian matcha scoop listing shows how narrow and light the format is intended to be.
The curve does the work
The curved tip lets you lift dry matcha from the surface of a tin without scraping aggressively or compressing the powder. A long, slim stem keeps your fingers away from the container and gives you control when transferring the scoop to a sifter or bowl.
The small cross-section also means less powder remains trapped on the utensil. A smooth finish helps the chashaku move gently around a ceramic bowl, although the scoop itself should be used for transferring powder, not for stirring or whisking.
Australian descriptions also preserve the traditional making process. Some chashaku are heated, bent and carved from bamboo, while vintage examples available locally show that the form has continued as a collectible object as well as a working utensil.
What this means on the bench
A generic bamboo spoon may hold more powder and may have a different bowl depth. A chashaku's narrow profile encourages a controlled amount, but it doesn't promise a fixed gram weight. Its main technical advantage is repeatable volume when your technique remains consistent.
The best test is to compare two tools using the same matcha and fill method. If one spoon encourages you to press, scrape or heap unpredictably, it isn't serving the same purpose as a chashaku. The design supports consistency, but the person using it still controls the dose.
How to Measure Matcha With a Bamboo Scoop
Consistent matcha dosing depends less on the scoop's label than on how you fill it. Start with dry, settled powder and a clean chashaku. Place the curved end into the matcha with a controlled downward movement, rather than forcing it in at an angle. Lift without compressing the powder, then follow the recipe's chosen fill style.
Australian product guidance may describe a heaped bamboo scoop as roughly 1 gram, while another listing gives approximately 2 grams for one serve. A local chashaku listing explains this variation shows why the café needs a defined method, especially when powder density and humidity change.
Three practical fill styles
Level fill: Draw the scoop across the tin's edge, or remove the excess with a finger. It is straightforward to teach and repeat.
Heaped fill: Leave a small mound above the scoop. This produces a stronger drink, but a slightly larger mound can change the dose quickly.
Pinched transfer: Lift the powder with the scoop, then adjust it between your fingers. This informal home method is difficult to standardise in a café and creates a hygiene concern.
For a commercial recipe, weigh the selected method. A kitchen scale shows what your particular matcha, storage tin and filling technique deliver, rather than assuming that level or heaped means a universal mass.
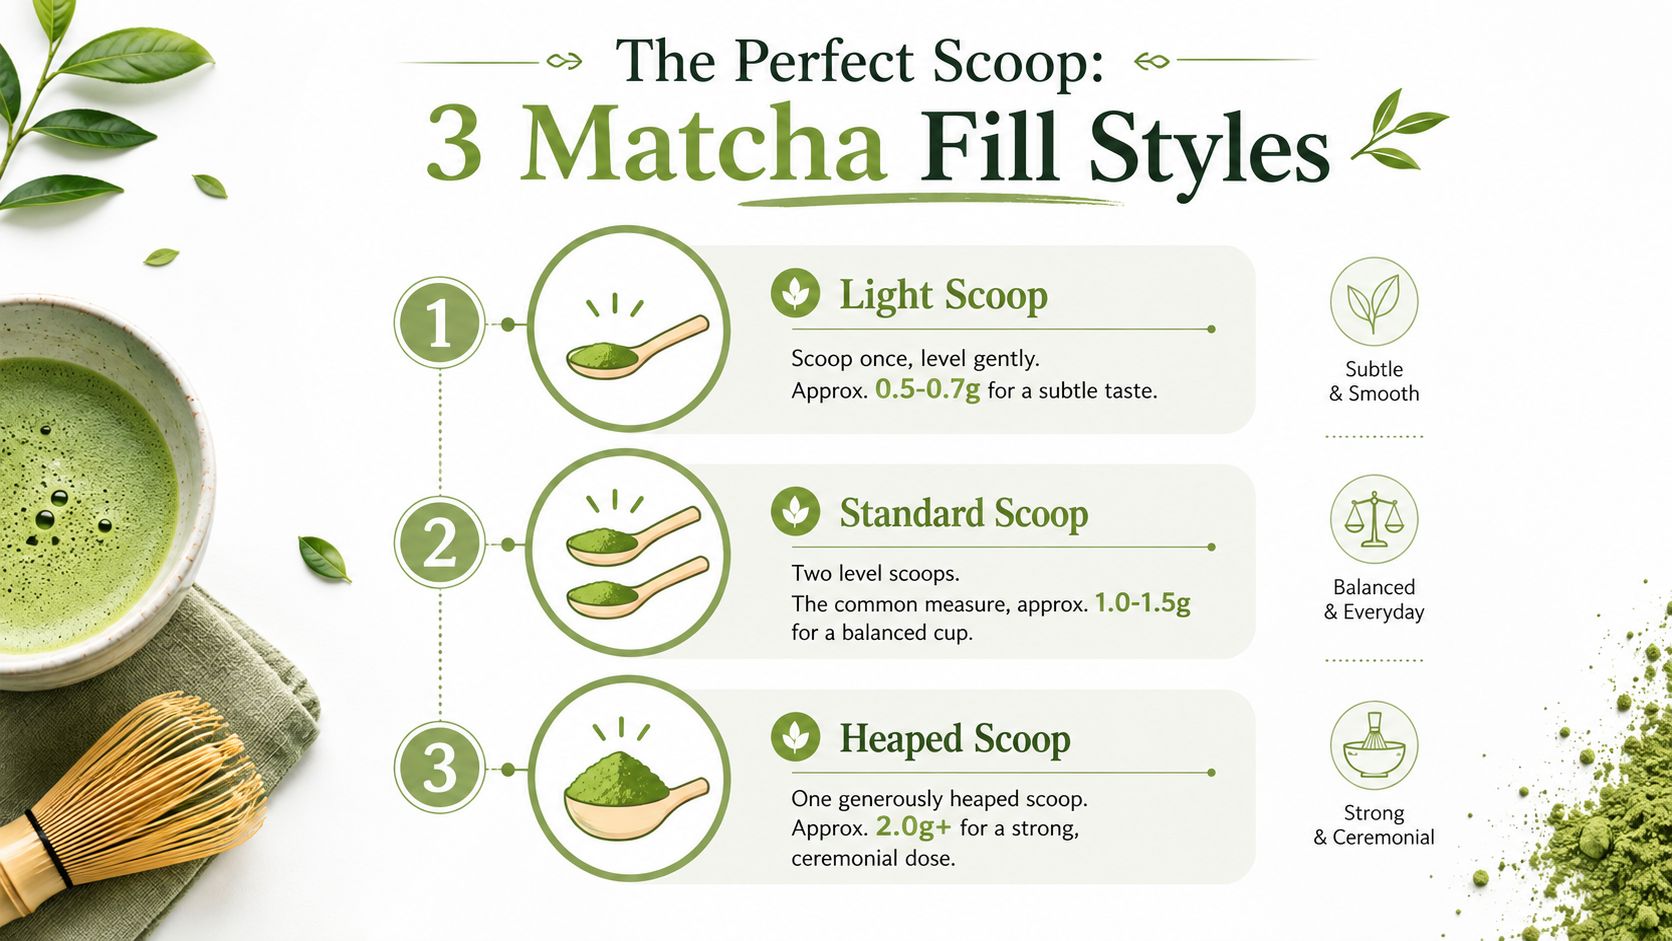
Use three test fills to identify variation. For example, record each level scoop separately after the powder has been stored in the same conditions. If the results spread noticeably between a dry morning and a humid service period, keep the fill motion and recipe dose fixed, then check again after changing matcha grade or storage. That result can guide portion costing as well as flavour consistency. A matcha tea sifter can remove clumps before filling, so compacted powder does not distort the scoop.
Bamboo Versus Steel, Plastic, and Ceramic Spoons
The right scoop depends on where and how you'll use it. Bamboo feels natural in a tea ritual and transfers powder neatly, but moisture can affect its condition and its volumetric output. Stainless steel is easier to sanitise and more resistant to humidity, while plastic is practical for busy service and ceramic suits visible presentation.
| Material | Dosing accuracy | Hygiene | Durability | Cost AU | Ceremony feel |
|---|---|---|---|---|---|
| Bamboo | Consistent by volume when technique is standardised, but mass varies with conditions | Requires dry handling and careful storage | Can split, darken or absorb odour | Varies by product and craftsmanship | Strong |
| Stainless steel | Useful for repeatable portions when sized consistently | Easy to clean and sanitise | Highly durable | Varies by product | Low |
| Plastic | Consistent if the scoop is clearly sized and staff use the same fill method | Often easy to wash, with some materials suitable for dishwashing | Practical, but may stain or retain aroma | Usually accessible | Low |
| Ceramic | Depends on the bowl volume and shape | Washable, but chips need attention | Can chip or break | Varies by design | Moderate to strong |
Choosing for the setting
For a home ritual, bamboo is a natural choice. It connects the movement of measuring with the history of matcha and feels pleasant in the hand. It also suits single-origin tasting, gift presentation and preparation where the utensil remains visible.
For high-volume café work, stainless steel or colour-coded plastic usually makes the operational decision easier. Staff can identify a dedicated utensil quickly, clean it as part of a normal workflow and replace it without treating it as a keepsake. Resources covering spoons for cafés and events can help operators compare general service utensils before choosing a matcha-specific format.
Ceramic works best when presentation matters and the spoon stays on a tasting tray. It echoes the chawan, but breakage and variation between pieces make it less suitable as the sole dosing control in a busy bar.
Caring for a Bamboo Scoop in Australian Conditions
Bamboo and moisture don't make a relaxed partnership. Coastal homes, humid kitchens and steam near an espresso machine can leave a scoop damp long after the powder has disappeared. Air-conditioned offices create the opposite challenge, with dry air and temperature changes that can encourage splitting if the tool is stored carelessly.
After each use, remove loose matcha with a dry, lint-free cloth or a soft brush. Don't soak the chashaku, place it in a dishwasher or coat it with food oil. A damp wooden utensil needs to dry completely, and oil can create an unwanted surface for residue and mould, particularly in warm, humid conditions.
A practical storage routine
- Wipe immediately: Remove powder before it settles into the curve or handle.
- Air-dry fully: Rest the scoop vertically or in a holder so air can reach the curved tip.
- Keep it away from steam: Store it away from kettles, sinks, stovetops and espresso steam wands.
- Use dedicated storage: Cafés should keep staff scoops labelled and separate from utensils used with raw ingredients.
In a commercial kitchen, follow the venue's food-safety procedures and keep preparation tools clean, dry and assigned to their intended ingredient. End-of-shift storage should leave the scoop dry rather than sealed while damp.
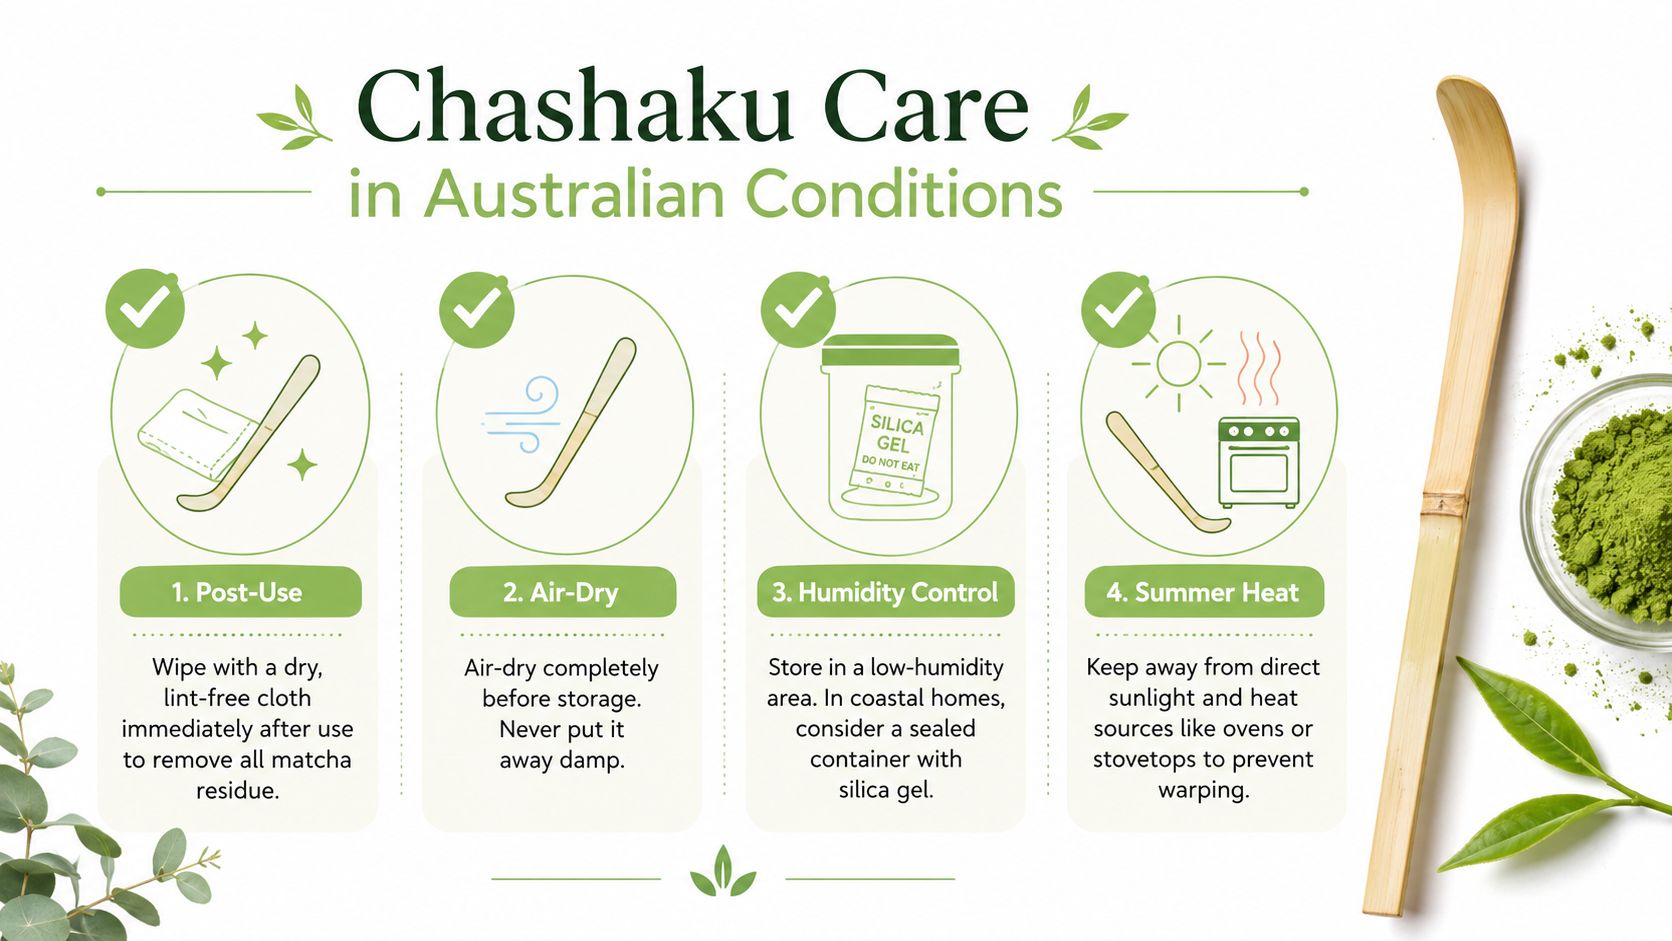
Retire the scoop when you see cracks, splinters, darkening, persistent odour or powder that keeps clinging after drying. Australian product pages show that chashaku are readily available as standard teaware, so replacement is preferable to continuing with a damaged utensil. PepTea's matcha tea accessories collection is one place to compare compatible preparation tools.
When a Scoop Is Not Enough for a Café Workflow
A bamboo scoop can work beautifully at the tea counter, but it shouldn't be the café's only dose-control system. The volume changes when the powder is denser, more humid, more finely settled or filled differently, so two apparently identical scoops can produce different drinks.
That matters as Australian matcha demand and supply pressure increase. Market coverage reported matcha revenue above US$54 million in 2024, projected annual growth of 7.1%, and Japan-to-Australia green tea exports up 131% year on year by August 2025. The same coverage noted cafés in Sydney, Melbourne, Brisbane, Perth and Adelaide charging about A$6 to A$8 for a matcha latte in 2025 amid shortages. SBS News provides that Australian market context.
A better service system
- Calibrate the scoop: Weigh a level fill with a scale that reads to 0.1 gram.
- Test several fills: Record the results rather than relying on a single reading.
- Set the recipe: Choose a target dose in the 1 to 2 gram range when that suits the menu, then document the fill method.
- Train the team: Use one dedicated scoop and one agreed levelling technique.
- Check stock: Compare expected powder use with actual consumption and investigate drift.
Batch-weighing portions into clean, labelled containers can speed service, while the chashaku remains useful for presentation and small adjustments. A scale should stay available for opening a new matcha, checking staff technique and investigating changes in flavour or stock use.
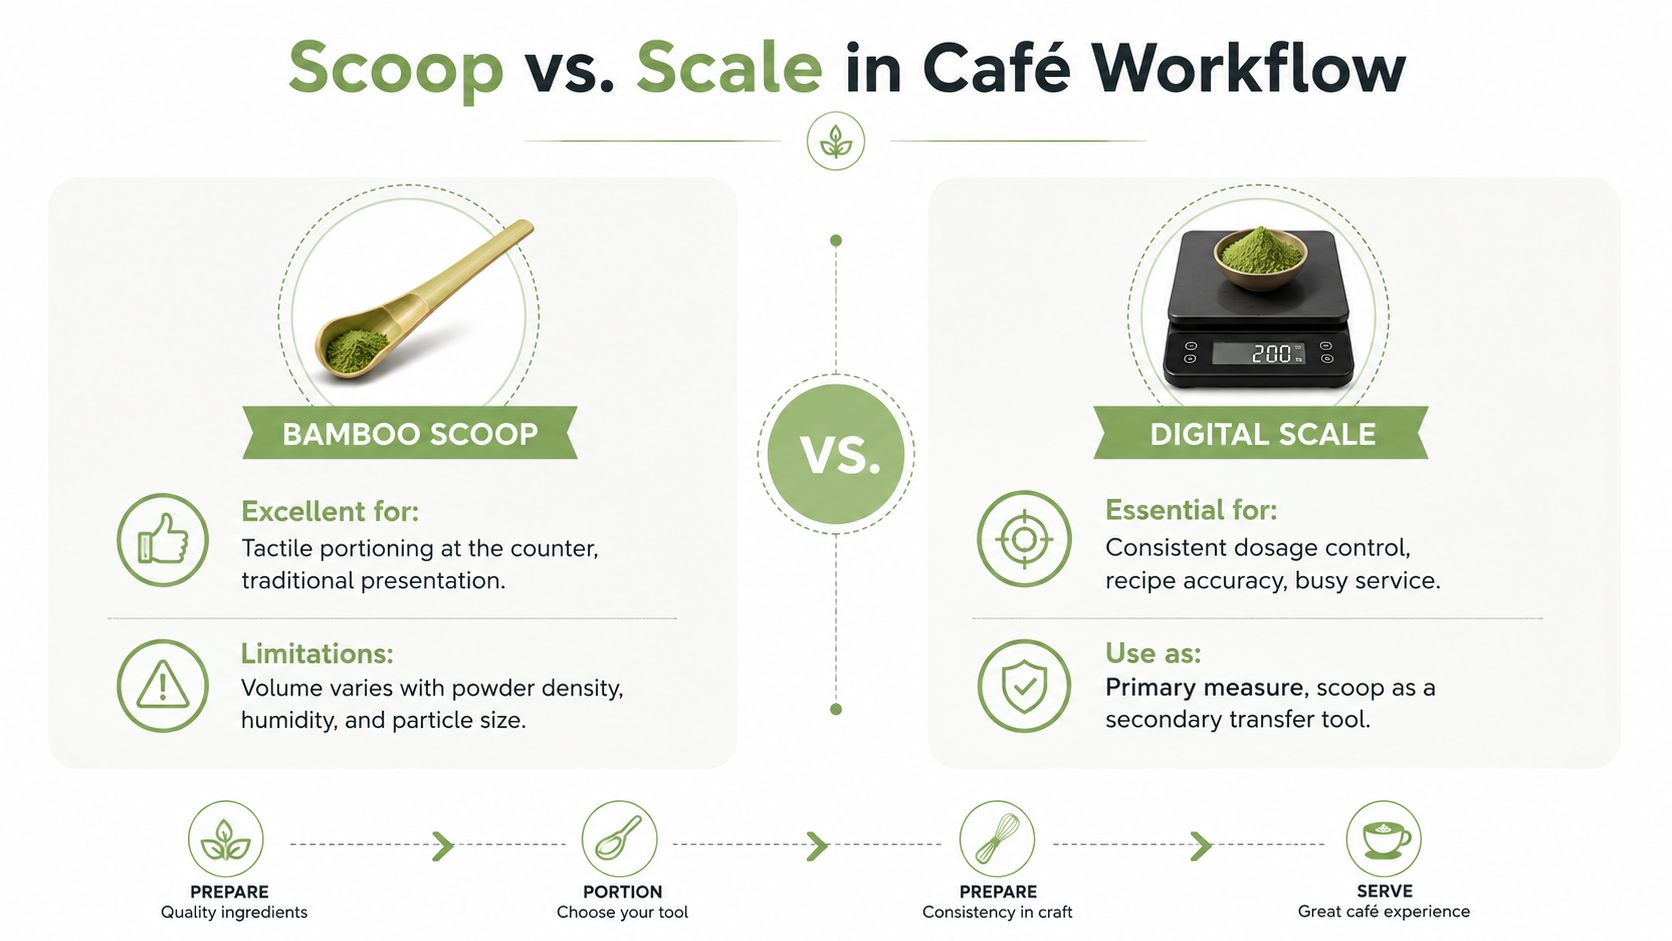
The aim isn't to remove tradition from café service. It's to pair the tactile familiarity of bamboo with a system that protects drink quality, ingredient control and customer expectations.
Bringing It All Together With Your Matcha Ritual
A matcha bamboo scoop works best when you treat it as a measured portioning tool with cultural character. Its traditional bamboo form and curved tip make it especially satisfying for ceremonial preparation, while the same geometry helps transfer powder neatly for everyday lattes, smoothies or baking.
Choose one fill style and repeat it. Use a digital scale when a recipe needs tight control, and don't assume that a heaped scoop will match another person's heaped scoop. Keep the chashaku dry, remove residue after use and replace it when it cracks, splinters, develops a musty smell or shows mould.
For home brewers, bamboo offers connection, handling and a gentle sense of ritual. For cafés, it works best alongside calibration, labelled storage and a backup measuring method. Once the tool is understood this way, it becomes less mysterious and more useful.
Pep Tea offers organic Japanese matcha powders, including Premium 100g Organic Matcha Green Tea and Organic Matcha Japanese Imperial Tea Powder, for home preparation and café use. Visit Pep Tea to explore the matcha range and choose a powder that suits your scoop, recipe and daily tea ritual.
Is Matcha Green Tea Latte Good for You? a Real Look

A matcha green tea latte can be a healthy everyday drink or a sugar bomb in disguise, depending almost entirely on how it's prepared. A standard iced serving sold in Australia contains 240 kJ, 28 g of carbohydrate, 26 g of sugar, and 75 mg of caffeine, while an unsweetened preparation can look very different.
So, is matcha green tea latte good for you? The honest answer isn't a simple yes or no. Matcha powder, milk, sweeteners, serving size, and brewing strength all shape what ends up in your cup. The same vivid green drink can support a lower-sugar routine when whisked with unsweetened milk, or become closer to a sweet café treat when made with syrup, sweetened powder, and a large milk base.
A tea professional would start with the ingredient system, not the marketing around the word “matcha”. Let's look at what changes the experience, from whole-leaf processing and caffeine to powder quality, milk choice, and the sweetener hiding in many café recipes.
What Makes a Matcha Latte Different From Your Usual Coffee
Matcha starts with a different physical format from both steeped green tea and brewed coffee. Producers shade tea plants before harvest, then process the leaves and grind them into a fine powder. When you drink matcha, you consume the powdered leaf rather than drinking water that has passed over or through the leaves.
That distinction matters because the whole leaf brings along its naturally occurring polyphenols, catechins, chlorophyll, caffeine, and amino acids. Published analyses report total polyphenols in matcha at 169–273 mg GAE/g and caffeine at 18.9–44.4 mg/g. You can read the compositional analysis in this peer-reviewed matcha study.
The taste is part of the quality signal
Good matcha usually has an earthy, savoury umami character, with gentle vegetal sweetness and a rounded finish. Coffee offers roasted aromas and bitterness, while steeped green tea tends to taste lighter because the leaf remains outside the cup.
A harsh or dusty flavour doesn't automatically mean matcha is unsafe, but it can indicate a powder that needs help from sugar or flavouring. Culinary matcha has a stronger flavour profile designed to work in baking, smoothies, and other recipes. Ceremonial-style matcha is generally selected for drinking, where colour, aroma, texture, and balance are easier to notice.
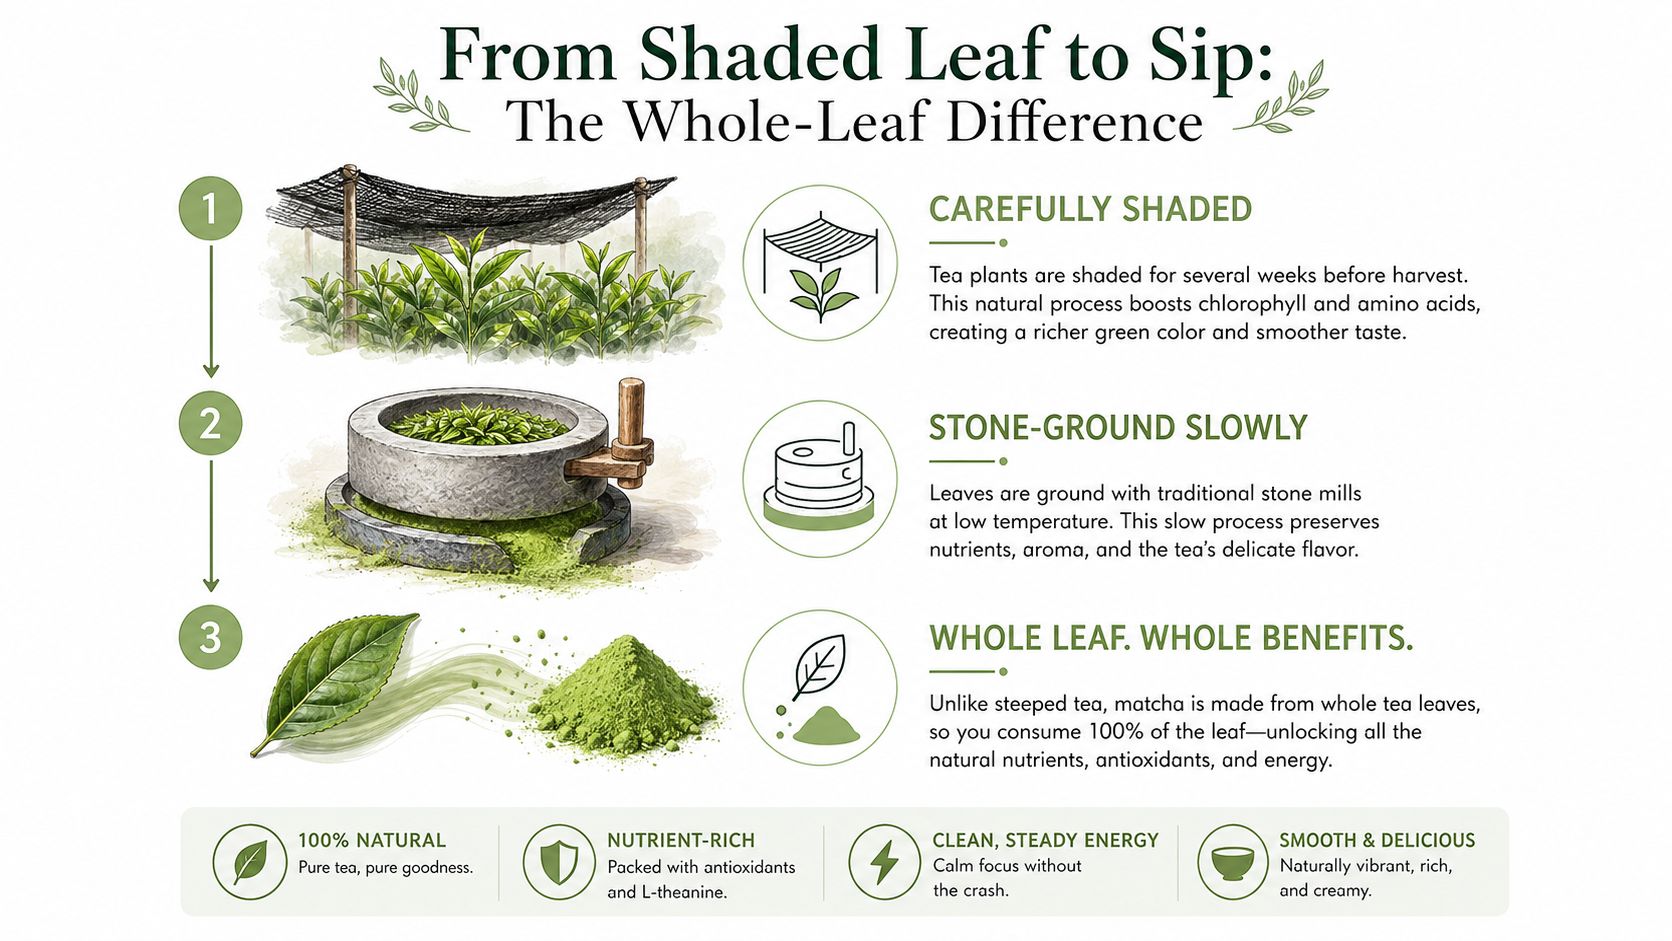
Practical rule: Judge the latte by three levers, powder grade, milk choice, and sweetener load. Those choices often matter more than the word “matcha” on the menu.
Antioxidants and L-Theanine Inside a Genuine Matcha Powder
Matcha is often discussed as an antioxidant-rich tea because the whole powdered leaf remains in the drink. Its catechins include EGCG, a compound associated with antioxidant activity, along with other plant compounds such as rutin, quercetin, and chlorophyll. Australian nutrition guidance describes EGCG as being investigated for antioxidative, antiviral, anti-inflammatory, anti-obesity, and hypolipidemic effects, while also stressing that more research is needed for most health conditions. The same guidance discusses a commonly recommended green tea intake of 2 to 3 cups daily, providing about 240 to 320 mg of polyphenols. You can explore that cautious overview in Australian green tea nutrition guidance.
The important distinction is exposure, not magic. A steeped tea infusion extracts some compounds into water, while matcha leaves the finely ground leaf in the cup. That can make matcha more concentrated, but it also means the amount of powder used and the quality of the product matter.
Why L-Theanine feels different
L-Theanine is an amino acid naturally present in tea. Matcha drinkers often describe the combination of caffeine and L-Theanine as calm focus, but individual responses vary. It shouldn't be treated as a guarantee against jitters, anxiety, or an afternoon energy dip.
Water temperature also affects flavour. Boiling water can make matcha taste more bitter and less smooth, encouraging people to add more sweetener. A gentler approach helps preserve the drink's delicate texture and allows the umami character to remain noticeable.
| Compound | Matcha Latte Serve | Steeped Green Tea |
|---|---|---|
| Catechins and other polyphenols | Whole powdered leaf is consumed, so the drink may provide a concentrated amount | Compounds are extracted into the infusion, with the leaves discarded |
| Caffeine | A moderate stimulant dose, shaped by the powder amount | Lower concentration varies with tea and brewing |
| L-Theanine | Naturally present in the leaf powder | Present in green tea infusion |
| Chlorophyll | Consumed with the powdered leaf | Less directly consumed because leaves are removed |
For readers interested in the relationship between this amino acid and matcha, PepTea explains L-Theanine in matcha green tea. The sensible conclusion is that matcha may contribute useful plant compounds, but it isn't a cure-all. A low-sugar recipe lets those qualities remain part of a balanced beverage rather than burying them under sweetness.
Caffeine Compared With Coffee, Black Tea, and Green Tea
Is matcha closer to green tea or coffee for caffeine? It depends on the powder amount, milk, and serving size. Australian reporting places a 250-millilitre cup of matcha at about 60–75 mg of caffeine, compared with about 24–45 mg for green tea and about 100 mg for coffee in the same volume. These figures are summarised in Australian reporting on matcha and coffee caffeine.
Black tea also varies. The Australian Institute of Sport lists green tea at about 30–50 mg per 250 mL cup and black tea at 25–110 mg per 250 mL cup. The range makes the drink name an incomplete guide. Powder grade and quantity, cup size, and the recipe all shape the final caffeine dose. A further benchmark appears in this Australian matcha caffeine reference.
What changes the caffeine in your cup
A small homemade latte using a modest amount of powder will usually contain less caffeine than a large café drink made with a generous scoop. Milk changes texture and flavour, not the caffeine from the matcha itself. A second caffeinated drink later in the day also adds to your overall intake.
Some people experience matcha as a steadier lift than coffee. The tea's natural combination of caffeine and L-Theanine may contribute to that impression, but it does not remove caffeine's effects. If you are prone to palpitations, anxiety, disrupted sleep, or caffeine headaches, choose the powder amount and timing with care.
A useful comparison: Matcha often sits between ordinary green tea and coffee for common serving sizes. “Natural” describes the source, not an absence of stimulant effects.
The Sugar Question Most Matcha Latte Advice Skips Over
The most important question may be what else is in the cup. A matcha latte made with unsweetened powder and plain milk is a different beverage from one made with flavoured syrup, vanilla sauce, sweetened milk, or condensed milk.
An Australian standard iced matcha green tea latte provides 26 g of sugar and 28 g of carbohydrate per serving, alongside 75 mg of caffeine and 240 kJ. Those figures come directly from the Australian product nutrition information for an iced matcha latte. The matcha may still contribute catechins, but the added ingredients change the overall nutritional picture.
Read the order as an ingredient list
Cafés often use sugar to soften bitterness, especially when the powder is culinary grade or when the drink is served cold. The common additions include:
- Flavoured syrups: Vanilla, caramel, or other syrups can make the latte taste more like a dessert.
- Sweetened powders: Some commercial matcha blends contain sugar before the powder reaches the shaker.
- Honey or maple syrup: These may sound more natural, but they still add free sugar.
- Condensed milk: This creates a rich texture and pronounced sweetness, but it can substantially increase the sugar content.
| Drink Preparation (Large/16 oz) | Approx. Added Sugar | % of WHO Daily Free-Sugar Limit (25 g) |
|---|---|---|
| Unsweetened matcha with unsweetened milk | No added sugar from the recipe | Not applicable |
| Sweetened café-style matcha | Varies by powder, syrup, and milk | Check the café nutrition panel |
| Standard iced Australian café example | 26 g total sugar per serving | Compare with the 25 g reference limit, noting that total sugar isn't automatically the same as added sugar |
The table needs a careful reading. The Australian product figure is total sugar, so it shouldn't be relabelled as added sugar without a full ingredient breakdown. It still demonstrates why a reader should ask whether the café uses sweetened matcha or milk. For a practical recipe without added sugar, see PepTea's guide to making a sugar-free matcha latte.
An unsweetened Australian matcha latte blend can list only 0.2 g of sugars per serving while still containing caffeine, showing that the ingredient system, not matcha powder alone, determines whether the drink is low sugar. Naturally occurring lactose in dairy milk isn't the same as added sucrose from syrup, so you don't need to demonise milk or sweetness. You need to know which type you're drinking and how much has been added.
Milk Choices and a Simple Home Method for a Healthier Cup
Milk changes more than the colour of a matcha latte. It affects body, foam, flavour, protein, fat, and any sugar already present in the carton. Dairy milk usually provides a familiar creamy texture and useful protein, while skim milk creates a lighter drink. Soy milk can foam well and brings plant protein, whereas almond milk is lighter and often less creamy.
Oat milk gives a naturally soft, sweet flavour, but barista-style versions can contain added oils and sweeteners. Coconut milk contributes a distinctive richness, while almond and coconut options may provide less protein than dairy or soy. Always check the ingredient panel, especially for “barista” blends, because recipes differ between brands.
A reliable home method
- Sift the powder. Use 1–2 g of ceremonial-grade matcha to remove clumps and create a smoother texture.
- Add hot water. Pour in 60 mL of hot water below 80°C, then whisk until the powder forms a smooth, lightly frothy suspension.
- Warm the milk. Heat 200–220 mL of your chosen milk separately. Don't boil it, as overheating can flatten the flavour.
- Combine gently. Pour the milk into the whisked matcha and taste before sweetening.
- Adjust only if needed. Unsweetened vanilla can add aroma without much sweetness. If you prefer maple syrup, start with half a teaspoon and see whether you still taste the tea.
The water temperature is a practical quality control step. Very hot water can intensify bitterness, which often leads to a heavier pour of syrup. Unsweetened milk also keeps the drink closer to the whole-leaf tea you intended to enjoy.
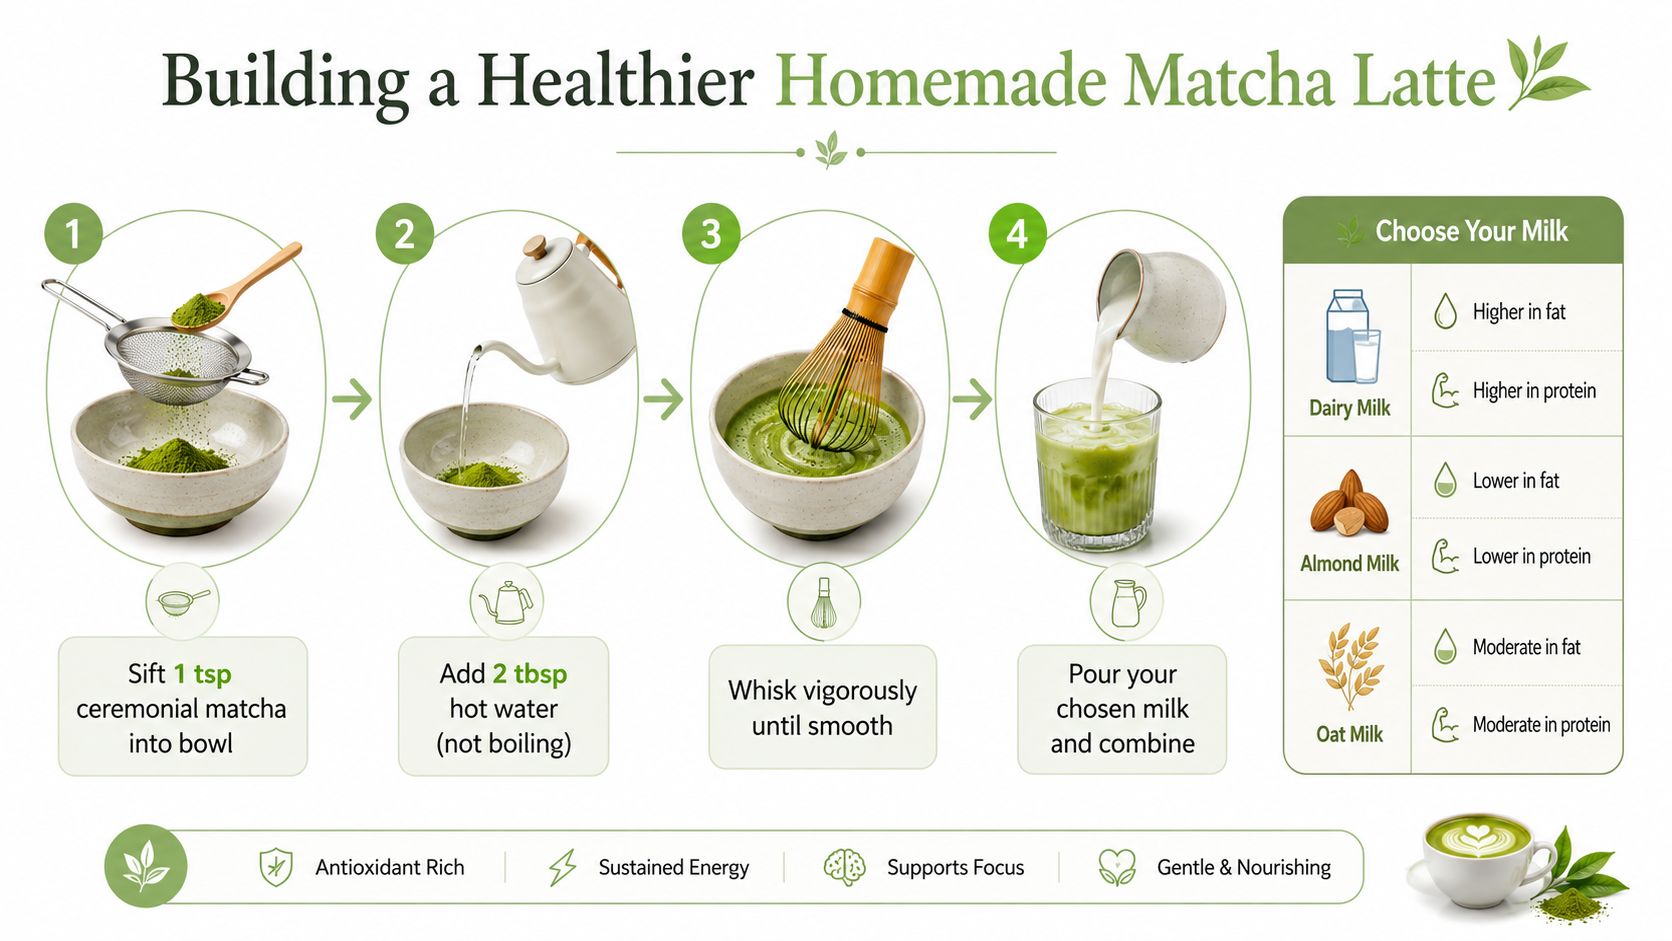
If you're developing café recipes or preparing a menu, a clear visual recipe card can help staff and customers understand the ingredients. Resources designed to boost conversions with food templates can also make preparation instructions easier to present.
For a more detailed home version, use PepTea's matcha green tea latte recipe.
Who Should Adjust Their Matcha Latte Habits
Who benefits from adjusting a matcha latte habit? The answer depends on three levers: how much powder is in the cup, when you drink it, and how much caffeine you consume from other sources. Pregnancy, childhood, and caffeine sensitivity call for more careful choices than a general wellness label suggests.
Pregnancy and breastfeeding
Australian guidance commonly uses a 200 mg daily limit during pregnancy, counting caffeine from coffee, tea, cola, energy drinks, chocolate, and supplements. A typical 250 mL matcha cup contains about 60–75 mg, so one latte earlier in the day may fit for many people, provided the rest of the day's intake is included. As noted earlier, matcha caffeine can vary with the amount and preparation of powder.
Personal circumstances still matter. Ask your midwife, doctor, or pharmacist for advice, especially if you have a pregnancy complication or medication concern. A smaller, unsweetened latte with food is easier to account for than a large, heavily sweetened café drink.
Children and teenagers
Matcha contains caffeine, so it is not the same as a caffeine-free green drink. Young children generally do not need caffeinated beverages, while adolescents should keep intake modest, particularly when a café latte also carries substantial sugar.
A warm milk drink without matcha can preserve the café ritual without adding caffeine. For a child, a sweetened matcha latte fits better as an occasional treat than as a daily wellness drink.
Caffeine-sensitive adults
If coffee causes a racing heart, nervousness, headaches, or poor sleep, begin with less matcha powder. A smaller cup, food alongside the drink, and a morning serving make your response easier to observe.
People with palpitations or relevant medical conditions should discuss caffeine with a healthcare professional. Matcha's plant origin does not remove the need to consider individual tolerance, medications, and health conditions.
Late-day drinkers
Caffeine may affect sleep even without a strong feeling of stimulation. If an evening latte keeps you awake, move it earlier, reduce the powder, or choose a caffeine-free drink. Keeping matcha to the morning or early afternoon, then watching your sleep, gives you a more useful answer than assuming every cup has a “smooth” effect.
| Audience | Daily Caffeine Ceiling | Suggested Matcha Latte Approach | Best Drinking Window |
|---|---|---|---|
| Pregnant people | 200 mg per day across all sources | Count every caffeinated drink and discuss personal advice with a clinician | Morning, preferably with food |
| Children | No general daily matcha habit recommended | Choose caffeine-free alternatives | Not applicable |
| Caffeine-sensitive adults | Individual tolerance matters | Use less powder and a smaller serving | Early day |
| Late-day drinkers | Individual sleep response matters | Avoid evening servings if sleep changes | Morning or early afternoon |
Key Takeaways and Common Questions About Matcha Lattes
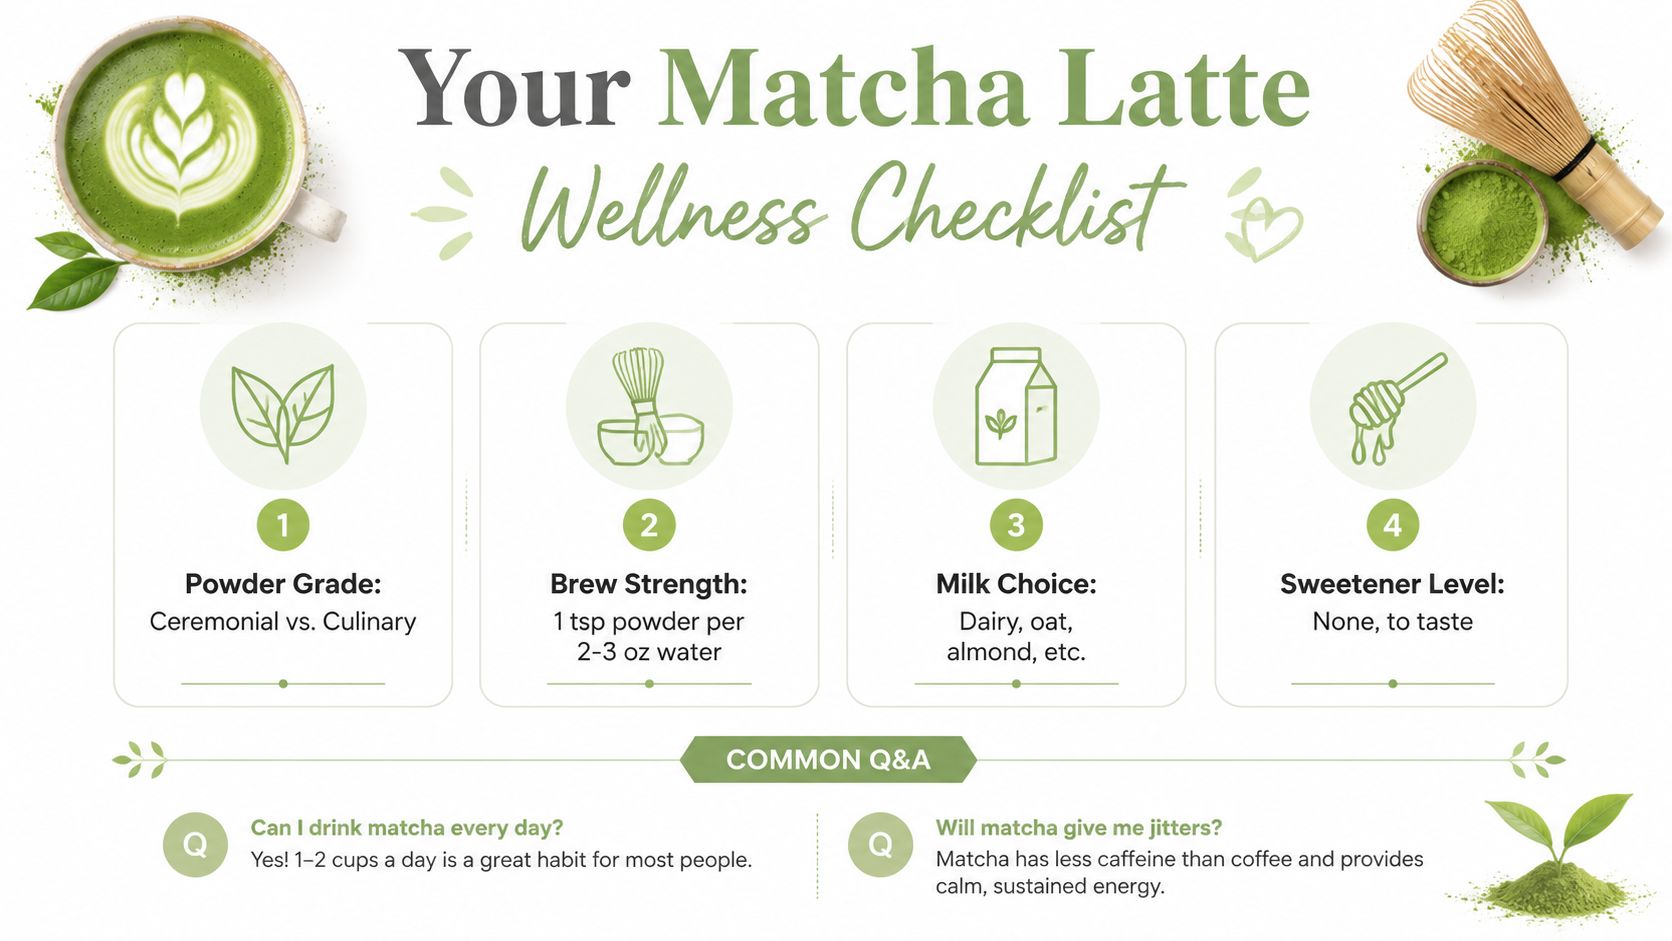
A good answer to “is matcha green tea latte good for you” comes down to four checks:
- Powder grade: Use a drinking-grade powder when you want a smooth latte, and reserve culinary powder for recipes where stronger flavour will be balanced.
- Brew strength: More powder means more caffeine and more concentrated leaf compounds.
- Milk choice: Select dairy or plant milk according to your protein, texture, allergy, and sugar preferences.
- Sweetener level: Start without added sugar, then add the smallest amount that makes the drink enjoyable.
Can a matcha latte help with weight management?
Matcha shouldn't be marketed as a weight-loss treatment. Its catechins and caffeine make it a functional beverage, but the latte can become energy-dense when you add syrup, sweetened milk, or condensed milk. The practical move is to reduce added sugar and treat matcha as one part of an overall eating pattern.
How often can I drink one?
A moderate routine may suit many adults, but there isn't one universal serving limit that works for everyone. Count the caffeine from your entire day, pay attention to sleep and anxiety, and reduce the amount if your body signals that the drink is too strong.
Does an iced matcha latte have the same benefits?
Cold preparation doesn't remove the powdered leaf, so an iced drink can still provide matcha's characteristic plant compounds. The bigger issue is the recipe. Ice, unsweetened milk, and plain matcha create a different drink from a sweetened café blend with syrup.
Should leftover matcha be refrigerated?
Matcha is sensitive to air, light, heat, and moisture. Store the powder sealed in a cool, dry, dark place and use clean, dry utensils. A prepared latte is best consumed fresh, particularly if it contains milk, rather than left sitting for long periods.
Pep Tea offers organic Japanese matcha for drinking and cooking, along with practical guidance for preparing lower-sugar lattes at home. Visit Pep Tea to explore the matcha range and choose a powder that suits your preferred cup.
Home Brew Bottles: A Practical Buying and Safety Guide

You've probably got a few bottles sitting in the garage right now, and you're trying to decide which ones are worth keeping for kombucha or cider. Some look sturdy enough, some came with a drink you liked, and a few are cheap enough that you're tempted to reuse them no matter what. That's where people get into trouble, because home brew bottles have to survive carbonation first, and only then do they need to play nice with Australian recycling rules later.
Pick the bottle for the pressure job, not for sentiment. A bottle that looks tidy on the bench can still fail if the glass is weak, the seal is worn, or the closure was never meant for pressure in the first place.
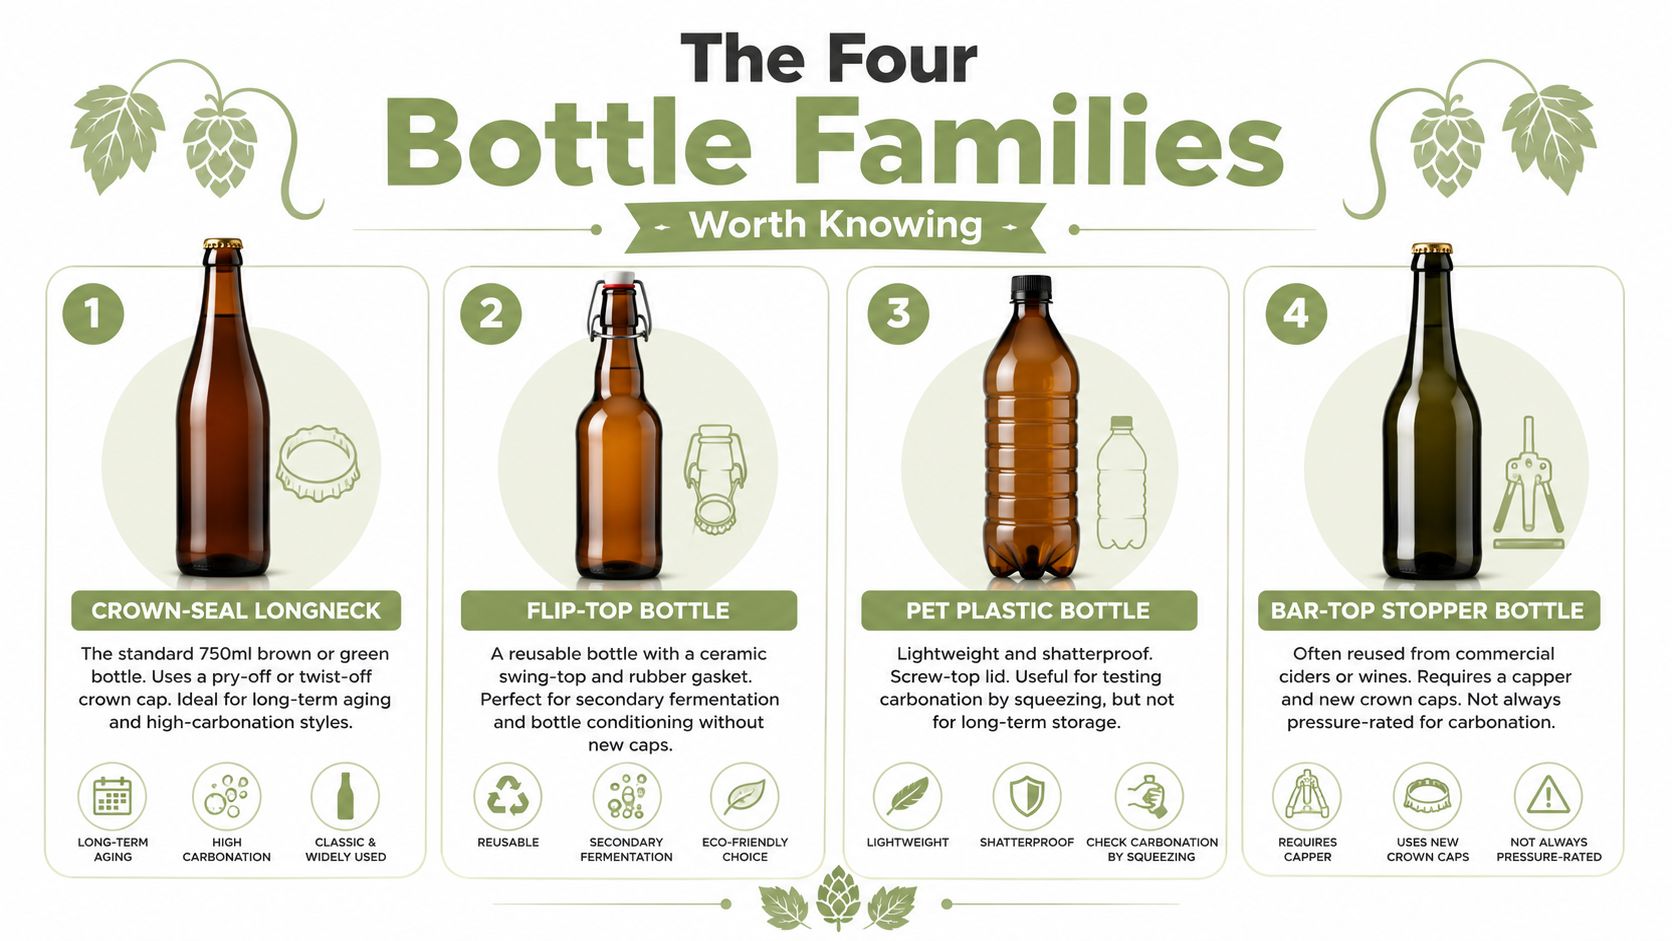
The Four Bottle Families Worth Knowing
The Australian shelves mostly give you four families of bottles, and they're not interchangeable. If you buy the wrong type, you don't just get poor carbonation, you get leaks, flat drink, or a cleanup job you didn't want.
Crown-seal longnecks and why they still matter
A crown-seal longneck is the plain workhorse. The standard 330 ml crown-seal glass bottle is so common in microbreweries and home-brew setups that Australian retailers treat it as a default size, not a niche pick (The Brew Shop). It suits small pours, sample bottles, and any brew you want to hand out without committing to a big serving.
Use them when you want a tidy, consistent format and you're happy to cap with fresh crowns. Don't use twisted old beer bottles that were never designed to seal properly, because they're a lousy bet once carbonation starts building.
Amber flip-tops are the practical middle ground
A 500 ml amber flip-top is the bottle I'd reach for most often in a kombucha or cider bottling line. Australian suppliers market them as a premium option for beer, cider, kombucha, seltzer, and sparkling drinks, and the amber glass is doing real work here by protecting light-sensitive drinks (The Brew Shop).
They're ideal when you want reusable closures without hunting for caps every time. The weak point is simple, if the gasket, wire bail, or ceramic stopper is tired, the whole system starts leaking.
Grolsch-style swing-tops belong in pressure jobs
A Grolsch-style swing-top is built for bottle conditioning, not for wishful thinking. In the Australian market, pressure-capable reusable flip-top bottles are sold for fermented and carbonated drinks, including 750 ml models for kombucha, kvass, kefir, ginger beer, and lager (Aussie Brewmakers).
These are the bottles you buy when pressure is part of the plan. If the wire bail is corroded or the porcelain stopper is chipped, retire it without drama.
PET and reused commercial bottles have a narrow job
PET plastic bottles and reused commercial bottles can be useful, but only for low-pressure work. PET is handy when you want to see carbonation by squeeze, but it isn't the bottle I'd trust for long ageing or secondary fermentation. Reused commercial glass can work for still or lightly fermented liquids, but if it wasn't built for pressure, don't pretend it was.
Practical rule: if the drink is going to keep making gas in the bottle, use a bottle that was built for gas.
Matching Bottle Size to the Brew You Actually Make
Size matters, but not in the lazy way often assumed. A bigger bottle doesn't automatically mean a better bottle, and a smaller bottle isn't always safer. Headspace, serve size, and pressure margin matter more than the number printed on the label.
Smaller bottles suit shared samples and controlled carbonation
A 330 ml crown-seal bottle is the neat choice for small-batch kombucha samples and cider pours you want to share cold. It gives you less liquid per unit, which makes it easier to split a batch and compare outcomes without opening a big bottle and losing the lot.
A 500 ml amber flip-top is the everyday sweet spot for many home brewers. It's easy to pour, easy to store, and practical when you're bottling a batch you expect to drink across the week.
A 750 ml flip-top is a better fit when the bottle itself is part of the presentation, especially for sharing pours and bottle-conditioned styles. It looks proper on a table, but it asks more from the glass and the seal, so don't fill it with something that's still wildly active.
| Bottle Size vs Brew Use | Size & Type | Capacity | Headspace | Pressure Margin | Best Brew Use |
|---|---|---|---|---|---|
| Small sample bottle | 330 ml crown-seal | Small | Tight but manageable | Good when capped correctly | Small-batch kombucha shares, cider sample pours |
| Everyday reusable | 500 ml amber flip-top | Medium | Sensible for most home batches | Comfortable for moderate carbonation | Kombucha, ginger beer, routine bottling |
| Presentation bottle | 750 ml flip-top | Large | Needs disciplined fill levels | Strong if the bottle and gasket are sound | Bottle-conditioned saisons, farmhouse ales, cider sharing pours |
Headspace beats raw capacity
Too much air slows conditioning, because there's more space for the gas to spread out before you feel any firmness. Too little headspace leaves no room for thermal expansion, which is exactly the kind of mistake that gets ugly in a hot Aussie garage.
So choose the bottle around your actual brewing habit. If your fridge shelf is shallow, your batch is small, or you want easy cold storage, that matters more than whatever looks impressive on the rack.
Sanitising Bottles the Way Commercial Brewers Do
Clean bottles don't just look better, they protect the batch. If you leave residue in there, you're giving wild microbes a place to hang on, and no-rinse sanitiser alone won't save you.
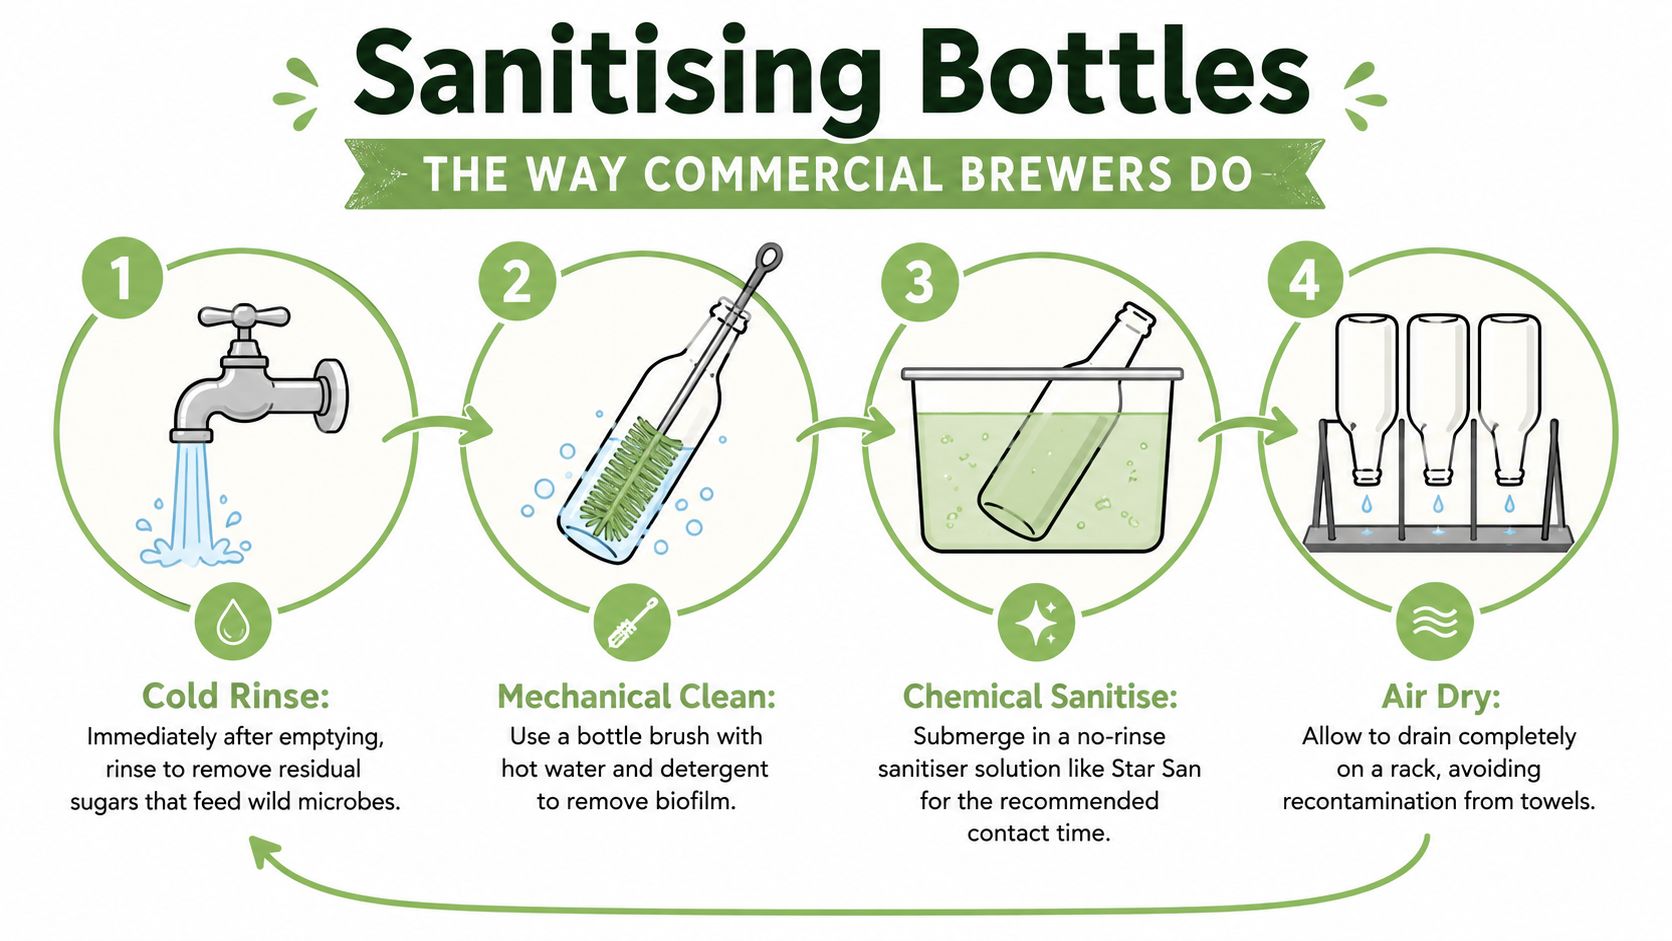
Start with rinse, scrub, and real cleaning
Cold rinse first, because leftover sugars feed the wrong microbes. Then give the bottle a proper hot caustic or PBW soak to strip the brewing soils off the glass walls, not just the visible bits.
After that, rinse thoroughly with tap water so the cleaner doesn't sit there and interfere with fermentation. If you skip the caustic or detergent soak, you're leaving biofilm behind, and sanitiser won't penetrate that on its own.
Finish with a no-rinse sanitiser and clean drying
Use a no-rinse sanitiser such as Star San or iodophor right before filling, and make sure it touches every internal surface. That final step matters because it knocks back the organisms that survive handling and air exposure.
Then dry bottles upside down on a sanitised rack so you don't drag lint, towel fibres, or sink grime back inside. If you're bottling into a bucket, do that instead of tube-filling when you want lower oxidation risk and a more even fill.
Skip the towel. Towels reintroduce dirt faster than most brewers realise.
A practical bottle-cleaning option sits in this fermenting glass jar guide, which is worth a look if you're setting up a tidy kitchen workflow around fermentation gear.
Carbonation Safety and Pressure Limits
A bottle can look spotless and still fail under carbonation. The risk comes from pressure building inside a container or closure that was never designed to hold it, even when you measured the priming sugar carefully.
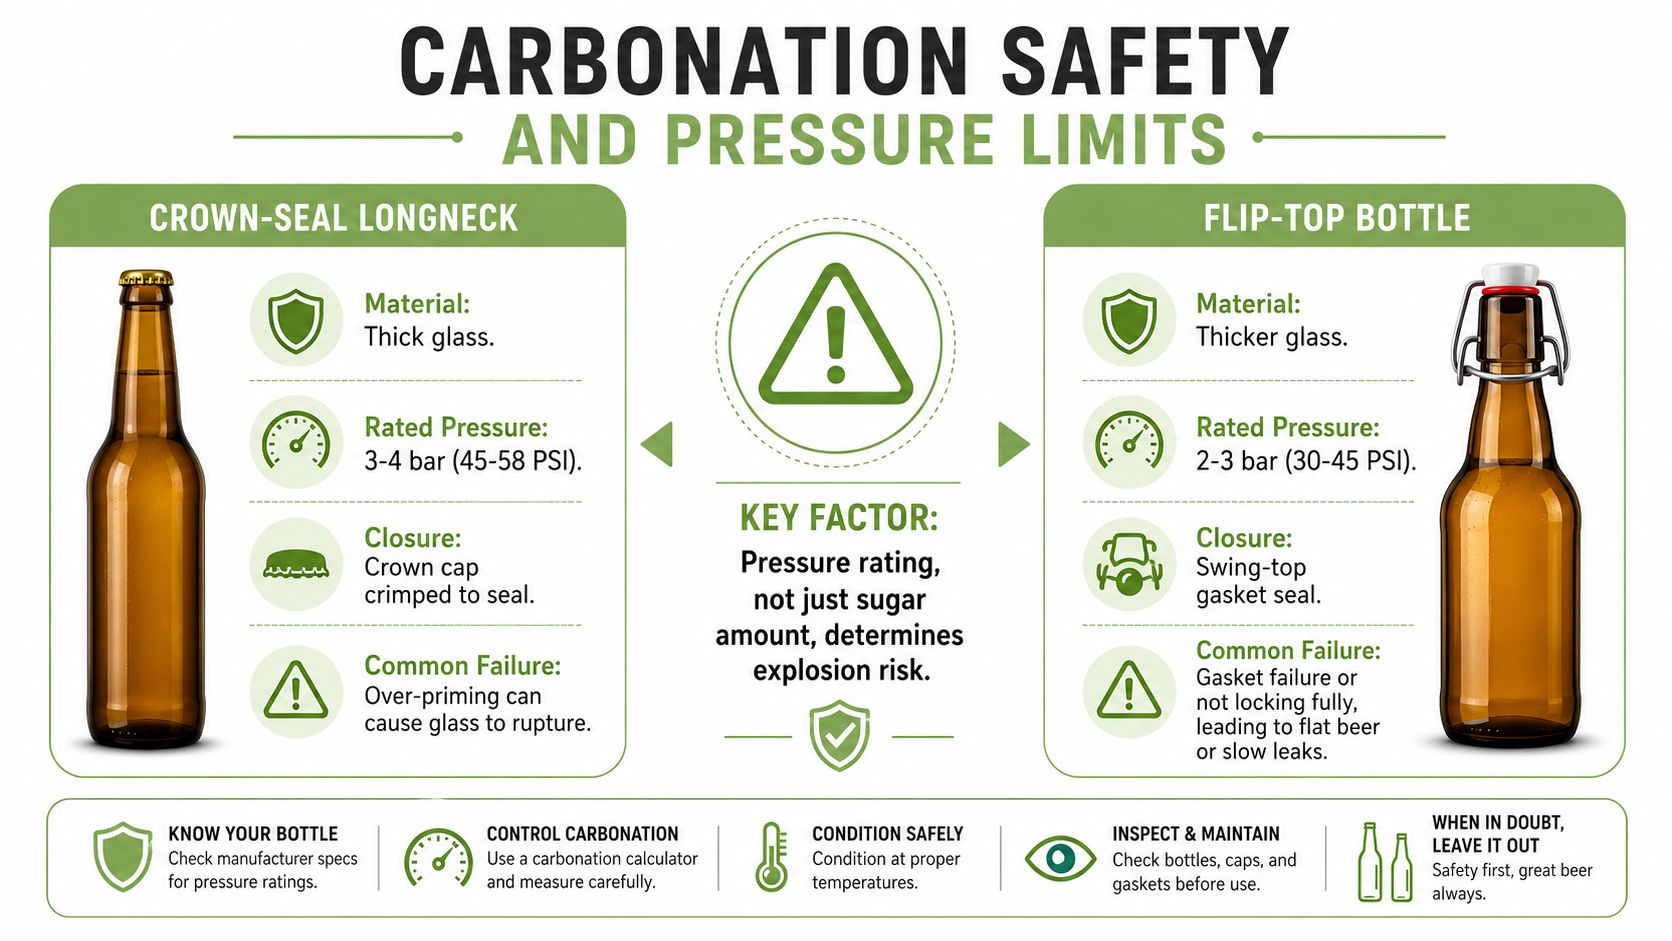
Read the bottle like a pressure vessel
Treat reusable home-brew glass as pressure-rated equipment, not ordinary kitchen storage. Standard bottles can fail at roughly 100–150 psi, according to Pitch and Pour's bottle-bomb safety guidance. That gives you no room for casual acceptance of chips, scratches, worn seals, or closures that do not seat properly.
For kombucha and lightly carbonated ferments, aim for the practical range of 1.5 to 3 volumes of CO2. That pressure level points you towards purpose-built flip-tops or beer bottles, rather than random reused glass. Measure priming sugar with a calculator instead of guessing. A small error can create far more pressure than the bottle or closure can safely contain.
Inspect the weak points before filling
Check the shoulders, base, and closure before every fill. Reject chipped shoulders, hairline cracks at the base, weakened porcelain stoppers, and corroded wire bails. A defect that is barely visible can still reduce the bottle's safety margin.
For an unfamiliar flip-top, test the seal with warm water before bottling. During conditioning, treat a bottle that feels rock-hard as a warning. Chill it to slow yeast activity, then keep it contained in a sturdy box or tub. Wear eye protection and gloves while handling it.
Choose the right bottle for kombucha
PET and ordinary crown-seal bottles are poor choices for kombucha unless the bottle is pressure-rated and its closure remains sound. Actively fermenting drinks need a seal built to contain gas, not a cap that merely keeps the top covered.
Follow a reliable kombucha second fermentation guide when setting up the process. The key rule is straightforward: the seal and pressure rating matter more than the bottle's label or appearance. Select the container for the carbonation it must survive, then plan how you will safely retire it when it no longer meets that standard.
When Reused Bottles Are and Aren't Worth the Risk
Reusing commercial bottles feels thrifty, but thrift stops being smart once pressure enters the picture. A bottle that was fine for oil, sauce, or still storage isn't automatically fine for carbonation, and sentiment won't hold a crown cap shut.
What reused glass is good for
Reused sauce, passata, and olive-oil bottles can work for still ferments or short-term storage. They're fine when the liquid isn't building gas and you're not asking the bottle to hold pressure for days or weeks.
The trouble is that these bottles often have thin walls, single-use seals, and no verified pressure rating. Once a bottle has held hot liquids, been dropped, or developed a cloudy interior that won't scrub clean, I'd retire it without arguing with myself.
Retire bottles by evidence, not hope
If the thread won't seat a crown cap properly, bin it. If you can see a stress mark, bin it. If the seal is visibly tired, bin it. That's the standard I use, because a cheap replacement is better than a broken bottle and a sticky kitchen.
| Reused vs Purpose-Built Bottles | Bottle Type | Typical Pressure Rating | Best Use | Retire When |
|---|---|---|---|---|
| Reused commercial glass | Sauce, passata, olive oil bottles | Not verified for carbonation | Still ferments, vinegar, short-term storage | Any chip, crack, cloudiness, hot-liquid history, or poor closure fit |
| Purpose-built crown-seal | Beer-style crown bottles | Pressure-rated for the job when sound | Carbonated beer, kombucha with crown caps | Visible damage, rusty finish, repeated seal failures |
| Purpose-built flip-top | Amber or clear swing-top bottles | Designed for carbonation when rated | Secondary fermentation, cider, kombucha, ginger beer | Worn gasket, bent bail, damaged stopper, or leaks |
Purpose-built bottles can run many cycles if you inspect them properly. Reused commercial bottles usually don't earn that same trust, and in a pressure line, trust has to be earned every single time.
End of Life, Recycling, and Container Deposit Rules
A bottle shouldn't disappear into the wrong bin just because it's empty. In Australia, the end-of-life path depends on the state, the container type, and whether the bottle is whole or broken.
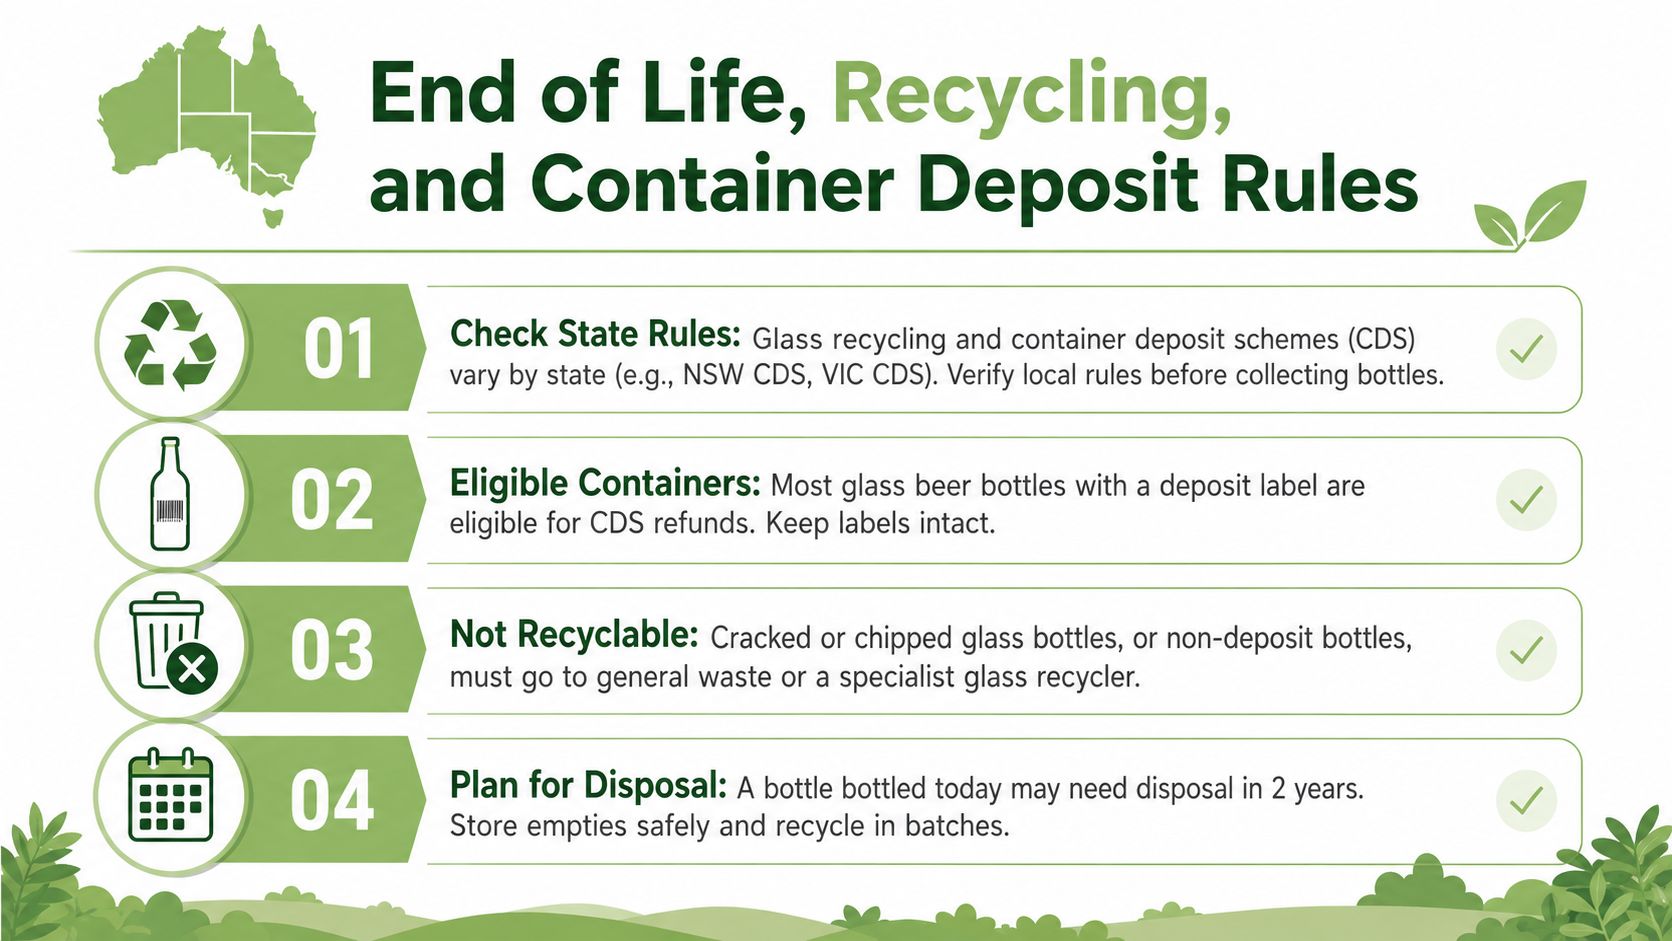
Know the state rules before you stockpile empties
NSW and the ACT run Return and Earn with a 10-cent refund per eligible container, and many glass bottles qualify if the barcode is registered and the size sits in the 150 ml to 3 L range, according to the scheme guidance (Return and Earn). Victoria also runs a container deposit system, while Queensland, Western Australia, South Australia, Tasmania, and the Northern Territory mostly lean on kerbside recycling for whole glass bottles.
That's where the confusion starts. A bottle can be reusable for brewing, recyclable in kerbside glass, or eligible for a refund depending on where you live and what it originally held.
Broken glass needs a different exit
Broken ferment bottles should never go in kerbside bins. If a bottle is chipped, cracked, or shattered, take it to a community recycling station, a glass-crush facility, or a dedicated drop-off point used by metro councils instead.
Drain and rinse bottles before disposal, and remove flip-top seals so the metal, rubber, and glass don't complicate sorting. In the states with deposit systems, check whether the container is still eligible before you lug a crate around for nothing.
Build a retirement routine that keeps you organised
The simple habit is this, drain, remove seals, segregate chipped stock, and bag glass for drop-off rather than binning it. That keeps your bottling area safer and makes it easier to decide what's worth washing again and what's finished.
If you bottle a drink today, it may sit around for ages before you retire the container. Store empties safely in the meantime, because the disposal choice is part of the bottling decision, not an afterthought.
A Practical Buying and Bottling Framework
Start with the drink. Kombucha, water kefir, and low-alcohol ferments push you toward 500 ml amber flip-tops, because they give you a sensible balance of handling, carbonation control, and reuse. Hard cider and heavily primed ginger beer call for 750 ml pressure-rated bottles only when the bottle and closure are up to the job.
Run the same check every time
Before you bottle, confirm the seals and gaskets are sound. Sanitise properly, prime accurately rather than guessing, and then bottle-bucket when you want a cleaner transfer and lower oxygen exposure.
Then manage the finish like a brewer, not a gambler. Chill bottles once they've reached the carbonation you want, and don't let them keep warming up in a shed while you hope for the best.
One option in this space is Pep Tea's home brew kombucha guide, which fits neatly if you're building a kitchen-friendly fermentation routine around reusable bottles and low-sugar drinks.
Buy with disposal in mind
Check whether the bottle type is accepted in your state's recycling or deposit scheme before you buy a crate of them. Storage space matters too, because a great bottle is useless if you can't stack, wash, and return it without cluttering the place.
Choose by pressure first, size second, colour third, and aesthetics last. If the bottle won't hold the gas safely, nothing else about it matters.
Pep Tea makes organic matcha and sugar-free kombucha in Australia, and both fit neatly into a bottle-conscious kitchen or café setup. If you're sorting out your bottling gear and want drinks that align with a cleaner routine, visit Pep Tea and explore what we brew, blend, and supply.
Matcha Pancakes Recipe: Fluffy & Flavourful
Saturday morning, the pan is warm, the kitchen smells faintly grassy and sweet, and the first vibrant green pancake is ready to flip. A good matcha pancakes recipe looks simple, but the decisions made before the whisk comes out matter: the matcha grade affects colour and bitterness, the flour controls tenderness, and the pan determines whether the stack cooks through without turning brown.
I've tested this style of batter in ceramic, cast-iron and non-stick pans, using ceremonial, premium and culinary matcha grades. The reliable workflow is straightforward: choose the powder with the finished dish in mind, sift carefully, mix lightly, rest the batter, and cook by surface cues rather than the clock. The same approach works for a relaxed home breakfast, a vegan or gluten-free adaptation, or a café plate designed around controlled portions and complementary toppings.

Why matcha belongs on the breakfast plate
Matcha has moved well beyond specialist tea shops in Australia. One independent report estimates the Australian category grew at a 14.94% CAGR from 2020 to 2024, while another analysis places recent annual consumption growth at 12–16% and estimates that more than 90% of domestic volume is imported. Foodservice is estimated to account for 45–50% of volume, with household use at 35–40%, which helps explain why matcha now appears in café drinks, baked goods and home breakfast recipes. (Australian matcha market analysis)
ABC News described matcha in Australia as having shifted from a niche product to a mainstream staple, with demand accelerating through café-style iced matcha drinks. The powdered tea tradition itself dates back to 12th-century Japanese monks, who popularised whisking powdered tea into hot water as part of Zen meditation. (ABC News report on matcha in Australia)
Practical rule: Decide whether you're making a subtle, fluffy breakfast stack or a bold café-style plate before choosing the matcha. The powder isn't a finishing detail. It shapes the whole result.
If you enjoy comparing pancake formats, Rip Van's stroopwafel pancake method is useful for thinking about texture, fillings and griddle timing. For this recipe, though, the goal is a soft crumb that lets the matcha taste clean rather than burying it under sugar.
Ingredients and Why Each One Matters
A dependable batter starts with ingredients chosen for their jobs, not just collected from a list. The matcha provides colour, aroma and bitterness, while flour, dairy, eggs and leavening determine whether that flavour arrives in a tender pancake or a dense green disc.
Matcha grade sets the ceiling
Ceremonial-grade matcha gives the brightest jade colour and a clean, rounded umami character. It works beautifully when the pancakes are lightly sweetened or served with restrained toppings, but its higher price makes it difficult to justify for a large breakfast batch.
Premium culinary-grade matcha is usually the practical middle ground. It has enough colour and flavour to remain recognisable after cooking without asking you to use a precious drinking-grade powder in a batter. A lower-grade blend can look dull, taste aggressively bitter and leave the stack muddy rather than fresh.
| Matcha Grade | Colour Result | Flavour Profile | Best Use | Price Band |
|---|---|---|---|---|
| Ceremonial | Bright jade | Clean, delicate umami | Refined home or café plating | Higher |
| Premium culinary | Fresh green | Balanced, slightly earthy | Everyday pancakes and baking | Mid-range |
| Lower-grade blend | Dull green | More bitter, muddy | Budget cooking where colour matters less | Lower |
Sift the matcha with the flour and raising agents. If you're comparing grades before buying, this guide to ceremonial versus culinary matcha explains why drinking and baking powders behave differently. An organic matcha green tea powder is another option to consider when you want a clearly identified powder for kitchen use.
Build tenderness without losing structure
Plain flour gives the batter enough structure to rise while keeping the centre soft. A very strong flour can make the pancake chewy if you mix aggressively, while oat flour alone tends to produce a fragile stack. Almond flour brings richness, but it can brown quickly and compete with matcha's green colour.
Whole milk gives the most rounded texture and helps the surface brown gently. Buttermilk or plain yoghurt adds acidity and a tighter crumb, which can be pleasant, although too much can make the pancake feel heavy. Eggs provide structure, emulsification and colour, while baking powder supplies the lift. Keep the raising agents balanced rather than adding extra in the hope of getting a taller stack, because excessive leavening can leave a metallic aftertaste and a coarse interior.
For sweetness, maple syrup and honey soften matcha's bitterness while adding their own flavour. White sugar keeps the colour cleaner, coconut sugar darkens the batter slightly, and monk fruit can reduce sweetness without adding much bulk. Any liquid sweetener needs to be balanced with the milk so the batter doesn't become loose.
Mixing and Cooking the Batter
Start by sifting the flour, matcha, baking powder and salt into a large bowl. A fine matcha tea sifter breaks up powder clumps and spreads the raising agent evenly, so the cooked pancakes do not contain bitter green pockets.
Whisk the eggs, milk, melted butter or oil, sweetener and vanilla separately. For a smoother green colour, whisk the matcha into a little of the milk first, then combine it with the remaining wet ingredients. Pour the wet mixture into the dry ingredients and stir until the large dry patches disappear. Small lumps are fine. Continued mixing develops more gluten and can leave the pancakes dense.
Leave the batter to rest briefly. Australian guidance for matcha pancakes recommends sifting, gentle mixing, a short rest, medium heat, a roughly 1/4-cup portion, and flipping once bubbles or dry edges appear. (Australian matcha pancake method) This workflow also gives you room to adjust consistency for different matcha grades or dairy-free milks before cooking the full batch.
Cook by surface cues, not the clock
Heat a non-stick pan, cast-iron skillet or griddle over medium-low heat. Brush it with a thin film of butter or neutral oil, then pour enough batter for a pancake roughly ten centimetres across. Non-stick cookware is the easiest option for home batches. Cast iron retains heat well but may create darker hot spots, while a heavy griddle gives more even browning when you are plating several pancakes for brunch.
The edges should look set, with small bubbles appearing and opening across the surface. Check the underside before flipping. It should be green-golden rather than dark brown. Flip once and cook until the centre springs back lightly under gentle pressure.
Transfer cooked pancakes to a warm tray. Avoid packing them tightly in the pan or stacking them while very hot, because trapped steam softens the surfaces. The sifter solves powder distribution, but careful stirring and controlled heat still determine fluffiness.
Dietary Variations That Work
A useful dietary swap replaces an ingredient's job. Vegan batter still needs acidity, structure and fat. Gluten-free batter needs enough flexibility to hold together, while lower-sugar batter needs balance so matcha remains rounded rather than harsh.
| Variation | Replace | With | Texture Impact |
|---|---|---|---|
| Vegan | Dairy milk and butter | Soy milk with apple cider vinegar, plus neutral oil | Tender, with slightly less dairy richness |
| Vegan | Egg | Aquafaba | Holds structure, though the crumb is a little lighter |
| Gluten-free | Plain flour | A 1:1 cup-for-cup blend with xanthan already included | Similar lift and shape |
| Lower-sugar | White sugar | The same weight of coconut sugar or monk fruit | Coconut sugar darkens colour, monk fruit keeps the batter lighter |
Vegan pancakes
Soy milk and apple cider vinegar create buttermilk-style acidity that supports the leavening. Aquafaba replaces the egg and helps the pancakes hold together. Neutral oil takes the place of melted butter without adding dairy flavour or noticeably dulling the green colour.
Plant milks differ in thickness, so inspect the batter after its rest. If it has tightened too much, add a small splash of milk. Stir only enough to combine, since vigorous mixing can make the cooked texture heavier.
Gluten-free pancakes
Choose a 1:1 gluten-free flour blend with xanthan gum already included. It gives the batter enough flexibility to lift and flip without breaking. Oat flour alone often crumbles, while almond flour can brown before the centre has cooked through.
Lower-sugar pancakes
Coconut sugar can replace white sugar at the same weight, producing a deeper colour and caramel note. Monk fruit keeps the batter and finished stack lighter. Erythritol may leave a cooling aftertaste that competes with earthy matcha, especially when toppings are restrained.
Matcha grade affects the final appearance after a swap. Ceremonial-grade powder generally keeps its colour better, while culinary-grade powder may look duller with plant milk or darker sweeteners. Keep the resting time consistent across versions, then adjust thickness gently before cooking the full batch. This approach keeps the recipe practical for a dairy-free home breakfast, a gluten-free table, or a café brunch menu where colour and clean flavour matter.
Serving, Toppings and Drink Pairings
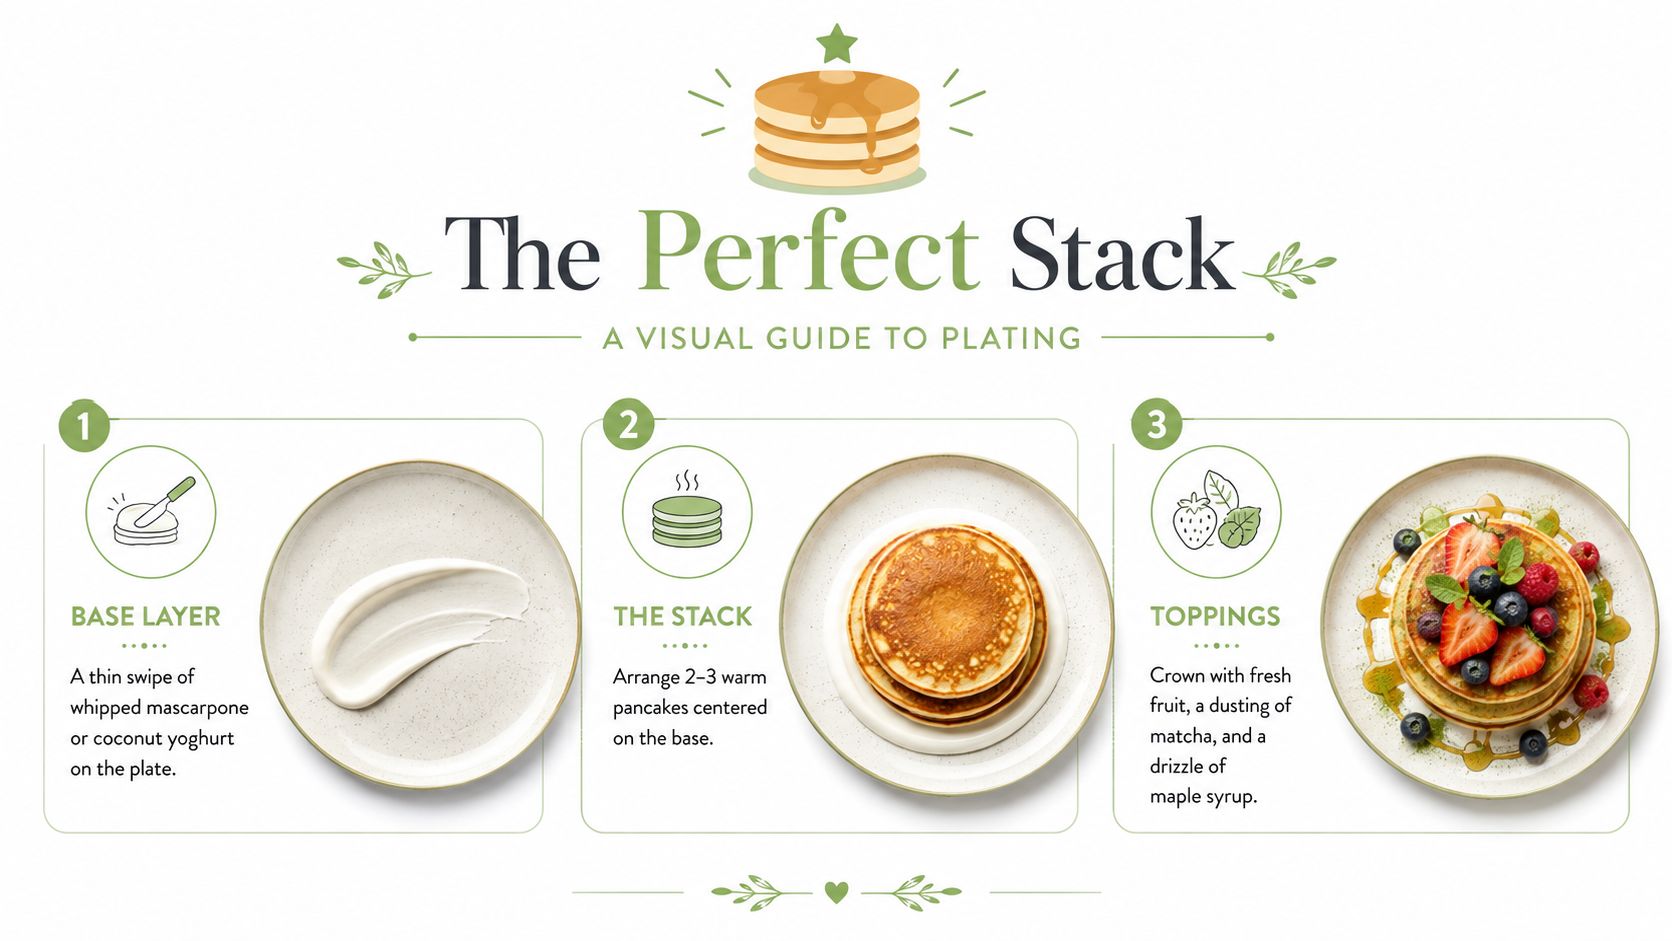
Treat the stack as the centrepiece. A thin swipe of mascarpone or coconut yoghurt anchors the plate, and toppings should sharpen the matcha rather than drown it. Arrange the warm pancakes over the yoghurt, then build the finish around contrast in colour, acidity and texture.
Fresh berries bring acidity and colour. Citrus segments add brightness, while toasted black or white sesame provides a gentle nutty edge. A light drizzle of honey or maple suits most plates, and a restrained dusting of matcha reinforces the aroma. Heavy syrup flattens the tea flavour, leaving the dish closer to a conventional sweet pancake with green colouring.
Drinks that keep the plate balanced
An iced PepTea matcha repeats the green tea character without introducing a competing flavour. A hot PepTea matcha latte fits a slower weekend breakfast, particularly with citrus or berries instead of a heavily sweet topping.
Kombucha offers a sharper contrast. Ginger, lemon or yuzu styles cut through the pancake's richness, and their acidity can make earthy matcha taste brighter. Pep Tea's Australian-brewed organic kombucha is made in the Hunter Valley, NSW. Its sugar-free range includes Ginger, Lime & Ginger and Mango. Serve it chilled in a small glass, allowing it to refresh the palate between bites.
For a café brunch menu, keep the stack visually controlled, use a warm plate and finish with a small pinch of salt. That restraint matters more with delicate ceremonial-grade matcha, while a stronger culinary-grade batch can handle bolder fruit or citrus. At home, a shorter stack with fruit and yoghurt is easier to eat and lets everyone adjust sweetness at the table.
Troubleshooting Common Pancake Problems
A disappointing stack usually points to heat or handling rather than a failed recipe. Matcha makes those mistakes easier to see, but the fixes are familiar.
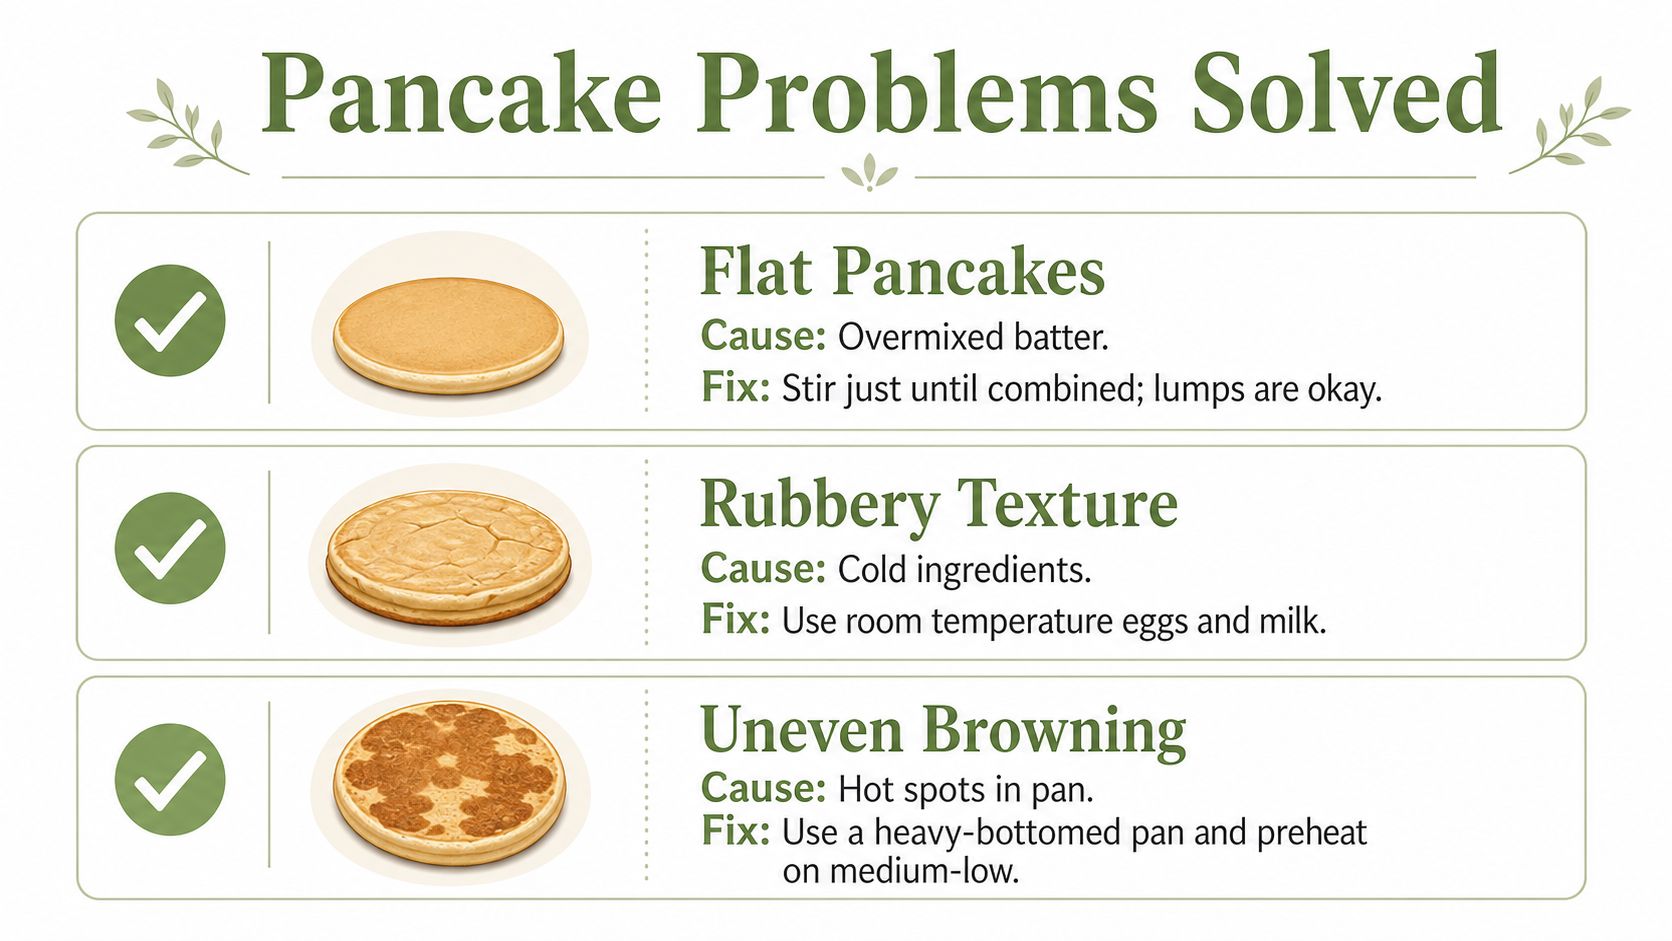
- Flat pancakes: Overmixed batter develops too much gluten. Stir until just combined, accept small lumps, then rest the batter for about ten minutes.
- Rubbery texture: Cold eggs and milk can make the batter uneven and slow to rise. Bring them to room temperature before mixing.
- Pale surfaces: The pan is probably not holding enough heat. Use medium-low heat, test it with a splash of water, and allow the first side to cook longer.
- Bitter flavour: High heat drives bitterness and darkens the powder. Whisk the matcha in at the end of the wet-mixture stage and avoid cooking over a high flame.
- Sticking: Use a well-seasoned pan and add butter between batches rather than flooding the pan at the start. Wait for visible bubbles before attempting the flip.
- Brown-green colour: Oxidation and excessive heat are usually responsible. Fold the matcha in last, cook gently and serve the pancakes promptly.
Don't flip because a timer says you should. Flip when the edges have set, the surface bubbles have opened and the pancake releases with a confident slide. That cue is more reliable across ceramic, cast iron and non-stick surfaces.
Storage, Reheating and Quick Nutrition Notes
Cool the pancakes on a wire rack so steam can escape instead of making the undersides wet. Once cool, store them in a sealed container in the fridge for up to three days, or freeze them with parchment separators for up to two months.
The toaster gives a single pancake the best balance of crisp edges and soft centre. For a whole stack, a low oven at 150°C warms the pancakes evenly. A microwave works when you're in a hurry, especially if you cover the pancake with a damp paper towel, but it can soften the crumb and dull the green colour.
| Method | Time | Texture Result | Best For |
|---|---|---|---|
| Toaster | Short | Lightly crisp outside, tender centre | One or two pancakes |
| Oven at 150°C | Gentle warming | Even and soft | A full stack |
| Microwave with damp paper towel | Very quick | Softest, sometimes slightly chewy | Speed over surface texture |
Matcha contributes caffeine because the powdered leaf is consumed rather than steeped and discarded. A peer-reviewed review reports published matcha caffeine concentrations ranging from 18.9 to 44.4 mg per gram, while an Australian matcha FAQ gives a common range of 19 to 44 mg per gram and describes a standard usucha serving as about 2 g, or roughly 38 to 88 mg of caffeine. (Peer-reviewed matcha review) (Australian matcha FAQ)
Because the exact amount in a pancake depends on the powder and recipe quantity, don't treat the stack as caffeine-free. FSANZ identifies caffeine as a regulated substance in the food supply, and its guidance notes that the Food Standards Code restricts caffeine in certain products to a maximum of 320 mg per litre. (FSANZ caffeine guidance)
I won't invent calorie, protein or carbohydrate figures without the exact flour, milk, fat, sweetener and serving size. For practical planning, treat the recipe as a breakfast containing flour-based carbohydrates, egg-derived protein and matcha caffeine, then adjust toppings according to whether you're aiming for a light home meal or a more substantial café plate. For matcha storage guidance, use Pep Tea's matcha shelf-life guide.
Pep Tea offers organic Japanese matcha suited to drinking and culinary use, alongside Australian-brewed organic kombucha from the Hunter Valley, NSW. Visit Pep Tea to choose a matcha for your next pancake batch and explore sugar-free kombucha pairings for a bright, balanced breakfast.
Lemon Ginger Kombucha: Benefits, Brewing, and Buying
You're standing in front of a café fridge, trying to choose between sparkling water, an iced tea, a soft drink and a row of colourful functional beverages. Lemon ginger kombucha catches your eye because it sounds familiar, refreshing and a little more grown-up than lemonade. But the label raises sensible questions. How much lemon and ginger is in the bottle? Is it low in sugar? Does it contain live cultures, and can the alcohol level change during fermentation?
Those questions matter in Australia, where kombucha has moved well beyond a niche wellness drink. The flavour is appealing, but the quality of the fermentation, ingredient dose, storage and labelling determines what you're really buying. Here's how to assess lemon ginger kombucha with the practical eye of a tea and fermentation specialist.
Why Lemon Ginger Kombucha Is Winning Over Australian Drinkers
A café customer may choose lemon ginger kombucha for a simple reason: it offers brightness, spice and fizz in one bottle. Lemon gives the drink a clean, tart edge, while ginger adds warmth that lingers after the sip. That combination feels refreshing in hot weather, yet substantial enough to replace a sugary soft drink or an alcoholic aperitif.
The flavour also suits the way Australians increasingly use drinks. A bottle can sit beside a work lunch, accompany brunch, or become the base of a non-alcoholic menu serve. Health-conscious shoppers may look for a low-sugar option, while café owners want something with more character than plain soda water. Home brewers like the pairing because lemon and ginger are easy to recognise, source and adjust.
A mainstream category, not only a wellness niche
Australian kombucha already has a broad commercial foundation. One market estimate values the category at USD 184.1 million in 2024, with a projection of USD 650.4 million by 2033 at a 15.1% CAGR, while another estimates USD 218.3 million in 2024 rising to USD 765.8 million by 2033 at 15.0% CAGR. These are independent estimates with different market methodologies, but both point towards strong category expansion. Grand View Research's Australian kombucha market outlook
The same outlook identifies conventional kombucha as 89.8% of the market in 2024, with on-trade channels accounting for 60.7% of sales. That mix suggests lemon ginger kombucha can work as an everyday café or retail product, not merely as a specialist health-store purchase.
A federal fermented-beverages issues paper also reported that kombucha sales rose 174% over the previous three years, with New South Wales recording the largest consumer base, closely followed by Queensland. Australian fermented beverages issues paper For a Hunter Valley-brewed product, that local connection is especially relevant, but popularity doesn't remove the need to check what's inside the bottle.
What Makes Lemon Ginger Kombucha Unique
A café may serve two lemon ginger kombuchas that look similar on the label yet taste completely different. The difference usually comes from the tea base, fermentation stage, ingredient dose and alcohol control, rather than the flavour name alone.
Kombucha starts as sweet tea fermented by a SCOBY, a symbiotic culture of bacteria and yeast. The culture converts some sugar into acids, gases and other fermentation compounds. Lemon and ginger are often added during a later flavouring stage, although recipes and timing vary between producers.
Lemon supplies acidity and citrus aroma. Ginger adds heat, fragrance and a warming finish. In the right proportions, those flavours keep a lower-sugar drink lively without making it taste thin. A well-made version should still show fermented tea beneath the botanicals, rather than tasting like sweetened water with generic citrus flavouring.
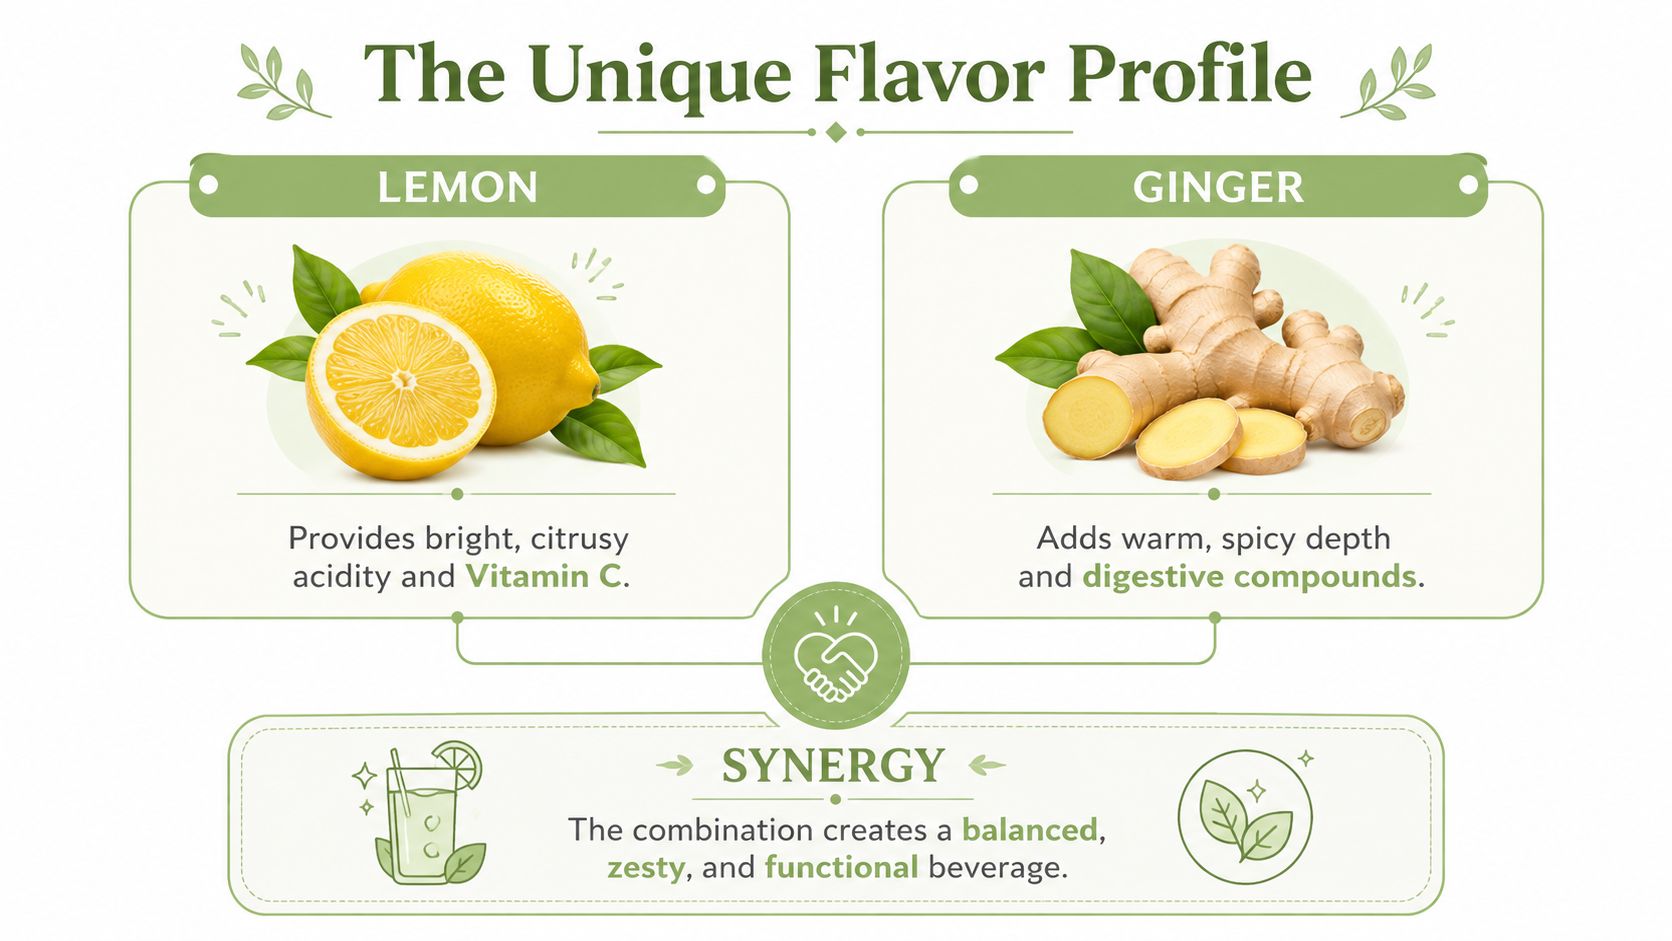
Why timing and dose change the result
Lemon and ginger affect more than flavour. A Western Sydney University study found statistically significant inhibition of S. cerevisiae and Bacillus species at 2–3% additions under low inoculum density. Lemon also inhibited L. plantarum under particular low-inoculum or higher-lemon conditions. The study's findings are discussed in more detail later in this article.
For home brewers, this makes addition timing a practical control point. Adding the ingredients after primary fermentation can make flavour adjustment easier, while fruit sugars may restart yeast activity. For cafés and packaged-product buyers, the formulation also affects consistency, refrigeration needs and alcohol management. Excess ginger can dominate the palate or interfere with culture activity, while too little leaves a sharp lemon tea profile.
Ingredient panels deserve a close read. One Australian listing specifies 0.1% lemon and 2% ginger. Remedy Ginger Lemon product information Those amounts do not determine quality by themselves, but they show why a broad wellness message should be separated from the actual recipe.
A useful tasting test: look for a clear sequence of tea, acidity and ginger warmth. If sweetness or artificial citrus takes over, the formulation is doing little beyond flavour coating.
Probiotic and Nutritional Benefits Worth Knowing
A glass of lemon ginger kombucha can supply fermented tea, organic acids and distinctive plant compounds. Its value depends on the live cultures that remain, the fermentation and processing methods, the amounts of lemon and ginger added, and the sugar left in the finished drink. That makes the recipe more informative than a broad wellness promise.
Live cultures may include organisms from groups such as Lactobacillus, Bifidobacterium and Acetobacter, although the profile varies between products. Culture names do not establish a particular health outcome. A label that identifies the cultures or provides a CFU count gives a clearer basis for comparison than a general probiotic claim.
What lemon and ginger can contribute
Lemon contributes citrus aroma, acidity, vitamin C and antioxidant compounds, depending on its dose and the way the drink is processed. Ginger supplies aromatic compounds, including gingerols, which create its warming character. Fermentation changes acidity and flavour, but it does not guarantee that every nutrient or plant compound becomes more bioavailable.
The Western Sydney University work found that lemon-treated kombucha increased antioxidant activity by 5–15% in a FRAP assay. That result applies to the tested formulation and assay, rather than to every lemon ginger kombucha. The study's research record The practical lesson is straightforward: ingredient concentration and fermentation conditions shape the result, so dosing matters alongside the ingredient list.
For a broader explanation of fermentation, live cultures and practical use, read Pep Tea's guide to the benefits of kombucha.
A realistic daily role
A small serve can replace a sweet soft drink or add variety to a hydration routine. It may suit people who enjoy tart, sparkling drinks and want a fermented option. It cannot correct an unbalanced diet, poor sleep or an underlying digestive condition.
Acidity also matters in everyday use. People with reflux, dental sensitivity, diabetes, pregnancy-related dietary questions or medically restricted diets should check the label and seek individual advice from a qualified health professional.
Australian product pages may highlight live cultures, organic acids and “no sugar” positioning without explaining the limits for every customer. Woolworths product information for Remedy Ginger Lemon A transparent label should help you assess acidity, sweeteners, caffeine, storage and ingredients. For home brewers and cafés, those details also support sensible portioning and menu descriptions.
Brewing and Selecting Quality Lemon Ginger Kombucha
A reliable batch starts with control, not flavour improvisation. Primary fermentation creates the plain kombucha base. A later flavouring stage introduces lemon and ginger, then the sealed drink may develop carbonation before refrigeration slows further activity.
A controlled brewing sequence
For home brewers, the process can be organised around three decisions:
Build a sound base. Brew tea, add the required sugar, cool it properly, then ferment with an active SCOBY and starter liquid. Australian room conditions vary, but a working range of 24–28°C is commonly used for fermentation planning. Time, temperature and culture strength all change the final acidity.
Add flavour with restraint. Fresh ginger root gives a cleaner, more layered heat than powder, while lemon juice supplies direct acidity. Zest brings aromatic citrus oils but can become bitter if overused. A brewer should taste the base first, then make a measured addition rather than tipping in ingredients by guesswork.
Manage the bottle stage. Lemon and ginger can introduce residual sugars or fermentable material. In a sealed bottle, yeast may continue working, creating pressure and increasing alcohol. Refrigeration helps slow that activity, but it isn't a substitute for a validated process.
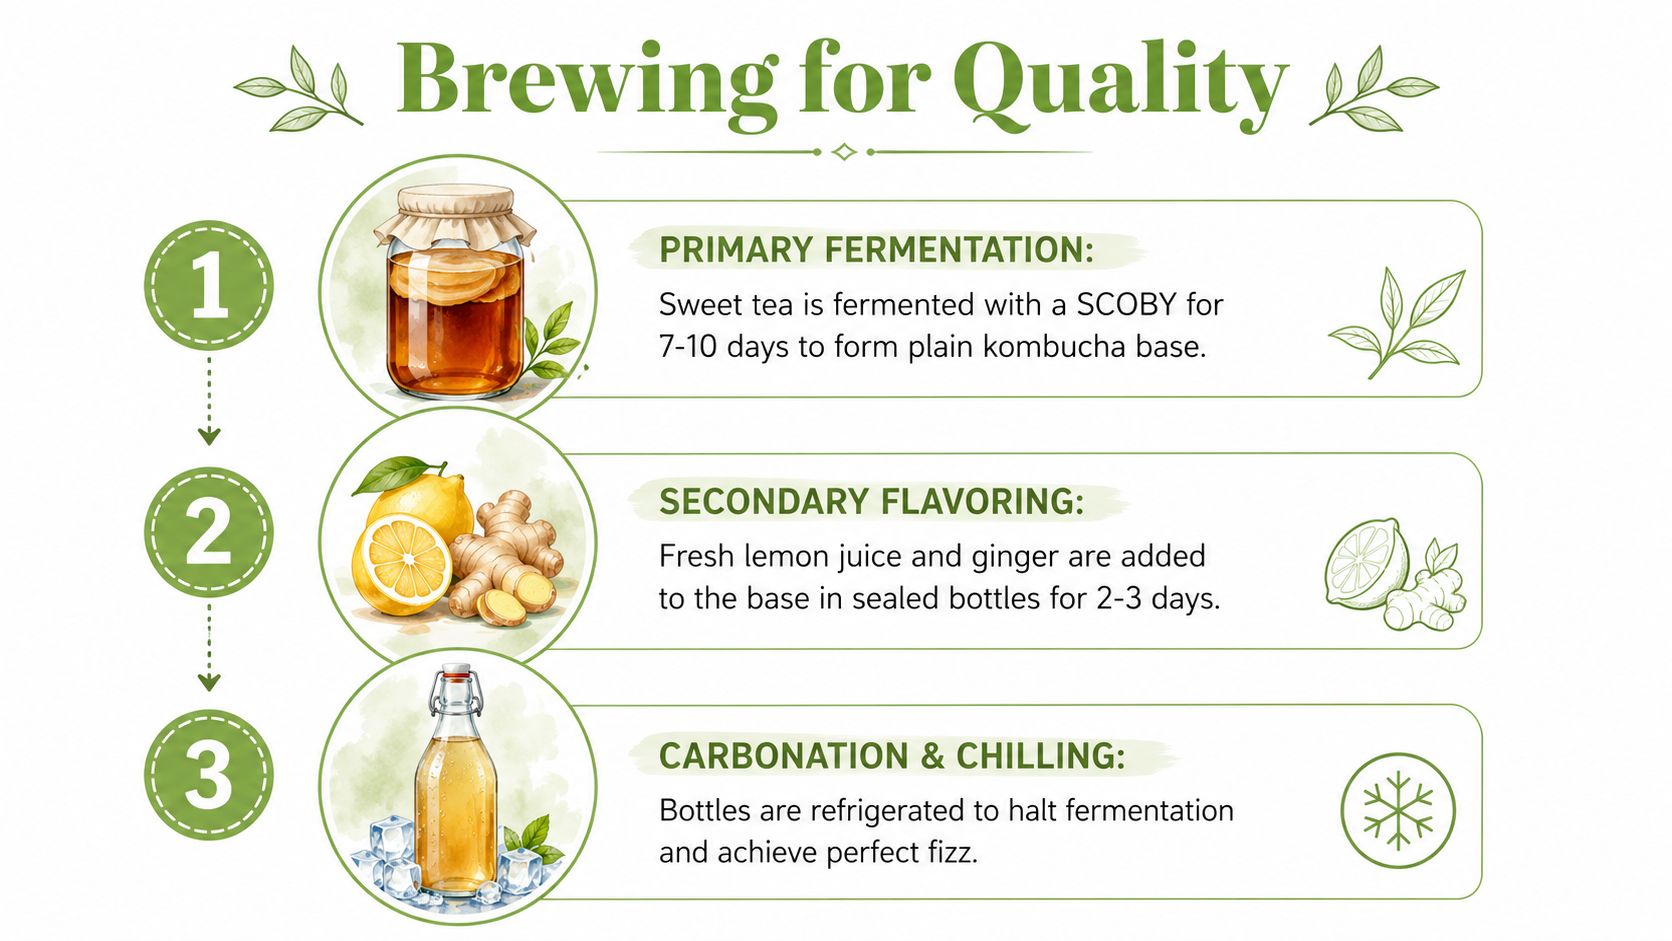
A purpose-built kombucha brewing container from Pep Tea can help keep the process organised, but equipment won't correct a weak starter, poor sanitation or uncontrolled temperature. Clean vessels, sound tea and careful observation remain the foundation.
Alcohol is a production issue
Australian testing shows why brewers and buyers shouldn't assume kombucha is automatically non-alcoholic. A Food Standards Australia New Zealand survey found 35.2% of sampled kombuchas below 0.5% ABV, 41.9% between 0.5% and 1.15% ABV, and 22.9% above 1.15% ABV. FSANZ coordinated survey of fermented soft drinks
In Queensland, Tasmania and Victoria, beverages above 0.5% ethanol by volume are classified as alcoholic, while jurisdictions using a 1.15% threshold apply a different boundary. The practical lesson is simple: producers need batch consistency, appropriate labelling and testing where necessary.
For troubleshooting, excessive sourness usually points to an overextended fermentation or too little residual sweetness. Weak carbonation may reflect insufficient fermentable material, a loose seal or a short bottle stage. Mould is a safety failure, not a flavour problem. Discard a mouldy batch rather than trying to rescue it.
Serving Ideas and Café Menu Applications
At a café, lemon ginger kombucha can arrive in a clear glass over ice, finished with a lemon wheel and a thin slice of fresh ginger. That presentation makes the ingredients visible and gives customers a quick sensory cue before they taste it. Serve it cold, pour gently and avoid burying the fermented character under syrups.

Three useful menu formats
A kombucha spritz combines chilled lemon ginger kombucha with muddled mint, ice and a small amount of soda water. Keep the additions restrained so the acidity and ginger remain recognisable. A fermented mule uses kombucha as the ginger element, with lime, ice and a non-alcoholic spirit if the venue wants a more structured bar-style serve.
Food pairing is straightforward. Lemon's acidity can cut through rich avocado toast, smoked salmon or pastry, while ginger brings enough spice to sit comfortably beside an Asian-inspired bowl. The drink's tartness can also refresh the palate between bites, especially where a creamy or oily component dominates.
Operational details for venues
Cafés should treat kombucha as a living product. Keep stock within the supplier's recommended cold-chain conditions, rotate it carefully and avoid leaving open bottles at room temperature for long periods. If a venue uses a keg or tap system, the team should confirm compatibility with the producer, maintain clean lines and monitor carbonation and flavour over service.
For winter, a café can offer a room-temperature or gently warmed spiced tea alternative using turmeric and cinnamon, but heating kombucha may affect live cultures and carbonation. Summer menus can use cucumber and basil for a lighter aromatic variation. For wider seasonal planning, Simply Hospitality's seasonal beverage ideas offers useful hospitality context.
Menu wording should stay accurate. “Fermented tea with lemon and ginger” tells customers more than an unqualified promise about gut health, and a clear alcohol statement helps staff answer questions confidently.
How to Choose the Best Lemon Ginger Kombucha in Australia
The best bottle isn't necessarily the one with the loudest wellness language. Start with the ingredient list, then assess processing, storage and taste. A mass-market product may be convenient and consistent, while a small-batch producer may offer a more distinctive fermentation profile. Neither label category guarantees quality.
Look for real lemon and ginger, rather than relying only on “natural flavour”. Check whether the drink is raw or unpasteurised, but remember that those terms still need context. A live product can change in the bottle, and a producer should be able to explain its storage and alcohol-control practices.
A practical comparison
| Quality Factor | Mass-Market Options | Premium/Small-Batch, for example Pep Tea |
|---|---|---|
| Ingredient detail | May provide a shorter or less specific flavour description | More likely to identify tea, cultures and flavour ingredients clearly |
| Processing | May prioritise shelf stability and broad distribution | May retain a more pronounced fermented profile, depending on process |
| Sugar positioning | Check whether fruit juice or concentrates contribute sweetness | Look for a clear sugar statement and an ingredient list you can understand |
| Alcohol control | Confirm the product's labelling and storage instructions | Ask how fermentation consistency and testing are managed |
| Flavour | Often designed for broad appeal | May show clearer tea, citrus and ginger character |
| Cold chain | Storage can vary across transport and retail | Chilled handling and producer guidance are especially important |
Australian food law treats kombucha as a traditional food rather than a novel food, so it doesn't need special pre-approval. It still has to be safe and suitable, and general food laws apply. CHOICE's kombucha guidance also notes that a low-sugar claim in Australia requires 2.5 g sugar or less per 100 mL.
Label questions worth asking
- Cultures: Are live cultures stated, and are specific organisms or CFU information provided?
- Sugar: Is “sugar free” supported by the nutrition panel, rather than inferred from a health claim?
- Acidity: Does the product suit your teeth, reflux history and preferred taste?
- Alcohol: Does the producer explain how ABV is controlled and labelled?
- Storage: Does the bottle require refrigeration, and has it stayed cold through retail?
For an Australian buying guide and retailer context, Pep Tea's guide to buying organic kombucha in Australia provides a useful starting point.
Making Lemon Ginger Kombucha Part of Your Routine
A home brewer pours lemon ginger kombucha after lunch, while a café owner serves the same style over ice with a citrus garnish. In both settings, its value comes from practical use rather than broad wellness promises: fermented tea, ginger warmth, acidity and carbonation in a soft-drink alternative or non-alcoholic menu base.
Start with a small serve and observe how your body handles acidity and carbonation. For cafés, trial it beside brunch or as a seasonal mocktail, then check whether the flavour remains balanced when diluted with ice or paired with food.
A reliable routine also depends on consistent brewing. Home brewers can adjust lemon and ginger gradually, while venues need a repeatable recipe, cold storage and a clear approach to alcohol control. The aim is a drink people can enjoy regularly, with its ingredients and production understood.
Explore Pep Tea's Australian-made organic kombucha options, including its sugar-free Lime & Ginger style, for a practical lemon-and-ginger-style choice.
Pep Tea offers organic tea and Australian-brewed sugar-free kombucha for home drinkers, cafés and wholesale customers. Visit Pep Tea to explore the range and brewing resources.
Home Brew Kombucha the Right Way

You're standing in the kitchen, watching a SCOBY drift through a glass jar and wondering whether that sharp, vinegary smell means the batch is working or heading for the sink. With home brew kombucha, both outcomes are possible. The difference usually comes down to sanitation, temperature, acidity, time and careful observation, not luck.
A SCOBY is a living culture, not a magic ingredient. Treat it like a small fermentation system, and you can produce a bright, tart drink with controlled sweetness and flavour. Treat it casually, and you can end up with mould, excessive pressure or alcohol content that isn't obvious from taste alone. This guide focuses on what works in Australian homes, including the safety details that many beginner recipes leave out.
Why Home Brew Kombucha Is Worth the Effort
The first successful batch often changes how you see fermentation. You begin with sweet tea, starter liquid and a rubbery culture. A week later, the tea has developed acidity, aroma and a completely different texture on the palate. The SCOBY hasn't performed a miracle. Yeasts and bacteria have transformed the liquid because you gave them a suitable environment.
That makes kombucha closer to bread baking or beer brewing than to a simple wellness ritual. You control the ingredients, provide the right conditions and make decisions based on the result. A two-litre batch can cost far less than buying individual boutique bottles, while the same process lets you adjust sugar, acidity, fizz and flavour to suit your household.
A healthy SCOBY can continue producing batches for a long time when you keep it supplied with suitable sweet tea and mature starter liquid. The practical trade-off is that fermentation needs space, stable room conditions and patience. Depending on your method, a batch may take seven to fourteen days before primary fermentation is ready for bottling, with additional time required for carbonation.
What you can control
Home brewing gives you useful levers:
- Sweetness: Stop primary fermentation earlier for a softer drink, or continue it for a drier, sharper profile.
- Carbonation: Use secondary fermentation, fruit or a measured sugar addition to build fizz.
- Flavour: Keep the base clean and add ginger, citrus, herbs or fruit after primary fermentation.
- Batch size: Start with a manageable jar before moving to continuous brewing.
The process also fits neatly into broader healthy-living routines. Kombucha isn't a substitute for a varied diet, and gut health depends on more than one drink, but readers looking at fermentation alongside fibre, hydration and daily food choices may find these fibre intake and gut health strategies useful.
Practical rule: Fermentation is observation plus adjustment. The calendar can guide you, but the jar, pH reading and taste tell you what to do.
Before buying a SCOBY, compare the practical differences between a homemade batch and a reliable packaged product in store-bought kombucha versus homemade. The comparison helps clarify whether home brewing suits your kitchen, schedule and tolerance for variable results.
Equipment and Ingredients You Actually Need
A successful home brew kombucha setup doesn't require a specialist laboratory, but the items you choose matter. Start with a wide-mouth glass brewing jar, ideally around four litres, because glass is non-reactive and the opening makes it easier to clean the walls and handle the culture. Food-grade stainless steel is also suitable. Avoid aluminium and other reactive metals, which can interact with acidic kombucha and affect the brew.
Australian food-safety guidance recommends food-grade glass or stainless steel, a covered vessel that allows gas to escape, and tea cooled to about 20 to 25°C within two hours before culture is added. The Food Safety Information Council's kombucha guidance is a useful reference to keep beside your brewing notes.
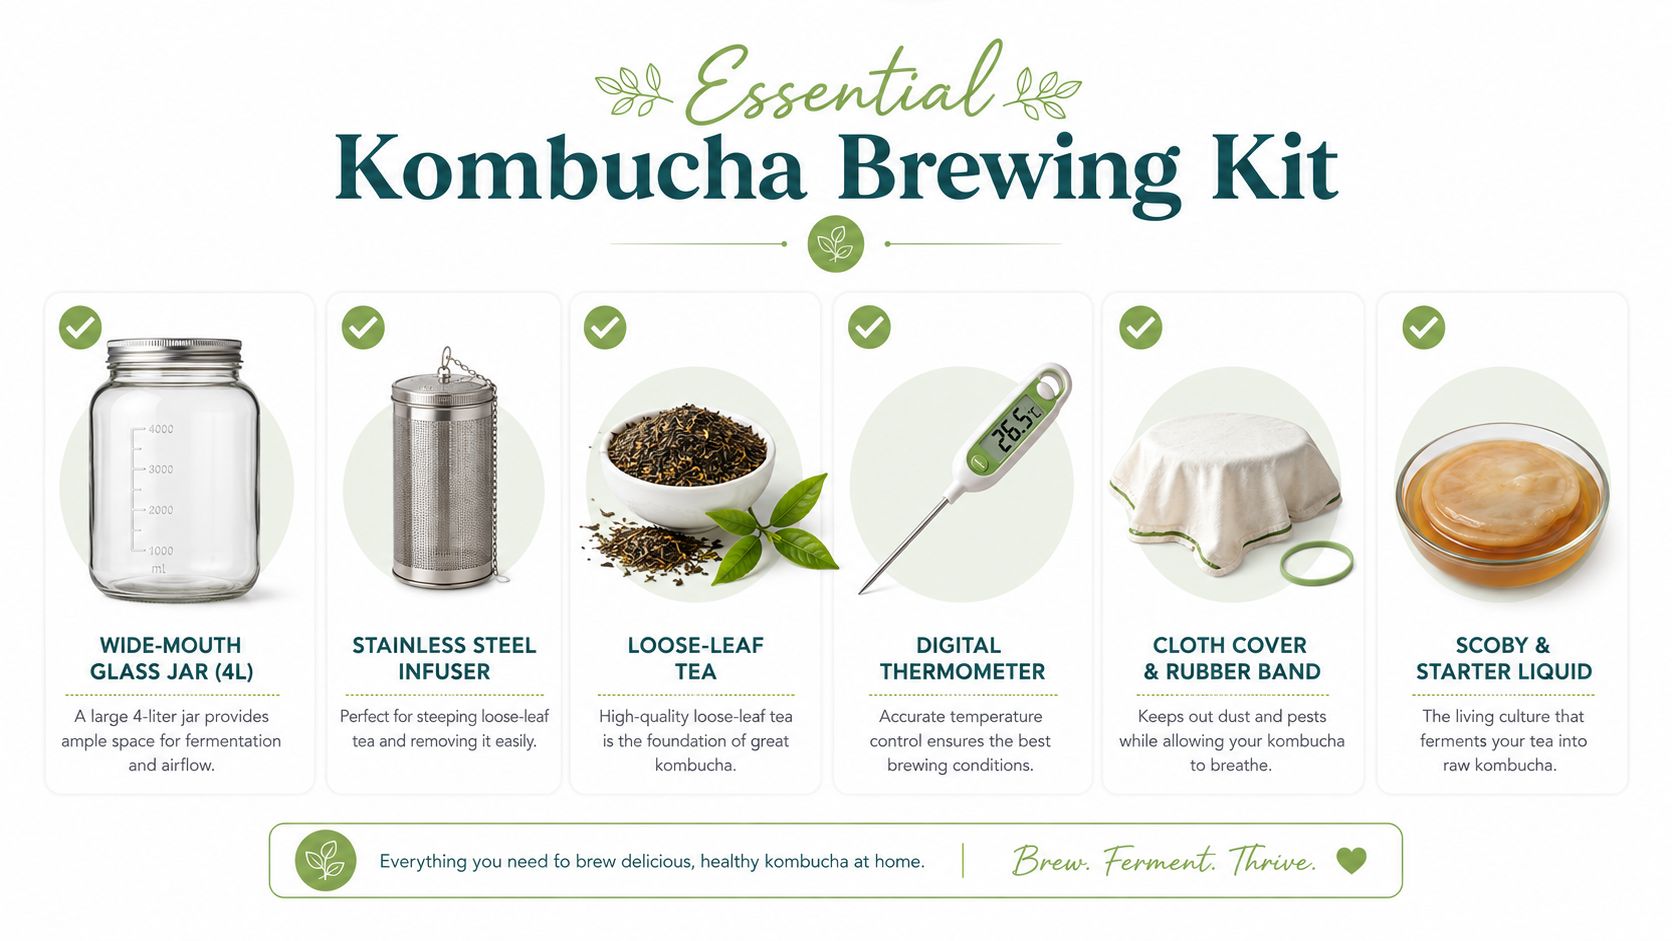
Build the kit around control
Use a tight-weave cloth, paper coffee filter or purpose-made fermenting lid secured with a rubber band. A loose kitchen towel can admit fruit flies and airborne debris, while a sealed lid during primary fermentation can trap gas. Keep a thermometer nearby, because guessing whether tea has cooled enough is an avoidable error.
A digital pH meter gives more precise readings when calibrated and maintained correctly. pH strips are cheaper and convenient, but their colour blocks can be difficult to read against dark tea. Add a long-handled stainless steel spoon, a fine mesh strainer, clean swing-top bottles or thick PET bottles, and a kitchen scale for repeatable sugar and flavour additions.
For tea, plain loose-leaf black tea is the dependable starting point. Tea bags work well too. Green tea can ferment successfully, but it tends to need gentler brewing temperatures and may produce a lighter, more delicate base. Avoid strongly perfumed teas and blends containing added oils until you understand how your culture responds.
Use ordinary cane sugar as the culture's food. Most sugar substitutes won't provide the same fermentable material, so a sugar-free final drink still begins with sugar in the brewing tea. Filtered water is preferable where tap water is heavily chlorinated, since chlorine can interfere with a living culture.
A SCOBY and starter liquid are not the same thing. The rubbery pellicle provides structure and microbial activity, while mature acidic kombucha helps lower the starting pH and establish the new batch. Source both from a brewer who can explain how the culture has been maintained, rather than accepting a dry pellicle with little or no starter liquid. Pep Tea's kombucha tea kit is one packaged option for people who want the core supplies together.
Making the Sweet Tea and Starting the Brew
The sweet tea and starter liquid should be treated as one connected sequence. Every stage affects the next one, so prepare the tea, dissolve the sugar, cool it properly and add the culture without leaving the mixture exposed unnecessarily.
Prepare the base
Heat filtered water to about 95°C, then steep four to six tea bags per litre for ten to fifteen minutes. Remove the tea bags or strain the loose leaves before the brew becomes harsh. While the tea is still hot, dissolve roughly 70 to 90 grams of cane sugar per four litres. Stir until no crystals remain on the base of the vessel.
Cool the sweet tea below 30°C before adding starter liquid or the SCOBY. Temperatures above 40°C can damage or kill the culture, so don't rely on a warm-to-the-touch test. An ice bath around the saucepan or brewing pot speeds cooling, but keep unboiled water out of the tea.
Pour the cooled tea into a sanitised brewing jar. Add starter liquid at roughly 10% of the batch volume, which is typically 400 ml for a four-litre brew, then place the SCOBY on top. It may float, sink or sit at an angle. Its position isn't a reliable measure of health.
Within the first day, a healthy culture may bring the brew to around pH 4.0 to 4.5. The useful temperature window for starting is approximately 22 to 28°C. If the tea remains warm, sweet and unchanged, check the thermometer, starter quality, sanitation and pH rather than adding more sugar at random.
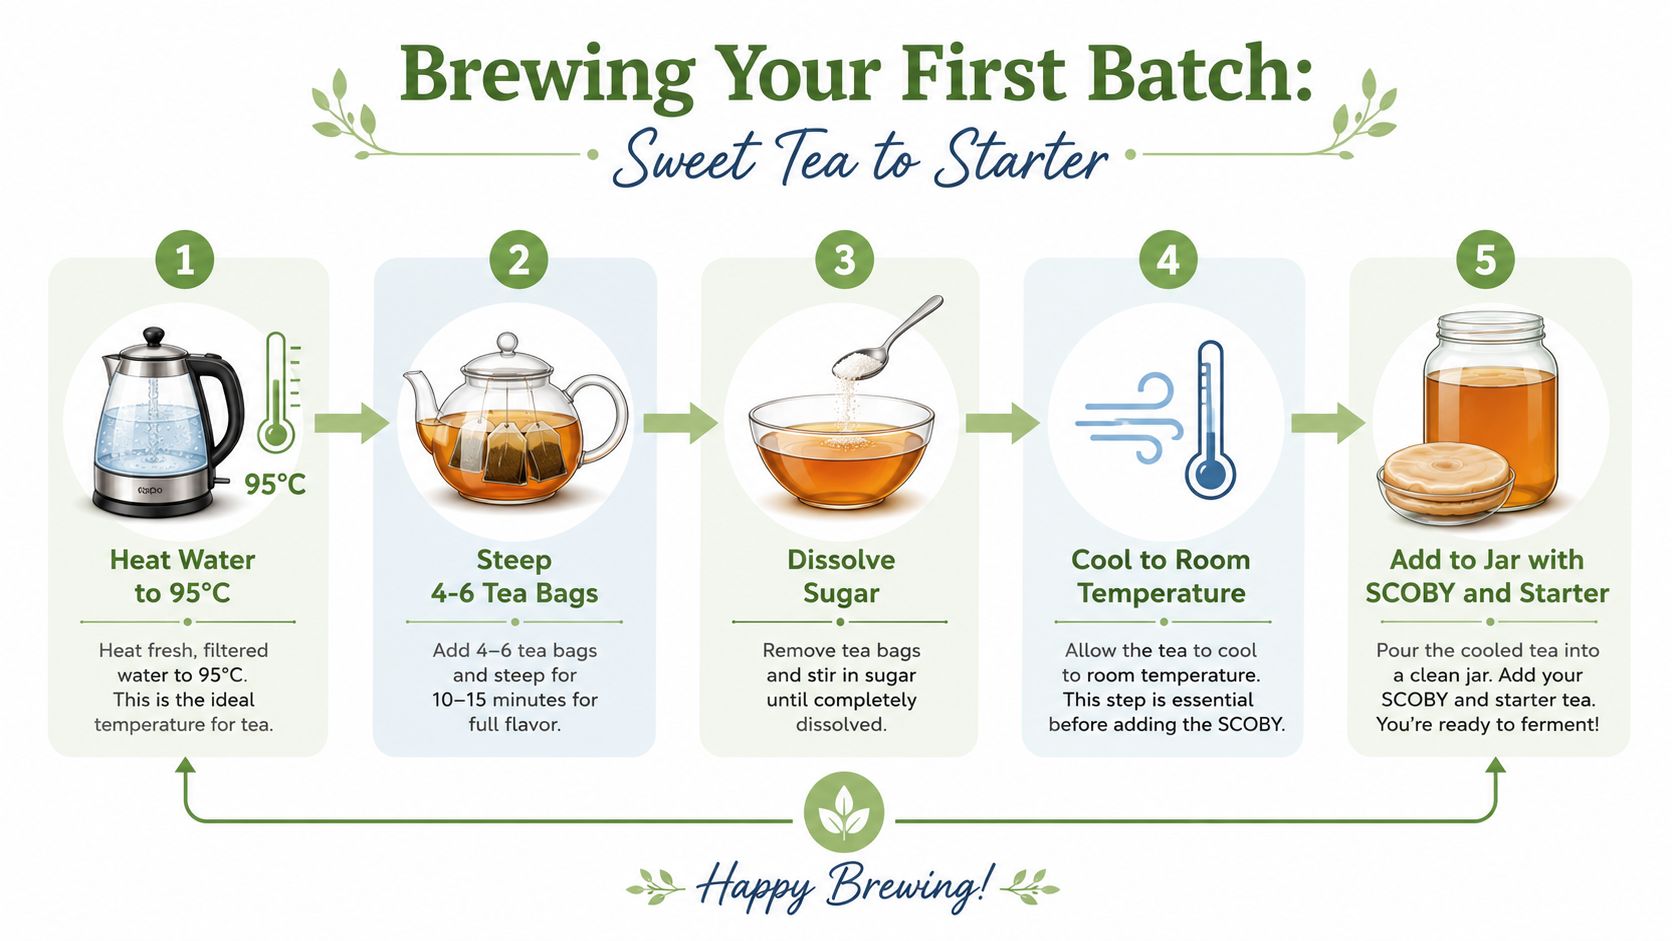
Keep the jar away from direct sunlight, strong kitchen odours and high-traffic areas. Cover it with the breathable material described above, label the batch with the date and tea blend, and record the initial temperature and pH. That small record makes later troubleshooting far easier.
This video can help visual learners see the broad sequence, but use the Australian safety milestones in this guide when deciding whether your own batch is ready.
Primary and Secondary Fermentation Explained
Primary fermentation, often called F1, is where the culture converts sweet tea into kombucha. Secondary fermentation, or F2, happens after you remove the SCOBY and bottle the liquid for flavour development and carbonation. Treating them as separate checkpoints prevents a common mistake, adding fruit or sealing the jar before the base has developed enough acidity.
F1 is an active phase
A practical Australian home-brewing window is seven to fourteen days at 22 to 26°C. Below 20°C, the culture can slow substantially, while a warmer room can accelerate fermentation and change the balance between sweetness, acidity and alcohol production.
Taste the liquid as it develops. A ready base is usually less sweet, lightly tart and sometimes slightly vinegary, with tea still present. Cheap pH strips may show approximately 3.2 to 3.8 at this stage, but don't use taste or the calendar alone to make a safety decision.
Fruit flies are a serious contamination risk. Secure a fine cloth with a rubber band, and inspect the cover regularly. A solid lid may seem cleaner, but it can trap carbon dioxide during an active ferment and create pressure in a vessel not designed to manage it.
F2 builds flavour and pressure
When F1 tastes balanced, remove the SCOBY and reserve mature starter liquid for the next batch. Strain the kombucha if needed, then decant it into clean swing-top bottles or thick PET bottles, leaving three to four centimetres of headspace.
Add fruit, juice, ginger, herbs or a carefully measured sugar addition. Seal the bottles and leave them at room temperature for two to five days, checking pressure as the liquid carbonates. Then refrigerate for a 24 to 48 hour cold crash. Cold storage slows yeast activity and makes opening less dramatic.
For glass bottles, use a cautious burp test. Open slightly over a sink, listen for pressure and close the cap if the release is aggressive. A leaking seal, bulging PET bottle, unusually hard glass bottle or forceful spray indicates over-pressurisation. Don't shake the bottle or open it near your face.
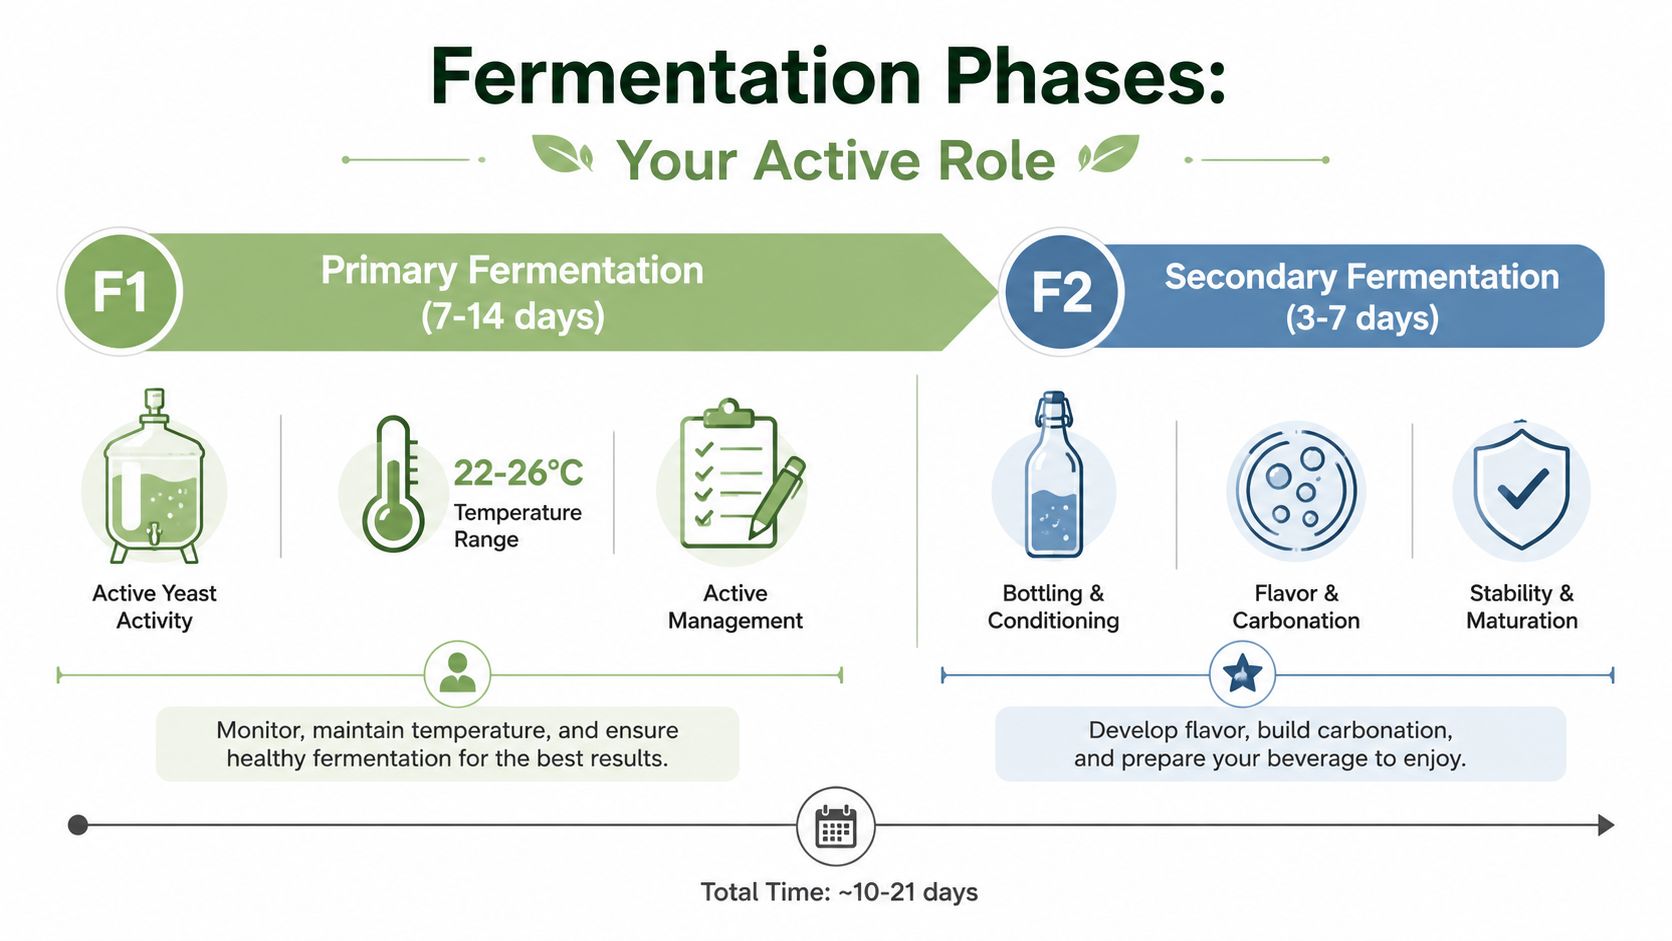
For a more detailed explanation of flavour development and bottle conditioning, use Pep Tea's guide to kombucha second fermentation. The important principle is simple: F1 develops the base, while F2 adds variables, so don't combine both phases when you're still learning to read your culture.
The Australian Alcohol Question Most Guides Skip
Kombucha can contain alcohol because yeast produces alcohol during fermentation. The amount varies with the culture, sugar availability, temperature, fermentation time and storage conditions. Australian regulatory material makes clear that this variation isn't theoretical.
A nationally coordinated Australian survey of fermented soft drinks found 35.2% were under 0.5% ABV, 41.9% were between 0.5% and 1.15% ABV, and 22.9% were above 1.15% ABV. These figures come from the Food Standards Australia New Zealand survey summary, and they show why a recipe alone can't guarantee a no-alcohol result.
In Australia, fermented soft drinks containing more than 0.5% ABV must carry an alcohol-content statement, while NSW Health says products above 1.15% ABV are treated as alcoholic drinks under NSW rules. NSW Health also warns that fermented drinks can contain varying alcohol levels and advises vulnerable consumers, including pregnant women, drivers and machine operators, to check labels before drinking. Read the NSW Health guidance on fermented drinks and alcohol before serving home brew to anyone who needs to avoid alcohol.
Factors That Increase ABV in Home Brewed Kombucha
| Factor | Effect on ABV | Practical control |
|---|---|---|
| Longer F1 fermentation | Gives yeast more time to ferment available sugar | Taste regularly and use pH records |
| Warmer room conditions | Can accelerate microbial activity | Keep the jar in a stable, moderate location |
| Extra sugar in F2 | Provides more fermentable material in a sealed bottle | Keep additions measured and conservative |
| Extended storage | Fermentation can continue if the drink stays warm | Refrigerate finished bottles promptly |
| Unpredictable culture balance | Yeast and bacteria may behave differently between batches | Keep batch notes and test when certainty matters |
Home controls can improve consistency, but they can't prove a batch is alcohol-free. Keep primary fermentation within a shorter, closely observed window, avoid excessive F2 sugar and refrigerate promptly. If you're serving pregnant guests, drivers, people taking medication or anyone avoiding alcohol for religious reasons, a laboratory test is more dependable than taste, a recipe or a home assumption.
People choosing mindful alternatives can also explore non-alcoholic beer options for 2026, while recognising that home brew kombucha needs its own fermentation controls.
Flavouring, Bottling, and Storing Your Batch
Flavouring is where a plain tea base becomes your house kombucha. A clean F1 gives you a better canvas than an over-fermented base, so taste the liquid before adding anything. If it already tastes sharply vinegary, fruit won't hide the imbalance. It will usually make the drink busier and harder to correct.
For a 500 ml bottle, start with one of these measured formulas:
- Juice: Add 15 to 20 ml for a clear fruit note.
- Purée: Use 10 to 15 grams for a fuller fruit texture.
- Dried botanicals: Try one to two teaspoons of ginger or hibiscus.
- Extra carbonation: Add five to ten grams of sugar only when you understand how quickly your bottles build pressure.
The most useful habit is a flavour log. Write down the tea, F1 taste, pH, fruit amount, room conditions, bottling date and carbonation result. A bottle that works beautifully with lime and ginger becomes a repeatable recipe instead of a one-off accident.
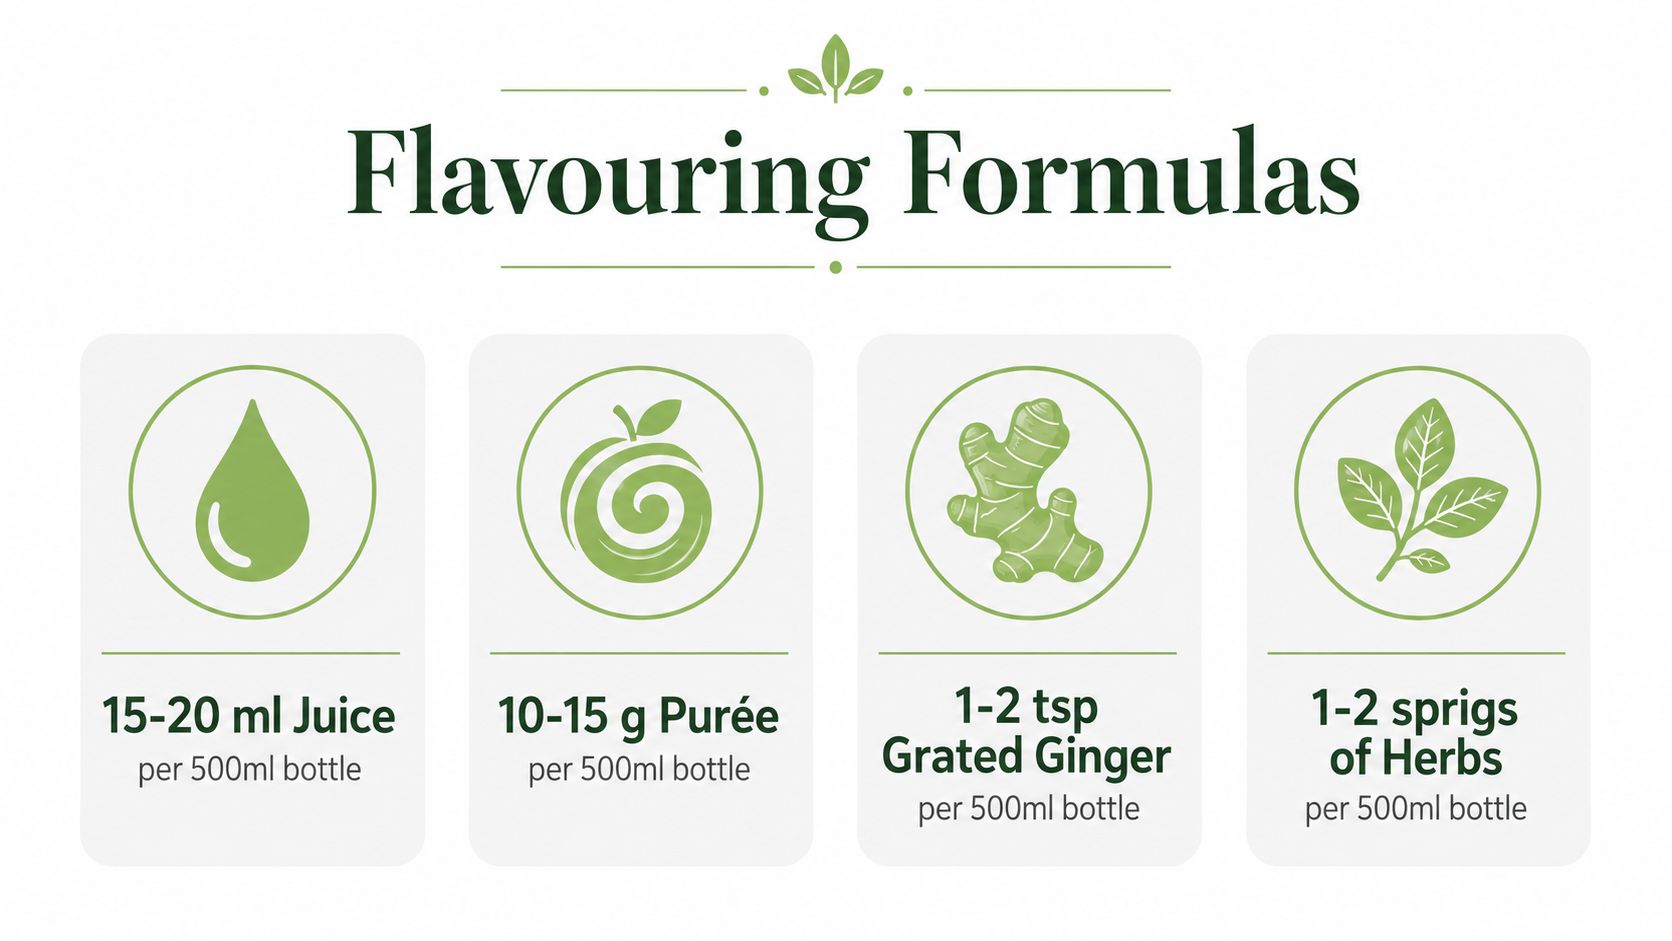
Choose bottles for the pressure you create
Swing-top glass looks good and works well when you monitor pressure, but it demands care. Thick PET bottles let you squeeze the sides and feel carbonation building, making them useful while learning. Repurposed commercial bottles are less predictable, especially if they weren't designed for secondary fermentation, so they shouldn't be your default.
Once the flavour is right, refrigerate finished bottles at 4°C. Cold slows yeast activity and helps preserve carbonation. An unopened bottle can remain at peak carbonation for three to six months, while an opened bottle should be consumed within three days.
A mature F1 vessel can also support continuous brewing. Remove a portion of finished kombucha and replace it with fresh sweet tea every seven to ten days, while keeping the vessel clean and monitoring acidity. Continuous brewing saves handling time, but it also makes contamination and drift harder to notice, so it suits organised brewers rather than anyone seeking a completely hands-off setup.
Troubleshooting Common Fermentation Problems
Fermentation faults are detective work. A new shape on the SCOBY doesn't automatically mean failure, and a pleasant smell doesn't automatically prove safety. Look at when the problem appeared, check pH, smell the liquid carefully and compare the batch with your records.
What happens early
During the first days, the surface may remain quiet. The SCOBY can sink, float, tilt or develop a thin new layer, and those changes don't by themselves diagnose a problem. A brown, stringy material is often yeast sediment or culture growth, especially when it appears without fuzzy patches or an unpleasant smell.
A sharp vinegar aroma usually means the acid-producing organisms are active. A lack of visible pellicle formation may reflect a culture adapting to a new tea, temperature or vessel. Check the temperature and pH before changing the recipe.
The Food Safety Information Council recommends fermentation at 18 to 26°C for about seven days, with pH falling below 3.0 by day seven. If it hasn't reached that point, the guidance says to continue fermentation with daily pH checks. Follow the Australian kombucha safety guidance rather than relying on appearance.
Recognise contamination
Mould usually appears as dry, fuzzy growth in colours such as blue, white or black. Fuzzy bubbles and spreading surface patches are not the same as smooth yeast strands or a new wet pellicle. If mould is present, discard the entire batch, including the SCOBY and starter liquid. Don't skim the surface and continue.
Kahm yeast can form a pale, wrinkled film and may smell yeasty. It isn't the same visual pattern as mould, but a questionable culture isn't worth rescuing when you're unsure. Strong cheesy odours, rotten aromas or bread-like smells that have gone wrong are discard signals.
Don't use a batch that remains above pH 4.6 after seven days. The Australian guidance's lower pH milestone is a useful safety checkpoint, while a persistently high reading suggests the culture hasn't acidified the tea as expected. Clean the equipment thoroughly and restart with fresh ingredients and reliable starter liquid.
Solve end-of-cycle problems
Flat kombucha usually means F2 lacked fermentable material, the bottle seal leaked or the drink was refrigerated before carbonation developed. Over-carbonation points to too much fermentable sugar, excessive time at room temperature or an active culture in a tightly sealed bottle. Open pressure-heavy bottles slowly over a sink, and don't keep them warm while hoping for more fizz.
A sour beer-like flavour can reflect an imbalanced or overextended ferment. A slimy texture may signal culture stress, excessive polysaccharide production or contamination. If the texture is accompanied by an off smell, unusual colour or uncertain pH, discard rather than trying to filter the batch.
Don't rescue a batch because you dislike wasting ingredients. Rescue it only when the evidence says the batch is sound and the fault is clearly flavour or carbonation.
Maintain a SCOBY hotel
A SCOBY hotel is a separate jar containing spare pellicles submerged in mature kombucha. It gives you backup cultures and a place to store layers you aren't using, but it still needs a breathable cover, clean handling and regular pH checks. Remove old layers when the vessel becomes crowded or the culture looks neglected.
A hotel isn't a substitute for fresh starter liquid. The liquid itself provides the acidic inoculation needed for a new batch, so reserve mature kombucha each time you brew. If the hotel smells foul, develops mould or fails to maintain suitable acidity, discard it and restart rather than treating it as an emergency supply.
Scale only when the process is repeatable
Moving from a home jar to a continuous-brew vessel changes the operational risk. Moving from there to café or retail volumes adds food-safety registration, documented sanitation, pH logging, ABV testing, batch traceability and consistent starter ratios. A larger vessel doesn't forgive inconsistent habits. It magnifies them.
Cafés should also plan for refrigeration, bottle pressure, staff handling and customer questions about alcohol. Commercial supplier support can help with SCOBY cultures and ongoing technical backup, including the type of support Pep Tea provides to cafés, but the venue still needs its own documented procedures and compliance checks.
Reliable brewers tend to share a few habits:
- Record every batch: Note ingredients, temperature, pH, taste and dates.
- Trust measurements over the calendar: A scheduled day isn't proof that fermentation is ready.
- Keep the culture fed: A hungry or repeatedly stressed SCOBY produces less predictable results.
- Inspect before tasting: Appearance, aroma and vessel condition come first.
- Refrigerate deliberately: Cold storage slows ongoing fermentation but doesn't erase alcohol already produced.
Pep Tea offers Australian-brewed sugar-free organic kombucha from the Hunter Valley, NSW, alongside organic Japanese matcha and kombucha-focused resources for home users and cafés. Visit Pep Tea to explore the range, learn more about dependable fermentation and choose a practical option for your next mindful drink.
What Is Matcha Green Tea Good for: A Practical Guide

What is matcha green tea good for, really? Is it mainly an antioxidant-rich wellness drink, a gentler coffee alternative, or a vivid green café trend? The most useful answer sits between those ideas. Matcha is a whole-leaf Japanese green tea that can provide calm focus, moderate caffeine and concentrated catechins, but its benefits depend on the serving, the product and how your body responds.
For Australians, matcha makes practical sense as an unsweetened morning drink, an iced café-style latte, a smoothie ingredient or a way to replace a sugary beverage. It isn't a miracle cure, and the evidence for cognitive and metabolic effects is measured rather than dramatic. Used thoughtfully, however, it can become a simple part of an everyday routine.
What Matcha Actually Is and Why It Stands Out
Matcha is made from Camellia sinensis, the same tea plant used for other green, black and white teas. The difference is what happens to the leaf. Producers grow suitable tea bushes under shade, harvest and process the leaves, then grind the prepared leaf into a fine powder. When you drink matcha, you consume that powder rather than removing the leaves after steeping.
That whole-leaf format explains why matcha is often associated with higher antioxidant intake. Standard green tea releases some compounds into water, while the spent leaf is discarded. Matcha keeps the leaf material in the cup, so its catechins, chlorophyll and amino acids remain part of the drink. A review of matcha research describes it as a powdered green tea with particularly high antioxidant potential, and reports that matcha infusions showed the highest antioxidant potential among the tea types considered in that review. A later comparative study reported antioxidant activity 1.2 to 2.5 times higher than standard green tea, depending on the assay used, as outlined in this scientific review of matcha.
Ceremonial and culinary grades
The words ceremonial-grade and culinary-grade describe intended use more than a universal legal standard. Ceremonial matcha is generally selected for drinking with water, where colour, aroma, texture and umami are easy to notice. Culinary matcha is designed to work with milk, yoghurt, fruit, flour and other ingredients, so its stronger flavour can hold its own in recipes.
Neither grade automatically makes a person healthier. A well-made culinary powder can be useful in a latte or smoothie, while a good ceremonial powder is best appreciated whisked with water. The key is to match the product to the way you'll use it.
Practical rule: Choose matcha for the drink or recipe you actually want to make, not for the label alone.
How Matcha Is Grown and Made
Matcha's flavour and colour begin in the tea field. Producers shade tea bushes from direct sunlight for three to four weeks before harvest, a practice discussed in the research literature on matcha composition. Reduced light supports the vivid green appearance and helps create matcha's rounded, savoury flavour.
The production sequence involves several linked decisions:
- Shading: Covers block direct sunlight before harvest. This encourages chlorophyll and helps preserve the amino-acid profile associated with a smooth, umami character.
- Harvesting: Producers select young leaves and buds. They become the raw material for tencha, the leaf prepared for matcha, rather than sencha, which is commonly brewed and removed.
- Steaming: Japanese tea processing quickly steams the leaves to halt oxidation. This helps retain their green colour and fresh vegetal flavour.
- Drying and deveining: The leaves are dried, then stems and veins are removed. The remaining leaf flesh is called tencha.
- Stone-grinding: Granite mills slowly turn tencha into a fine powder. Properly prepared matcha should feel silky, not gritty.
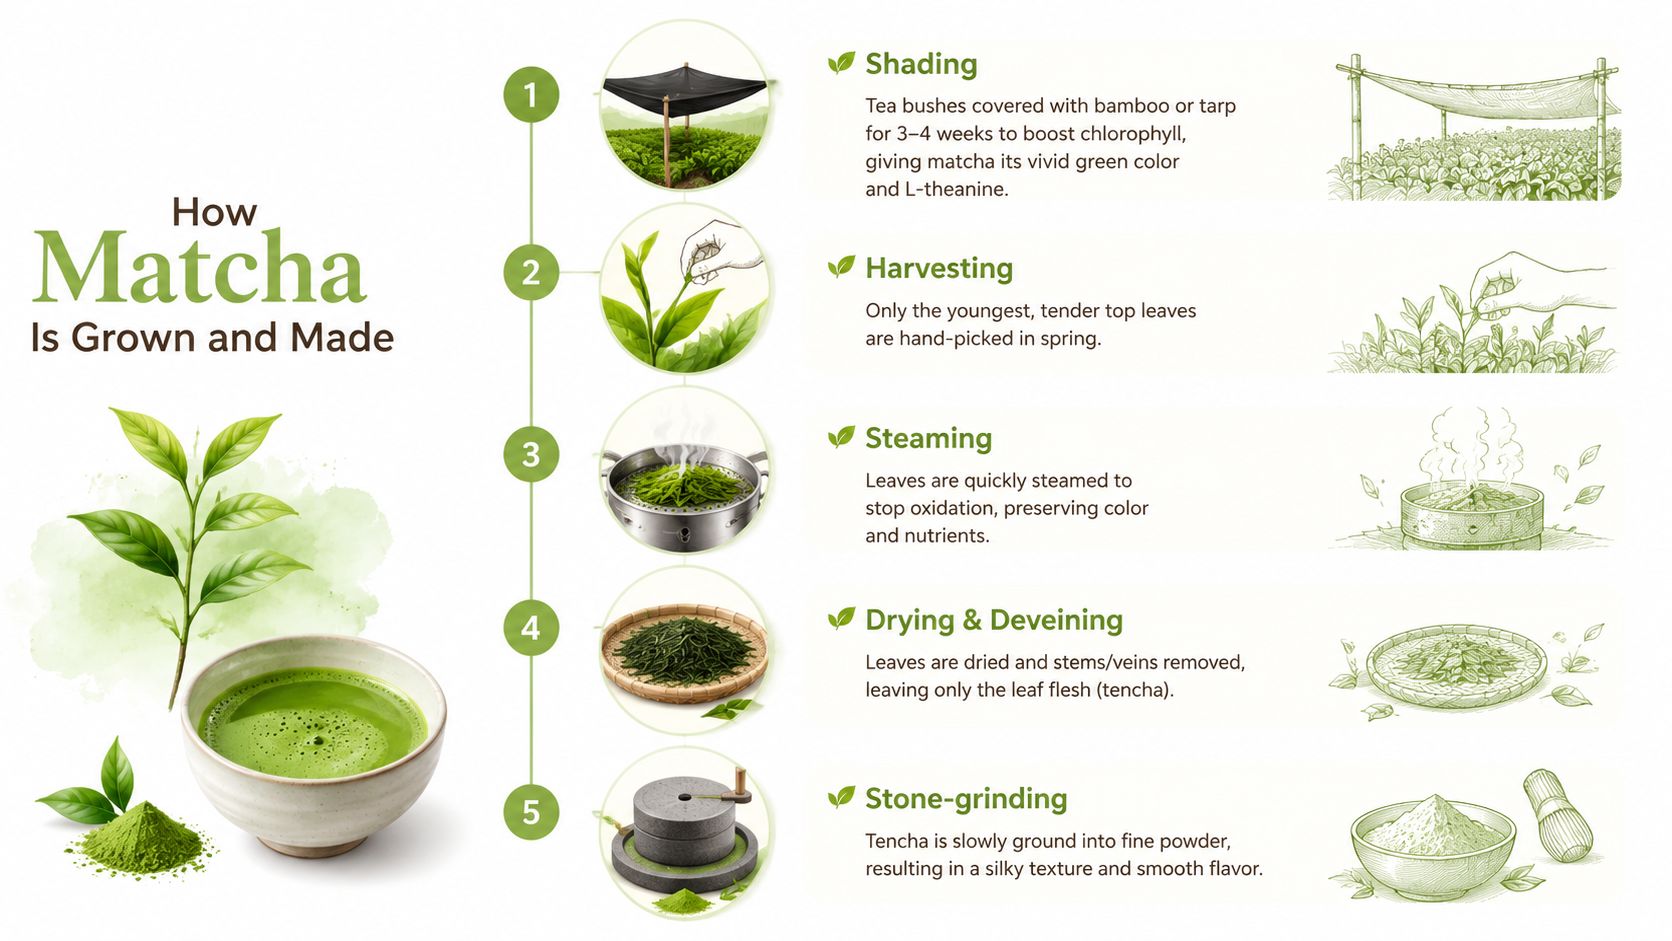
Why whole-leaf processing matters
Brewing extracts compounds into water, while matcha keeps the processed leaf suspended in the cup. The final composition still varies with tea variety, growing conditions, grade, storage and preparation. That difference matters for Australian drinkers choosing between a straight whisked cup, a café-style latte or a recipe.
You can follow each production stage in PepTea's guide to how matcha tea is made. The process also helps explain flavour differences. Fresh, well-stored matcha may taste sweet, grassy and umami-rich, while older or lower-quality powder can seem flat, dusty or harsh. Choose a grade suited to the drink or recipe you want to make.
The Key Compounds Behind Matcha's Benefits
What makes matcha feel different from ordinary green tea or coffee? Its character comes from three naturally occurring compounds working together: catechins, L-theanine and caffeine. They do not make matcha a medicine. They help explain why a whisked cup can feel alerting while remaining more even for some drinkers than coffee.
Catechins and EGCg
Catechins are plant compounds with antioxidant activity. The best-known catechin in matcha is epigallocatechin gallate, usually shortened to EGCg or EGCG. Because matcha is made from powdered leaf, you consume the leaf rather than only the compounds extracted into water. That makes it a catechin-rich beverage, although the amount varies with the tea, grade, storage and preparation.
Laboratory antioxidant activity is not the same as a predictable health outcome. Human effects depend on serving size, diet, lifestyle and individual biology. Research interest includes cardio-metabolic and cellular protection, but a daily cup should not be presented as disease prevention or a guaranteed way to change body composition.
For a plain-language explanation of this major catechin, see PepTea's guide to what EGCg is.
L-theanine and the feel of focus
L-theanine is an amino acid naturally found in tea. Shading during cultivation and consuming the whole powdered leaf help make it part of a matcha serving, though levels differ between products and preparation methods. Studies examine its relationship with relaxed attention and the way caffeine feels.
A review of randomised clinical trials reported that matcha decreased stress and slightly enhanced attention and memory, with no effect on mood. The finding supports a measured description: matcha may suit focused work for some people, but it is not a guaranteed productivity enhancer.
The practical analogy is a dimmer switch rather than a second engine. Caffeine provides stimulation, while L-theanine may contribute to a calmer experience. Individual responses still vary.
Caffeine and realistic expectations
How much caffeine is in the cup matters to Australian drinkers. A typical serving contains about 60 to 75 mg of caffeine, according to an Australian Broadcasting Corporation explainer cited in the matcha review above. That can suit morning alertness or an afternoon work block, but a café latte may contain a different amount depending on the powder and recipe.
Matcha is not caffeine-free energy. People sensitive to caffeine can still experience restlessness, a racing heart or disrupted sleep, especially with a larger serving or late-day use. Start with a modest serve, check the product guidance, and choose morning or early afternoon if sleep is easily affected. The research overview above gives useful context for how cultivation and processing influence matcha's composition.
Matcha Versus Coffee and Green Tea
Could matcha offer a middle ground between brewed green tea and coffee? In Australian café use, a standard matcha serve is often described as roughly 70 mg of caffeine, while the comparison for coffee is 80 to 100 mg. ABC reporting These amounts change with the powder, recipe and serving size, so treat them as a guide rather than a promise. Some drinkers also prefer matcha because they associate it with less of a coffee crash, although that experience differs between individuals.
The preparation method explains much of the difference. Brewed green tea uses water to draw compounds from the leaves, while matcha mixes powdered leaf into the drink. Matcha therefore provides whole-leaf exposure, including catechins such as EGCg, but the amount still varies by product and preparation.
| Beverage, 1 serve | Caffeine | EGCg catechins | Energy profile | Best time of day |
|---|---|---|---|---|
| Matcha | About 60 to 75 mg, ABC reporting | Varies by product and preparation | Alerting, with L-theanine-associated calm focus | Morning or early afternoon |
| Coffee | About 80 to 100 mg in the Australian comparison | Varies widely | Faster, sharper stimulation for many drinkers | Morning or earlier in the day |
| Steeped green tea | Varies by tea and steeping method | Less whole-leaf exposure than matcha | Lighter, gentler stimulation | Across the day, depending on tolerance |
Choosing by sensitivity
Coffee can feel too stimulating for some people, making matcha a practical café substitution. Choose an unsweetened preparation when you want to avoid added sugar, start with a smaller serve, and watch your own sleep and concentration rather than assuming the same response as another drinker.
Timing also matters. A late espresso may interfere with sleep, whereas an early-afternoon matcha may suit a work routine for some people. That is an individual response, not a universal rule.
Practical Ways to Use Matcha Every Day
Matcha doesn't need to stay inside a traditional tea ceremony. Its powder format makes it useful in drinks, breakfasts, baking and savoury food. The following serving ideas give beginners a clear place to start.
Straight and milky drinks
For traditional whisked matcha, sift one teaspoon into a bowl. Add a small amount of hot, not boiling, water and whisk until smooth, then add more water to taste. A bamboo whisk creates the familiar foam, but a small handheld frother can work for an everyday kitchen version.
For an iced oat matcha latte, use two teaspoons of matcha, first mixed with a little hot water to form a smooth paste. Pour it over cold oat milk and ice. Keep the drink unsweetened initially so you can taste the powder's natural balance before deciding whether it needs anything else.
Breakfast and snacks
A morning smoothie can take one and a half teaspoons of matcha with banana, spinach and almond milk. Banana softens matcha's vegetal edge, while the greens make the colour feel at home. Start with less if you're sensitive to bitterness or caffeine.
For a yoghurt bowl, stir a teaspoon through Greek yoghurt, then add berries and a small amount of honey if desired. This is a simple way to use culinary matcha without turning it into a strongly flavoured drink.
Baking and savoury cooking
Culinary matcha works well in blondies, energy balls, muffins, pancakes and ice cream. Sift it with the dry ingredients to reduce lumps, and remember that heat, flour and dairy will soften its flavour.
Savoury uses are less common but worth trying. Mix matcha into salt for roasted vegetables, or add a small amount to a vinaigrette with citrus and olive oil. Use a light hand. Matcha should add freshness and umami, not dominate the dish.
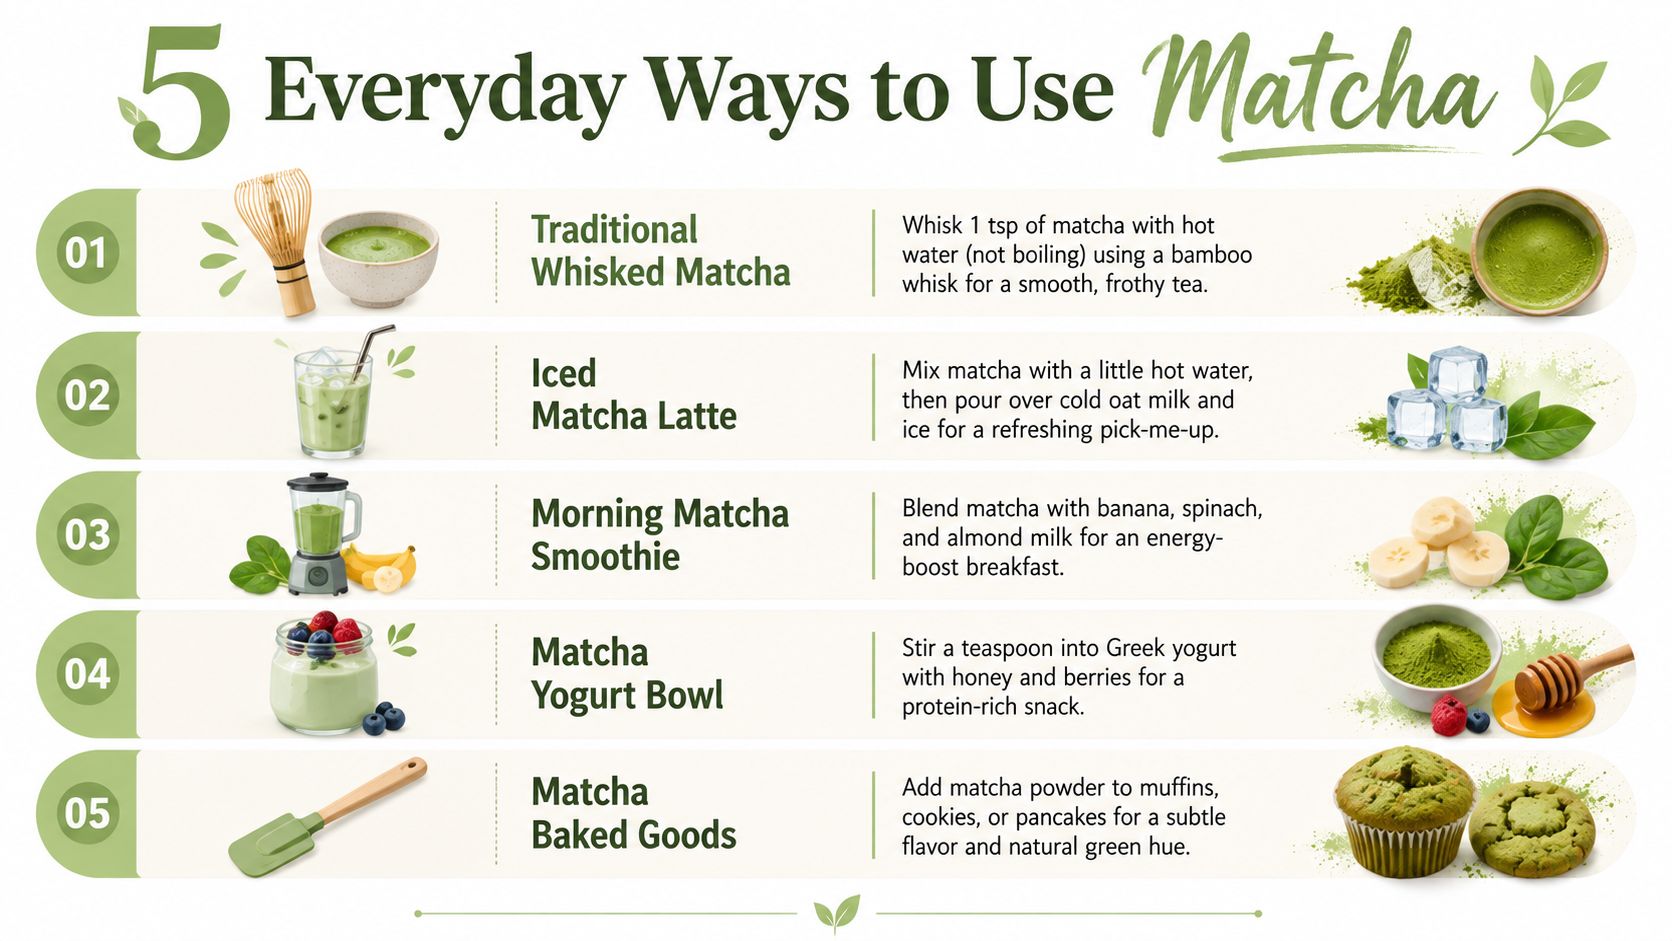
Store opened matcha sealed, protected from heat, light, air and moisture. Refrigeration can help preserve freshness, but let the container come to room temperature before opening so condensation doesn't enter the powder.
How to Choose Quality Organic Matcha
A good matcha announces itself through several sensory cues. Don't rely on a premium-sounding name alone. Terms such as ceremonial and premium aren't universal proof of quality, so inspect the powder and check the supplier's origin and testing information.
Four useful checks
- Colour: Look for a vivid jade-green powder. Yellow or brown tones can indicate older material, oxidation or poor storage.
- Aroma: Fresh matcha should smell grassy and gently sweet. Hay-like, stale or fishy notes are warning signs.
- Texture: The powder should be very fine and talc-like. It should whisk into water smoothly rather than remain sandy or heavily lumpy.
- Taste: A quality drinking matcha tends to have clean umami, mild sweetness and a rounded finish. Aggressive bitterness can point to quality, storage or preparation problems.
Origin matters, too. Japanese regions such as Uji and Nishio are well known for matcha production, but a named origin doesn't replace sensory quality or transparent product information. Look for a clear ingredient list, organic certification where that matters to you, and evidence that the product is matcha rather than a sweetened blend or powder containing fillers.
For Australian shoppers, organic certification can provide useful reassurance about production standards and synthetic pesticide use. Buy a size you can finish while the powder is fresh. Smaller tins are often more practical than a large container that sits open in a warm kitchen for months.
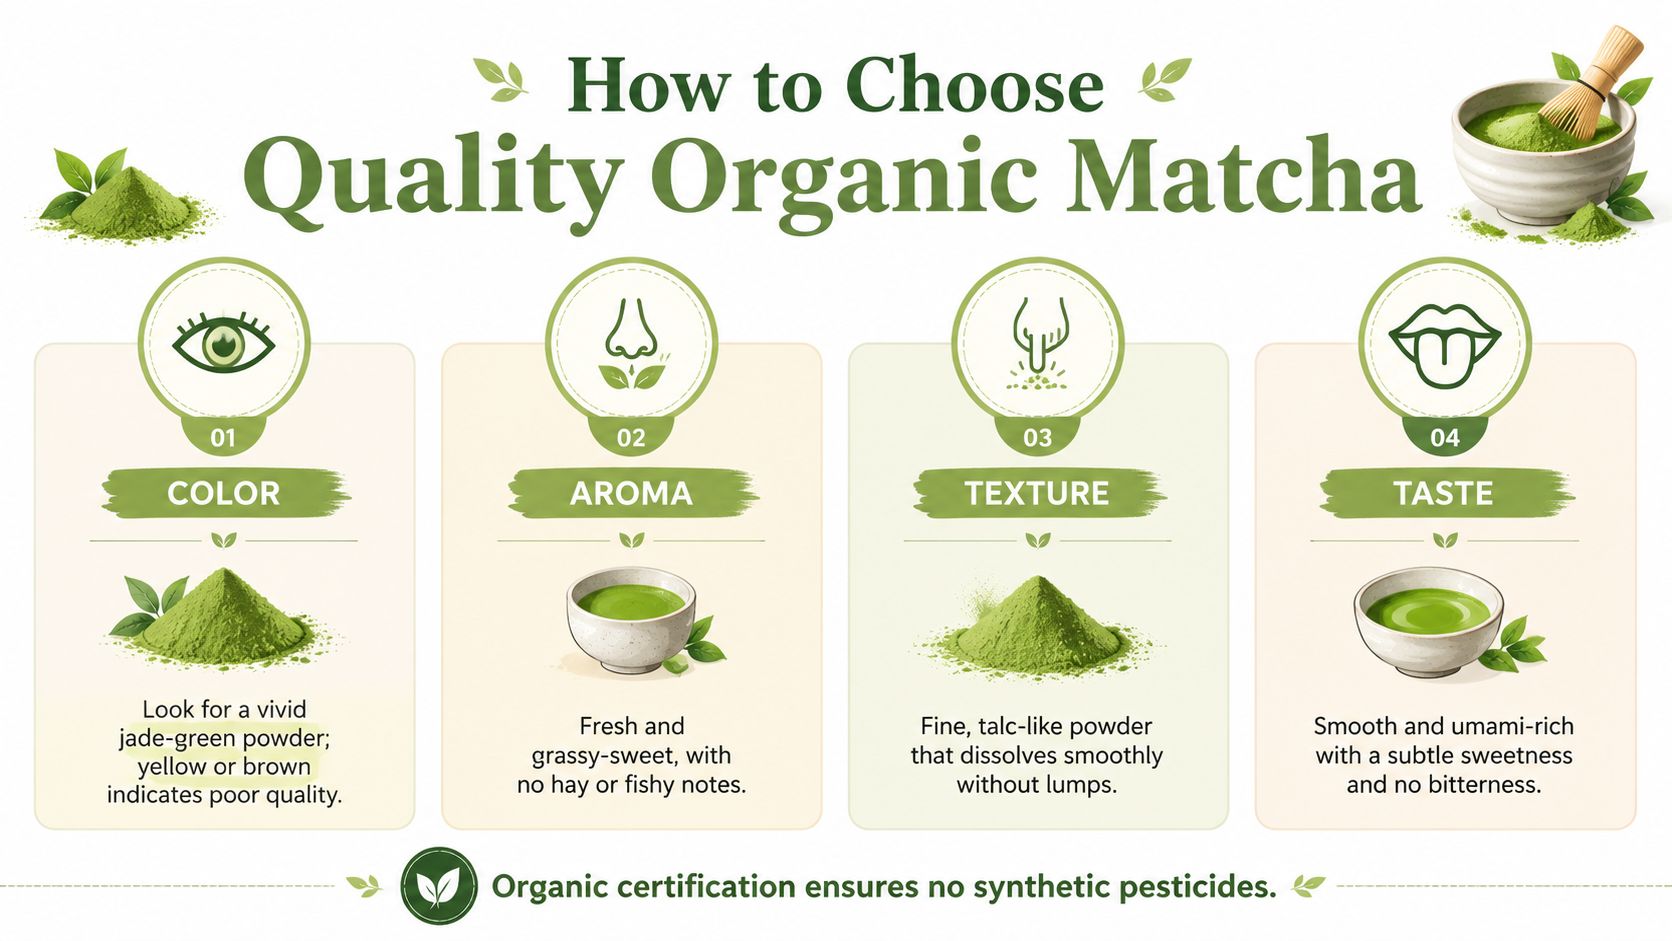
The following visual guide shows how colour, aroma, texture and taste work together:
For a deeper explanation of grades and buying cues, see PepTea's matcha grade and quality guide.
Serving Sizes, Safety, and Common Myths
A sensible starting point for many healthy adults is one level teaspoon, about 2 g, per serve. A practical daily ceiling is around three serves for most healthy adults, with less appropriate for pregnant people, children and anyone who is caffeine-sensitive. These are cautious everyday guidelines rather than a substitute for individual medical advice.
Caffeine isn't the only consideration. Tea compounds can affect the absorption of non-haem iron from plant foods, so people managing iron deficiency may want to separate matcha from iron-rich meals and discuss their routine with a healthcare professional. Drinking matcha with food may also feel gentler than taking it on an empty stomach.
What matcha isn't
- Not a detox cure: Matcha is a healthy beverage option, not a miracle treatment.
- Not the same as an extract: Concentrated green tea extracts can deliver far higher doses than a normal drink.
- Not automatically better by grade: Ceremonial grade is generally chosen for straight drinking, but it isn't a guarantee of superior health effects.
- Not unlimited energy: More powder means more caffeine and more catechins, not necessarily more benefit.
The Australian Therapeutic Goods Administration states that rare liver injury cases have been linked to concentrated green tea extracts, while the majority of green tea use, including beverage form, is unlikely to cause harm. That distinction matters. Typical matcha is a food-format drink, whereas capsules and concentrated extracts deserve more caution, particularly if you have a medical condition or take medication.
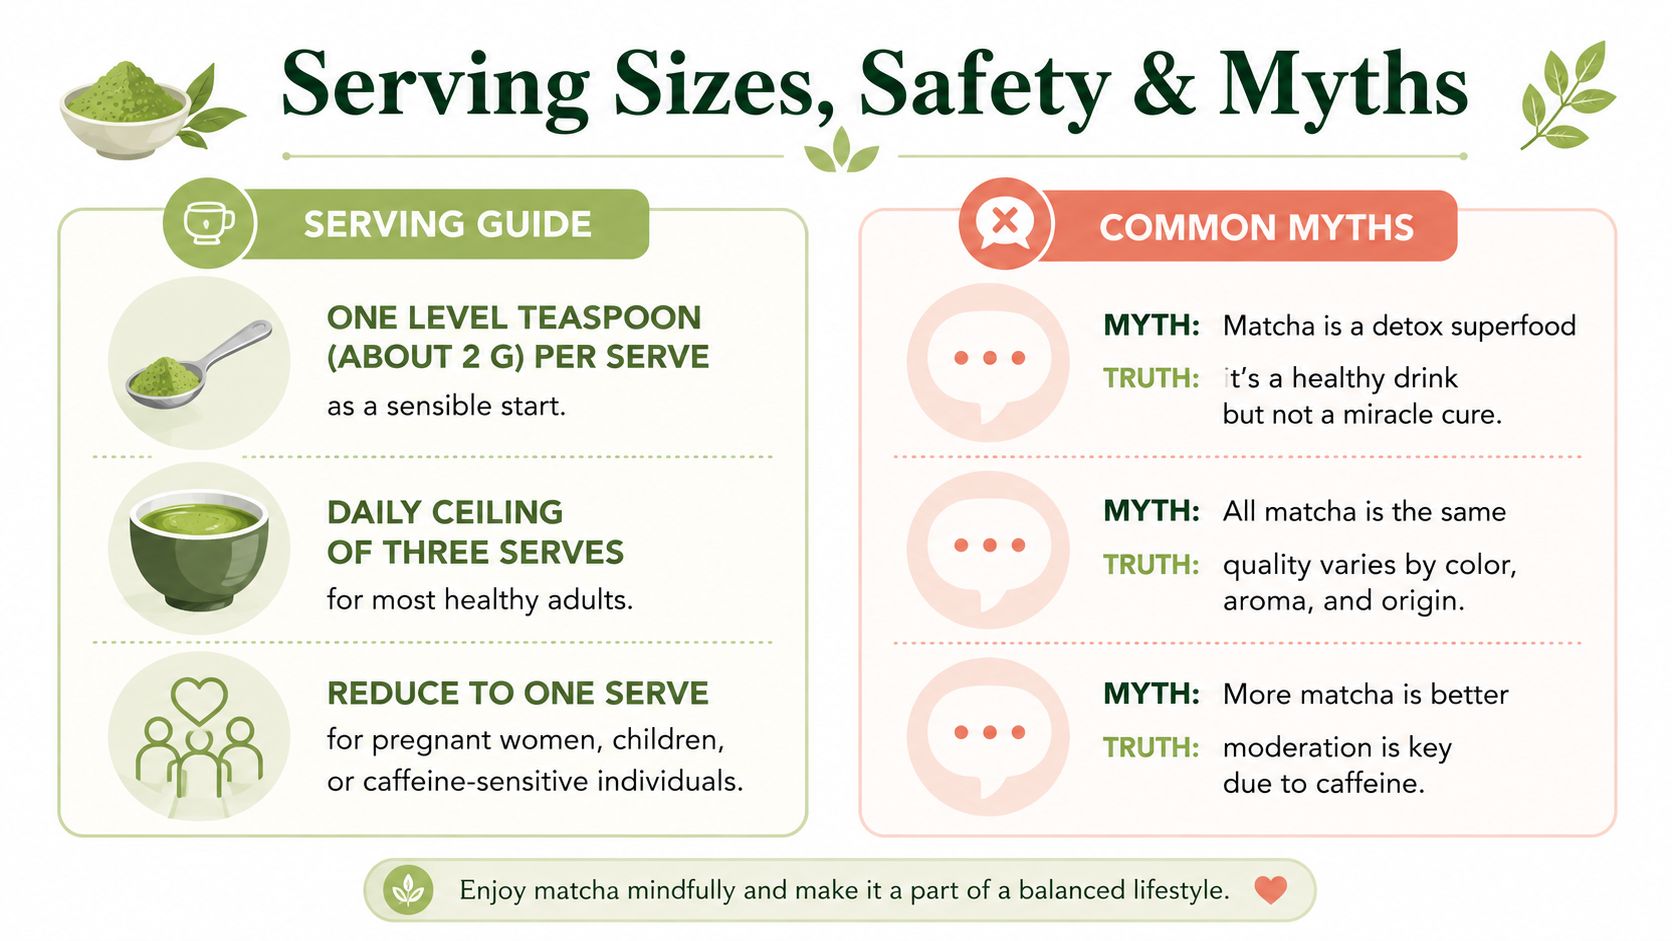
Bringing Matcha Into Your Routine
The easiest routine is the one you can repeat. Start with one morning matcha in place of a coffee, using a modest serving and no added sugar. Give yourself time to notice the flavour, alertness and effect on sleep before adding another serving.
Keep a small sealed tin beside the kettle, but store it away from heat and direct light. Whisking matcha into hot water is the quickest default. Across the week, you can turn the same powder into an iced oat latte, a smoothie, overnight oats or a yoghurt bowl.
A pre-workout or mid-afternoon serve may suit some adults, but caffeine tolerance varies. If you notice restlessness or disrupted sleep, reduce the amount or move matcha earlier. Pregnant people, children and people taking medication should seek personalised advice before making matcha a daily habit.
Consistency matters more than chasing perfect gram precision. Choose a grade that fits your use, buy a quantity you'll finish while fresh, and treat matcha as one useful beverage within a varied diet rather than as a replacement for proper meals or medical care.
PepTea offers organic Japanese matcha for straight drinking, lattes and cooking, making it a convenient Australian source for readers who want to begin with a clearly defined product and serving style.
Explore the organic matcha range at Pep Tea and choose a powder suited to whisking, lattes or recipes. Start with one simple morning serve, then build your matcha routine around the flavour and caffeine level that work for you.
Kombucha Continuous Brew vs Batch: Which Method Suits You
The popular advice is simple: continuous brew is easier, while batch brew is old-fashioned and labour-intensive. That's only half the story. For Australian home fermenters and cafés, the more important question is whether the method gives you reliable control over alcohol, pH, flavour and service timing.
A continuous vessel can keep kombucha available with regular draw-offs, but its living contents change as fresh sweet tea enters the system. Batch brewing takes more planning, yet each fermentation has a defined beginning and end. If your kombucha needs to sit on a café menu as a dependable non-alcoholic option, convenience alone isn't a sufficient reason to choose continuous brew.
| Factor | Batch brew | Continuous brew |
|---|---|---|
| Basic system | Separate fermentation cycles | One active vessel with regular draw-off and refill |
| Control | Clear fermentation window and harvest point | Rolling system with changing liquid composition |
| Workflow | Brew, ferment, bottle, clean and restart | Draw finished kombucha, then replace the removed volume |
| Flavour | Easier to vary by cycle | More consistent when managed well, but can drift |
| Compliance focus | Easier to isolate and test a finished run | Requires close attention to refill, dwell time, pH and alcohol |
| Best fit | Experimentation, traceable production and wholesale | Steady household or café service with disciplined monitoring |
Why the Wrong Kombucha Brewing Method Costs You More Than Time
Continuous brew isn't a universal shortcut. It can reduce the number of full resets, but it also creates a system where fresh sugar, active culture, temperature and time interact continuously. If the balance changes, the result can be more acidic, more alcoholic or less predictable than the last pour.
That matters in Australia because alcohol in kombucha isn't merely a flavour issue. National surveillance found 35.2% of kombucha samples below 0.5% ABV, 41.9% between 0.5% and 1.15% ABV, and 22.9% above 1.15% ABV in the coordinated survey of fermented soft drinks (Australian fermented soft drinks alcohol and labelling survey). NSW Health has also reported that around 65% of tested kombucha samples exceeded 0.5% alcohol. A drink intended for a non-alcoholic menu can therefore become a labelling and licensing problem if the operator assumes the recipe alone determines the final ABV.
Start with the use case
Ask three practical questions before buying a vessel:
- How will you serve it? A household drinking small amounts at home has a different rhythm from a café pouring kombucha throughout service.
- How much control do you need? Batch brewing gives you a discrete ferment to taste, test and release. Continuous brewing gives you a moving target.
- What happens when the brew goes wrong? With a batch, you can quarantine one run. With continuous brew, an off-balance culture affects the liquid already in the vessel and the tea you add next.
Practical rule: Choose continuous brew for a steady service rhythm only if you're prepared to monitor it like a production system, not treat it like a countertop appliance.
The Australian category itself developed from small, culture-led fermentation into larger operations. MOJO Beverages began commercial production in South Australia in 2009, and by 2022 Melbourne-based Remedy had a production line capable of filling 20,000 brown glass bottles per hour after brewing for about 30 days, according to the Australian food timeline for kombucha. Those milestones show why vessel management, timing and consistency matter as production grows.
The wrong method can cost you wasted tea, spoiled product, difficult flavour conversations with customers and non-compliant stock. For a café, the risk sits at menu level. For a home brewer, it may mean a vessel that's hard to control or a brew that no longer tastes pleasant.
How Continuous Brew and Batch Brew Actually Work
Batch brew is a closed-cycle process. You prepare sweet tea, cool it, add starter liquid and a SCOBY, cover the vessel and allow primary fermentation to proceed. Australian industry commentary commonly places primary fermentation around 7 to 10 days, with secondary fermentation often occurring in the bottle (Australian kombucha production history and fermentation commentary).
A practical batch workflow looks like this:
- Brew tea and dissolve the required sugar while the liquid is warm.
- Cool the tea before adding mature kombucha and the SCOBY.
- Cover the vessel with a breathable cloth and keep it away from direct sunlight.
- Taste and measure during fermentation rather than relying on the calendar alone.
- Harvest the full batch, reserve mature starter for the next run, then clean the vessel.
Batch recipes often use a smaller starter proportion and ferment for 5 to 7 days at about 25 degrees Celsius, as described in Australian continuous-brew guidance. The exact recipe varies, but the important feature is the reset. Each run receives a defined tea volume and a defined starter amount, so you can record what went in and what came out.
Continuous brew uses a different physical arrangement. A spigot-equipped vessel holds mature kombucha and its SCOBY, and you draw off a portion from the bottom before replacing that volume with cooled sweet tea. One Australian setup reserves roughly 400 mL of finished kombucha and SCOBY to seed a 4 L vessel, then draws 250 mL to 500 mL daily and replaces it immediately. Another Australian supplier describes a 5 L jar that leaves 50% fermented liquid as starter. These operating details are set out in Australian continuous-brew instructions.
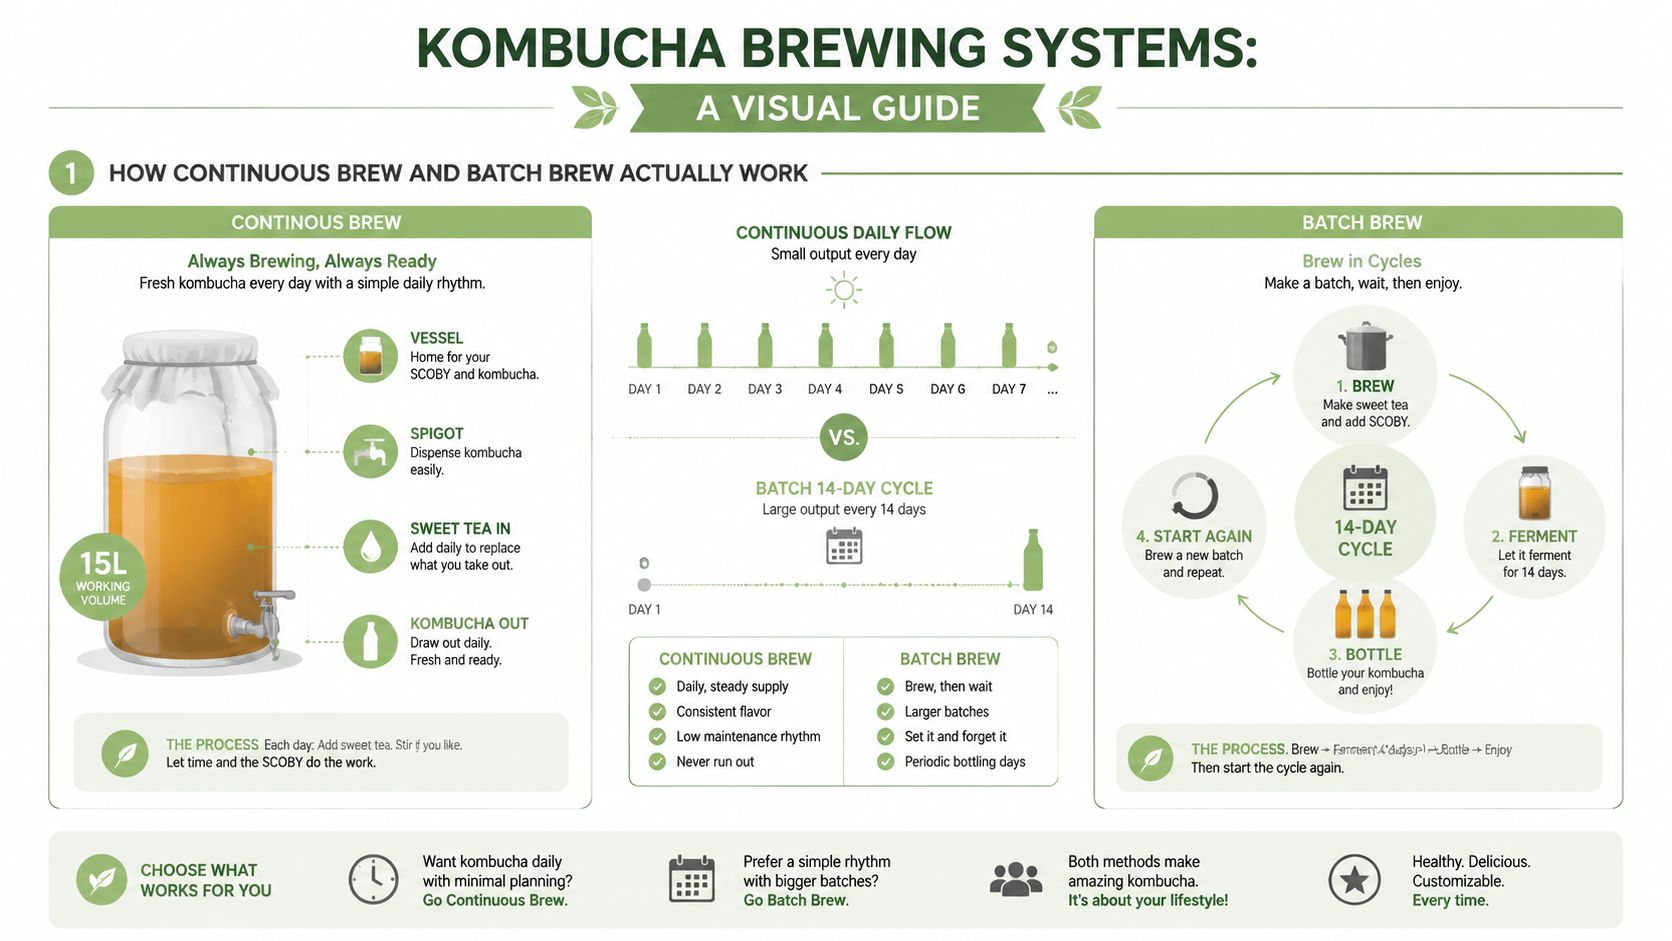
The spigot changes the work. You don't lift a full jar each time, but you do need to keep the tap clean, make sure sediment doesn't obstruct the outlet and refill with tea at a suitable temperature. A kombucha brewing container suitable for this style of setup needs stable placement, enough clearance for a bottle or jug and a surface that can cope with drips.
Glass is easy to inspect, food-grade HDPE can be practical in some production settings, and stainless steel may suit commercial equipment when it's appropriate for acidic beverages. Whatever the vessel, the culture must remain protected from insects and contamination, and the operator must be able to clean every contact surface.
Comparing Flavour, Workflow and Equipment Needs
Batch brewing gives you a flavour arc you can follow. The tea starts sweet, acidity develops, and the brew reaches a point where you can harvest the whole vessel. That makes it easier to compare tea bases, adjust the next recipe and produce a seasonal flavour with a clear identity.
Continuous brew tends to produce a more blended profile because mature liquid remains in the vessel while new tea is added. That can be appealing for a household or café that wants a familiar tartness, but the profile can move towards vinegar if draw-off is too slow or the culture remains underfed or over-acidified. The system is consistent only when the operator keeps the inputs and harvest rhythm consistent.
| Factor | Batch brew | Continuous brew |
|---|---|---|
| Flavour control | High control over each fermentation cycle | Stable profile when draw-off and refilling remain disciplined |
| Time commitment | More work on brew and bottling days | Smaller tasks repeated more frequently |
| Equipment | Multiple vessels can support different flavours | One large vessel, spigot, bench space and drainage access |
| Cleaning | Full clean between cycles | Spigot and vessel maintenance are central |
| Scaling | Add vessels or move to controlled production tanks | Increase vessel capacity, service frequency and monitoring |
| Commercial service | Strong fit where traceability matters | Useful for steady tap service if compliance controls are robust |
| Experimentation | Easy to run separate tea and flavour trials | Harder to isolate changes inside one living system |
Batch brew also fits operators who value flavour separation. You can finish a green-tea ferment, clean the vessel and begin a black-tea run without carrying as much of the previous profile forward. That flexibility is useful for home brewers who want to test ingredients and for cafés rotating a menu.
Continuous brew wins on physical convenience once established. A spigot reduces lifting and lets staff fill service containers directly, but it doesn't remove responsibility. The vessel needs a stable home near drainage, and the outlet needs regular inspection. Sediment, yeast and SCOBY growth can affect flow, especially when the tap is narrow.
Secondary fermentation adds another layer. Bottling a finished batch lets you manage flavour additions as a separate, traceable stage. The secondary-fermentation guide is useful for understanding why fruit, sugar and warm storage can change carbonation and alcohol after primary fermentation.
For a café, the decision often comes down to labour pattern. Batch work is concentrated into planned production windows. Continuous work is distributed across the week, but staff must remember to draw, refill, record and clean. A method that looks cheaper on paper can become expensive if the team doesn't follow the same routine every shift.
Alcohol, pH and Safety Realities for Australian Brewers
The central compliance question is whether the finished drink stays below the relevant alcohol threshold, not whether the recipe is marketed as “healthy” or “non-alcoholic”. FSANZ-linked Australian and New Zealand rules identify 0.5% v/v ethanol as the key threshold for declaring kombucha as alcoholic or non-non-alcoholic, while some Australian jurisdictions treat beverages above 1.15% ABV as liquor for regulatory purposes (Australian and New Zealand fermented beverage regulatory discussion).
Continuous brew can make alcohol management less intuitive. Fresh sweet tea regularly feeds an active culture, while the vessel retains mature liquid and continues fermenting between draw-offs. If refill volumes, temperature or dwell time change, alcohol output can change too. Batch brewing doesn't eliminate alcohol production, but a defined sugar dose and a planned harvest give the operator a clearer point at which to test and release the product.
The Food Regulation outcomes paper notes that kombucha traditionally involves primary fermentation followed by bottle conditioning, and that carbonation and additional alcohol can develop during secondary fermentation (Food Regulation fermented beverages outcomes paper). Bottling isn't therefore a neutral storage step. Warm bottles and longer conditioning can continue changing the drink after it leaves the main vessel.
pH is the stop point
Australian fermented-beverage guidance treats a final pH of 4.2 or below as the relevant safety target and says the SCOBY is removed once fermentation reaches that point (Australian fermented beverages issues paper). A continuous system shouldn't run indefinitely just because it still smells acceptable. Drawing off liquid can also dilute acidity with fresh tea, so the operator needs to check the vessel rather than assume its established culture guarantees the result.
Independent food-safety guidance recommends checking pH throughout fermentation. If the product hasn't reached pH 4.2 or below within seven days, the guidance says to discard and restart, while pH below 2.5 is identified as unsafe because of over-acidification (kombucha brewing and bottling safety guidance).
| Metric | Continuous brew | Batch brew |
|---|---|---|
| Alcohol control | More variable because fresh sugar enters an active, ongoing ferment | Easier to isolate by recipe, fermentation window and release test |
| pH behaviour | Can shift after refill if fresh tea dilutes acidity | Easier to follow across one defined cycle |
| Main safety task | Record every draw, refill and measurement | Record each batch from inoculation to bottling |
| Bottle risk | Ongoing fermentation may continue after packing | Secondary fermentation can still change alcohol and carbonation |
| Best operational safeguard | Frequent, documented checks and controlled refrigeration | Release testing, consistent timing and controlled storage |
A pH meter is more dependable for production decisions than taste alone. A digital pH meter for fermentation work should be clean, calibrated according to its manufacturer's instructions and used consistently. Commercial operators may also need alcohol analysis beyond a home hydrometer or refractometer, because sugar readings alone don't provide a definitive finished ABV.
Which Method Fits Your Home, Café or Small Brewery
A home fermenter making a small amount each week usually benefits from batch brewing. The vessel can sit in a kitchen corner, the brewer can choose a different tea for the next cycle and one finished run can be bottled or refrigerated before the next begins. The main risks are forgetting the fermentation, letting the brew over-acidify or creating too much pressure during bottle conditioning.
A café has a different problem. The team needs an available drink during service, and a continuous vessel can reduce the number of full brewing resets. That convenience comes with a management burden. Staff need a written routine for draw-off, refill, pH checks, refrigeration and alcohol control, and someone must own the record rather than assuming “the kitchen” will handle it.
A small brewery supplying wholesale customers needs repeatability above all else. Batch production makes it easier to assign a lot identity, record ingredients and fermentation conditions, hold finished stock and investigate a problem without affecting every vessel at once. Larger systems still need careful process control, but the batch structure supports clearer traceability and labelling decisions.
| Operator | Better starting point | Why it fits | Main risk |
|---|---|---|---|
| Home brewer | Batch | Low complexity and easy flavour changes | Inconsistent timing or over-fermentation |
| Café with regular tap service | Continuous, with testing | Steady output and fewer full resets | Alcohol or pH drift across refills |
| Small wholesale producer | Batch at scale | Traceability and repeatable release decisions | More cleaning, vessels and production planning |
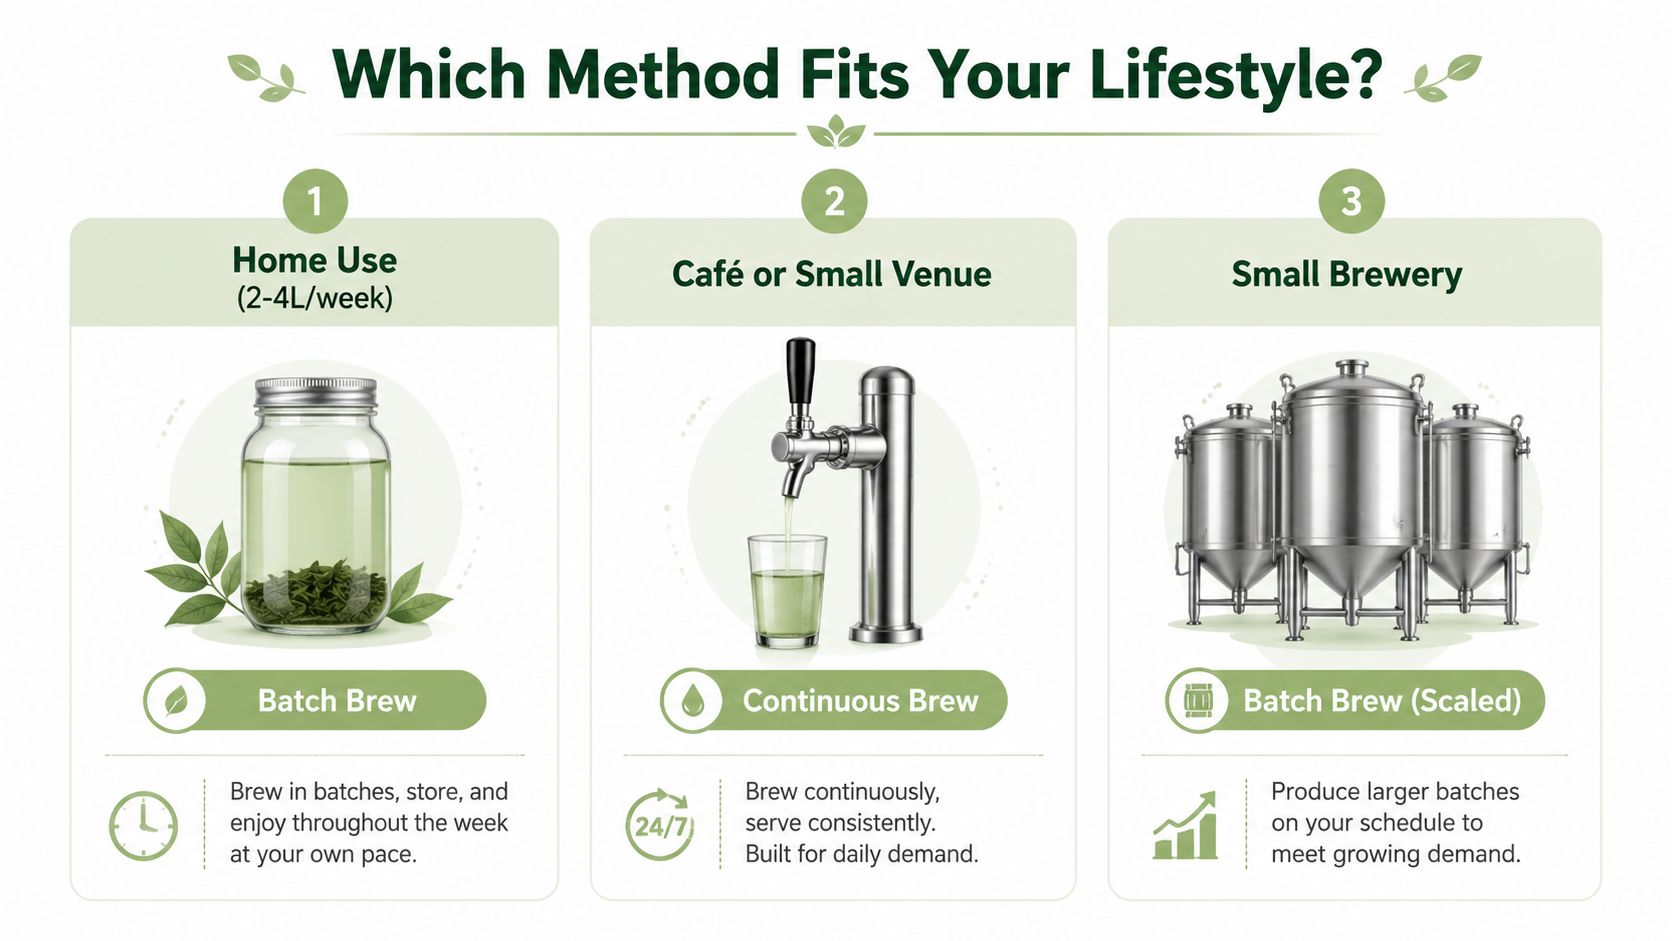
Many hospitality operators will eventually use both approaches. Continuous brew can serve a house kombucha where the profile stays familiar, while batch brewing can support limited releases, different tea bases or flavours that need to remain separate. That hybrid model makes sense when the menu has both an everyday pour and occasional products that require tighter control.
The most useful decision isn't “which method is best?” It's “which method can this team operate correctly every week?” A café with excellent equipment but inconsistent records is less prepared than a smaller venue with a simple batch process that staff follow without shortcuts.
For a visual overview of the three operating models, watch the brewing comparison below.
Troubleshooting and Recipe Adjustments for Each Method
Continuous brew problems usually begin with a disrupted rhythm. If alcohol appears to be creeping upward, reduce the amount of fresh sweet tea added at each refill or harvest more often, then test rather than guessing. If pH rises after a refill, check whether the new tea has diluted the mature liquid too heavily and review the starter proportion before changing the entire recipe.
A blocked spigot is a mechanical warning. Yeast and SCOBY material can restrict flow, so clean the tap and inspect the vessel during scheduled maintenance. Don't scrape or disturb the culture unnecessarily, but don't keep pouring through a visibly obstructed outlet either.
Batch failures are easier to isolate:
- Stalled fermentation: Check the room temperature, tea strength and starter health. A batch that remains sweet and inactive may need a sounder starter process, not just more time.
- Weak carbonation: Standardise the priming approach and bottle-conditioning conditions. Refrigeration slows fermentation, but it won't reverse pressure that has already developed.
- Over-fermented flavour: Tighten the tasting and harvest window. Vinegar notes usually mean the brew stayed active longer than your preferred flavour profile.
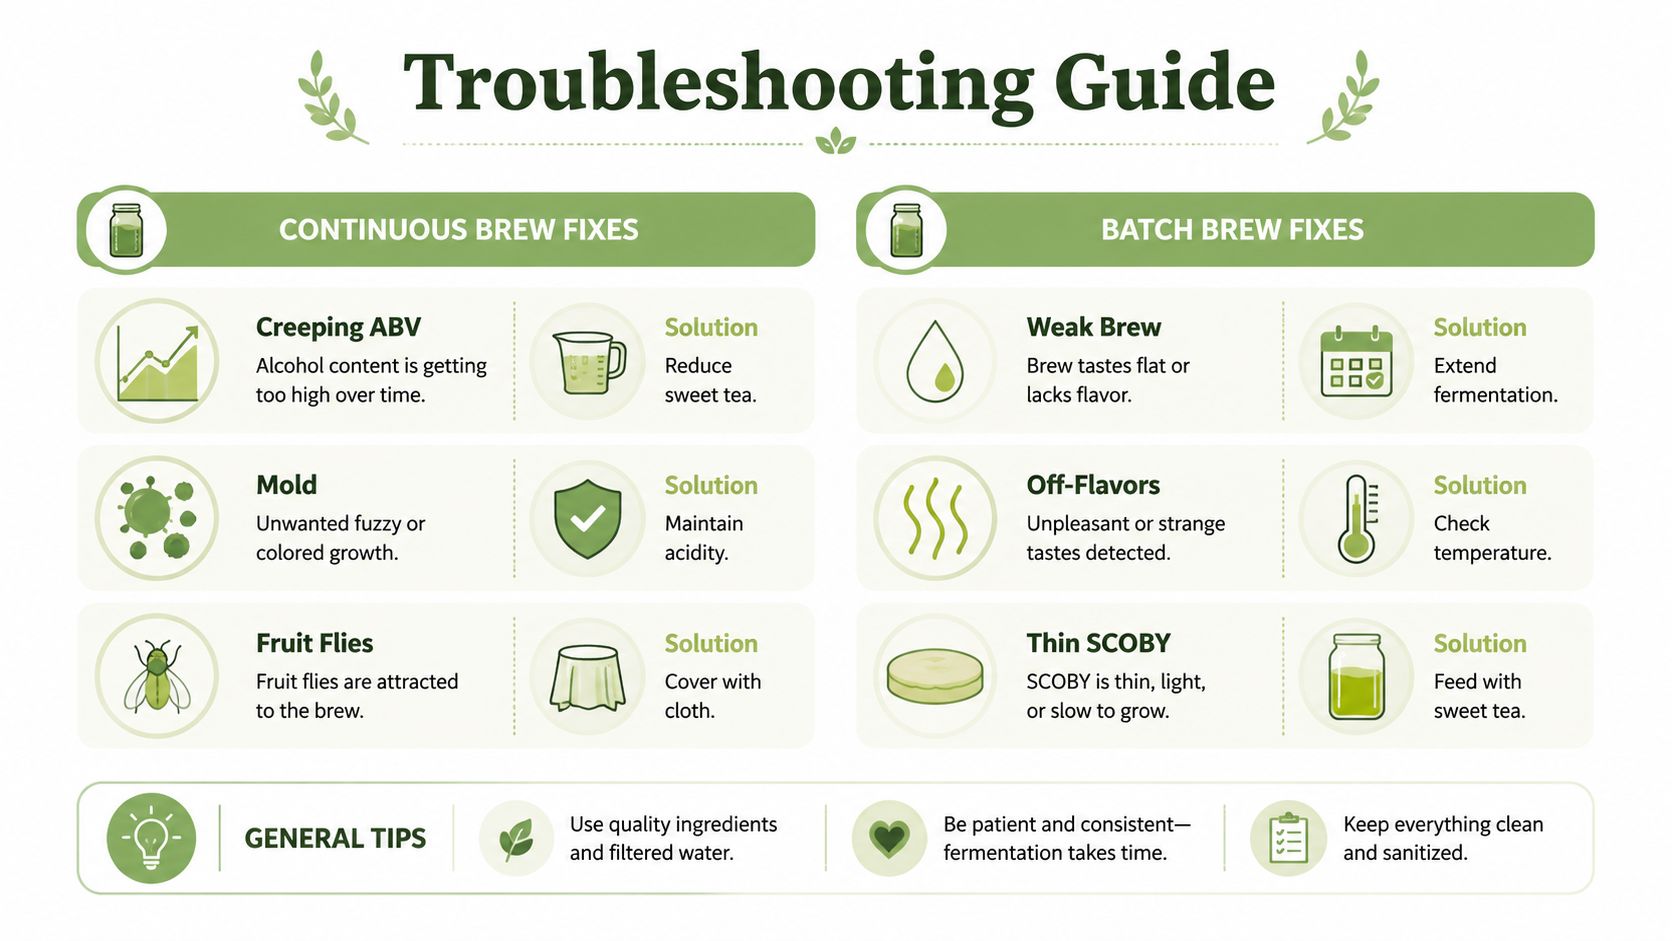
Australian weather changes the pace. Warm summer conditions can accelerate fermentation and alcohol development, while cooler winter conditions can slow activity. Keep the brewing location consistent, log temperature qualitatively and adjust the fermentation window rather than blindly adding more sugar.
“Sugar-free” also needs careful wording. Kombucha requires fermentable sugar for the culture to work, so a finished product may be low in residual sugar without beginning as sugar-free tea. If you're adapting a recipe for a lower-sugar finished drink, change the formulation cautiously and verify pH and alcohol because reducing or replacing fermentable ingredients can alter fermentation behaviour.
The fix for one system may damage the other. Harvesting more often can help a neglected continuous vessel, but it can also destabilise a small batch if applied without understanding the starter ratio. Record the change, make one adjustment at a time and judge the next measured result.
Choosing the Right Brew Method and Tea Base
Choose batch brew if you're a home brewer who wants clear start and finish points, simple flavour experiments and a straightforward reset. Choose continuous brew if you're a café operator with steady demand, enough space for a spigot vessel and the discipline to monitor pH, alcohol and refill timing. Choose scaled batch production if you're moving towards wholesale and need stronger traceability and labelling control.
Neither system can rescue poor tea. A clean organic black or green tea gives the SCOBY a dependable base and lets the finished drink express the tea rather than masking problems with flavourings. For an organised trial, commit to one method for 30 days, log pH and taste weekly, and only then decide whether to change systems.
Pep Tea offers premium organic Japanese Matcha alongside proudly Australian-brewed sugar-free organic Kombucha made in the Hunter Valley, NSW. Visit Pep Tea to explore quality tea and kombucha options for home routines, cafés and carefully managed fermentation programmes.
Kombucha Second Fermentation: A Practical Australian Guide

Most home guides treat kombucha second fermentation as a simple flavouring step. Add fruit, seal a bottle, wait a few days, and expect fizz. That advice misses the part that causes the most trouble in Australian kitchens: a sealed bottle is a pressure vessel, and the second ferment can also increase alcohol in the finished drink.
The common assumption that any sturdy-looking glass bottle will cope is unsafe. Bottle choice, residual sugar, temperature, pH, headspace, hygiene and storage all work together. A cool Tasmanian kitchen and a warm Queensland bench won't produce the same result from the same recipe. For home brewers, cafés and small producers, the right mindset is simple: treat second fermentation as a managed pressure operation, not a set-and-forget stage.
Why Second Fermentation Trips People Up
Once you add fruit, juice or sugar to finished kombucha and seal the container, the remaining yeast has access to fresh fermentable material. Yeast consumes that sugar and produces carbon dioxide. In an open vessel, the gas escapes. In a sealed bottle, it dissolves into the drink and raises internal pressure.
That pressure is what creates natural carbonation, but it can also cause leaking seals, cracked shoulders, broken swing-top hardware or shattered glass. Ordinary kitchen jars and decorative bottles aren't designed for this job. Even a bottle that looks thick may have weak seams, tired glass or a closure that can't safely release pressure.
Bench rule: If the container wasn't made for carbonated drinks, don't use it for a sealed second ferment.
The failures that appear in practice aren't always dramatic at first. A crown seal may pop, a swing-top may shear at the hinge, or a bottle may develop a fine stress fracture around the shoulder. A reused bottle can look perfectly sound until pressure exposes damage from earlier washing, thermal shock or repeated opening.
Australian heat changes the timing
Warm conditions accelerate yeast activity. Australian recipes written for cooler indoor temperatures can become unreliable during summer, particularly when bottles sit in a warm pantry, café storeroom or delivery vehicle. The Australian fermented-beverages issues paper identifies secondary fermentation, also called bottle conditioning, as a difficult process to standardise because the closed system retains carbon dioxide and changes the drink's alcohol and flavour profile. The Australian government issues paper on fermented beverages also explains that alcohol can't be converted to acetic acid inside the sealed system in the same way, so the drink can become carbonated while developing small amounts of alcohol.
That makes “leave it for a few days” poor control language. You need to know how much sugar went into each bottle, how warm the room is, how active the yeast is and how often you'll inspect the containers. A bottle that behaves calmly in a cool kitchen may over-carbonate quickly in a hot one.
The safest approach is to control the inputs first, choose packaging designed for pressure, inspect bottles daily and refrigerate as soon as the carbonation reaches the level you want. Second fermentation is useful for flavour and fizz, but it isn't harmless because the base drink began as tea.
Preparing Your Base Brew and Flavour Additions
A good second ferment starts with a stable primary brew. Don't bottle a sweet, barely acidified batch just because it tastes pleasant. Australian food-safety guidance recommends a tightly controlled first fermentation of about 7 days, with the pH checked by day 7 and driven below 3.0. Australian kombucha food-safety guidance also stresses clean equipment, warm airflow and covers that keep out fruit flies and wild microbes.
For a continuous brew, leave enough mature, acidic liquid behind to protect the next batch and keep the SCOBY covered. The exact volume depends on the vessel and working method, so use the established starter proportion for your system rather than draining it nearly dry. Draw off only the clarified portion you can bottle promptly, leaving heavy yeast sediment and loose culture material behind when a cleaner pour matters.
Check the base before flavouring
Use a calibrated pH meter rather than taste alone. A pleasant balance usually sits around pH 3.2 to 3.5, but safety control is broader than flavour preference. Food Standards Australia New Zealand guidance says kombucha should reach pH 4.2 or less during fermentation to become a non-potentially hazardous food, while finished products commonly sit at pH 2.5 or above. FSANZ guidance on fermented beverages also warns that continued fermentation can bring excess pressure, leakage and unsafe alcohol levels.
For a 750 mL bottle, a practical flavour trial might use:
- Juice and sugar: roughly 10 to 20 g sugar with 40 to 80 mL juice.
- Crushed fruit: roughly 30 to 50 g, strained later if sediment and pectin are a concern.
- Spice blends: ginger with turmeric, or hibiscus with lime, added in restrained amounts so the base tea remains recognisable.
- Low-sugar batches: flavour with aromatic herbs, citrus peel or tea infusions, but accept that less available sugar may mean less measurable carbonation.
A sugar-free second ferment is a contradiction if you expect strong natural fizz. Yeast needs accessible fermentable material. Cream of tartar, cold bottling and flavour-only additions can influence the result, but they don't replace a controlled sugar source.
Keep additions clean and predictable
Wash fruit, sanitise bottles, funnels and caps, and avoid additions that introduce unnecessary risk. Raw honey can carry variable microorganisms, fresh garlic is a poor fit for an acidic bottled drink, and untreated tap water can add contaminants or chlorine that disrupts flavour.
For repeatable café production, strain purées before filling and record the addition weight, bottle size, room temperature and bottling time. A PepTea kombucha tea kit can help newer brewers organise the core equipment, but no kit removes the need to measure pH and manage pressure.
Choosing Bottles and Managing Carbonation Pressure
Bottle selection is where popular advice often falls short. Flip-top glass is convenient, reusable and visually appealing, but it isn't automatically the safest choice. Australian food-safety material cautions that sealed glass vessels can become hazardous during secondary fermentation and points to high-quality BPA-free plastic bottles as easier to monitor for pressure.
The four formats below each solve a different problem. The cost column is qualitative because retail prices vary by supplier, pack size and bottle condition.
| Bottle type | Pressure tolerance | Reusability | Approx. cost (AUD) | Daily pressure check | Best use |
|---|---|---|---|---|---|
| 750 mL swing-top glass | Pressure-rated glass only, with conservative use | High if undamaged | Moderate | Listen for hiss and inspect the seal | Controlled, lower-sugar batches |
| Pry-off beer bottle | Depends on the bottle's carbonation rating and cap | Moderate | Low to moderate | Cap inspection is less convenient | Drier batches with suitable capping equipment |
| Soda-style PET | Thick PET gives visible expansion and pressure feedback | Limited to moderate | Low | Squeeze test is straightforward | Warm conditions and higher-flavour batches |
| Re-used kombucha bottle | Unknown unless the manufacturer confirms pressure suitability | Variable | Low if already owned | Difficult to assess reliably | Avoid for unverified second fermentation |
Choose monitoring over appearance
For glass, a conservative working ceiling is around 2 to 3 volumes of CO₂, while thick PET can tolerate 4 or more volumes in suitable designs. Those figures aren't a licence to chase maximum carbonation. Treat the lower end as a practical boundary, inspect every bottle and retire any container involved in a pressure event.
PET is the sensible choice for a high-sugar fruit batch in warm weather because the bottle gives you tactile feedback. As pressure rises, it becomes firmer. Glass gives no equivalent warning before failure. For lower-sugar, drier ferments, a purpose-made thick champagne-style bottle can work, but it still needs an intact closure and a conservative process.
Use a daily burp-and-test routine
Crack the closure carefully, listen for a controlled hiss and compare the result with a known-good batch. Don't shake the bottle before opening. Log the ambient temperature, because a small change in room conditions can alter the pace of carbonation.
A Brisbane kitchen at 28°C in July will drive activity faster than a Hobart kitchen at 18°C. The bottle doesn't know which recipe you copied. It responds to sugar, yeast and heat.
Serious small-scale producers should consider inexpensive pressure gauges on test containers or a pressure-rated vessel designed for beverage work. After any cracked bottle, blown seal or unexplained leak, retire the affected bottle and inspect the rest from the same batch. Never assume identical-looking bottles have identical histories.
Temperature, Timing, and Reading the Ferment
Second fermentation behaves best in a moderate indoor range of 22 to 26°C. At that temperature, yeast usually has enough activity to build carbonation without the rapid escalation that can occur in a hot room. In a cool Tasmanian kitchen, the same batch may need longer, while a summer pantry can move from flat to over-pressurised before the brewer expects it.
Use time as a guide, not a guarantee. For 250 to 500 mL bottles, a practical inspection pattern is:
- Around 15°C: allow a slower progression and check patiently rather than adding more sugar too early.
- Around 22 to 26°C: inspect from the first day and expect active carbonation to develop over several days.
- Above 30°C: shorten the room-temperature period and move to refrigeration earlier.
- Fruit additions: often need roughly 24 to 72 hours for flavour and carbonation to develop.
- Ginger additions: may take around 2 to 4 days, depending on sugar and yeast activity.
- Flavour-only infusions: can run around 4 to 7 days, but remove them sooner if the flavour becomes harsh.
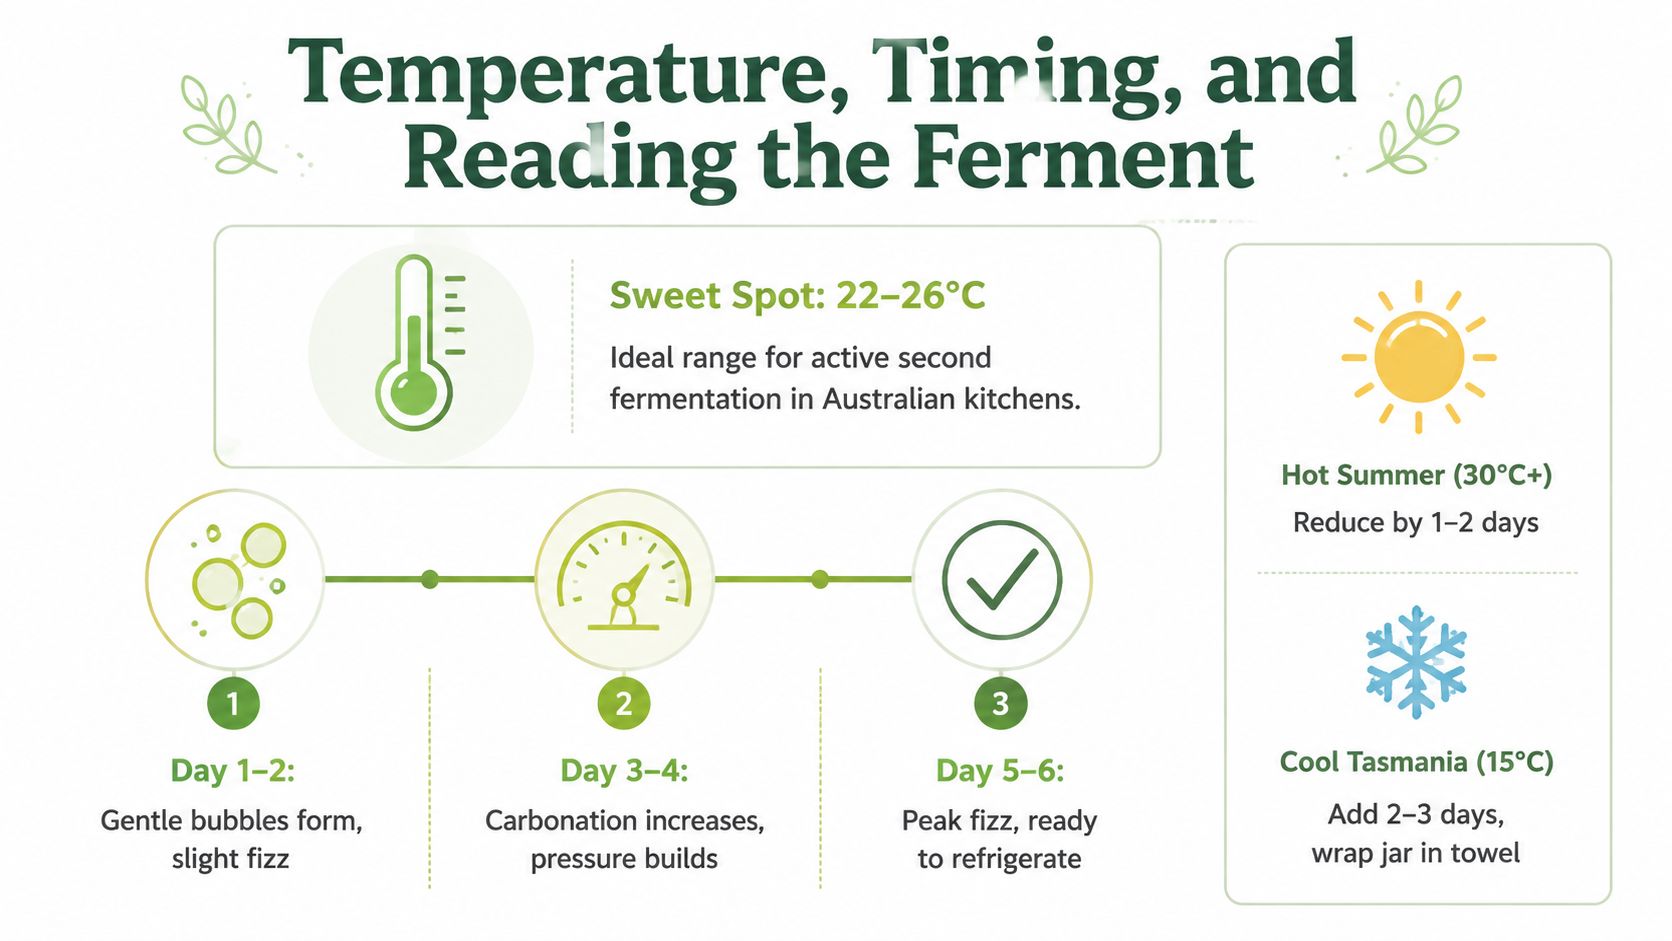
Read the bottle, not just the calendar
A PET bottle should become noticeably firmer as carbonation builds. With glass, look for a soft hiss on opening, fine bubbles clinging to fruit and a flavour shift from sweet towards drier and more acidic. None of these signs replaces pH or alcohol testing, but they help you decide when to refrigerate.
Bottling at the full sweetness of a primary brew is a common cause of gushers. The yeast has too much accessible sugar, then continues working inside a sealed container. Start with a balanced base, add measured flavouring and avoid treating sweetness as harmless.
After the second day, burp swing-tops carefully if the bottle is building pressure. Refrigerate when the bottle feels suitably firm and the opening test gives the carbonation you want. Cold storage slows fermentation, but it doesn't erase the pressure already present, so chill bottles in a way that keeps them contained and handle them gently.
For accurate pH readings before bottling, use a digital pH meter for kombucha. A meter gives you a repeatable control point that taste and bubble size can't provide.
The following video shows the practical visual cues of a working ferment and carbonation stage.
Safety, Pressure, and Alcohol Control
Kombucha isn't automatically non-alcoholic because it contains tea, nor does refrigeration guarantee that a poorly controlled batch is compliant. During bottle conditioning, trapped carbon dioxide and ongoing yeast activity change the drink after the SCOBY has been removed.
Australian survey data shows the scale of the problem. Around 65% of tested kombucha samples exceeded 0.5% ABV, according to the Australian fermented-beverages issues paper. A separate Food Standards Australia New Zealand survey found 35.2% of kombucha samples below 0.5% ABV, 41.9% between 0.5% and 1.15% ABV, and 22.9% above 1.15% ABV. The FSANZ survey summary shows why a low-alcohol claim needs process control and verification, not confidence based on taste.
Compliance point: If you sell a bottle as non-alcoholic or low-alcohol, confirm the finished product through an appropriate testing and labelling process.
Treat pressure ratings as limits, not targets
A practical ceiling for PET is around 4 atmospheres, while standard glass swing-tops may be rated around 3 atmospheres. In real use, treat ordinary swing-top glass more conservatively, around 2 atmospheres, because bottle age, damage and closure condition reduce confidence.
| Bottle type | Safe working pressure | Best for | ABV risk at typical 3-day ferment |
|---|---|---|---|
| Thick PET | Up to about 4 atmospheres when suitable for carbonation | Warm rooms and easy pressure monitoring | Moderate to high if sugar remains available |
| Pressure-rated swing-top glass | Treat conservatively, around 2 atmospheres in practice | Measured, lower-sugar batches | Moderate |
| Thick beer bottle | Use only when pressure suitability is known | Controlled carbonation with reliable caps | Moderate |
| Mason jar or repurposed decorative glass | Unpredictable | Not recommended | Uncontrolled |
Keep added sugar restrained, with a practical target of 10 to 15 g per litre for batches where alcohol and pressure need tight management. Refrigerated starter liquid can reduce the active yeast load, and finishing the ferment cold slows further activity, but neither approach proves the final ABV.
Release pressure without creating a hazard
Wear eye protection for a suspicious bottle, keep it away from your face and open it outdoors or inside a contained sink. Cover the closure with a cloth, release pressure slowly, stop if the seal starts to deform and never force a swollen cap.
Discard bottles with cracked shoulders, leaking seals or gaskets that no longer spring back. If one bottle has failed, don't continue using the rest without checking their condition and reviewing the batch's sugar, temperature and timing. Australian guidance also notes that some manufacturers use carbonation instead of bottle fermentation specifically to reduce alcohol production. That option may suit cafés seeking more predictable non-alcoholic service.
Troubleshooting Common Second Fermentation Problems
A second ferment gives you useful clues if you read the bottle and liquid together. Start with the simplest controllable variable, usually sugar, temperature, seal or fruit load, before blaming the SCOBY.
Use this bench checklist
- No carbonation after five days: Check the bottle seal, then squeeze a PET bottle or open one glass bottle carefully. If there's no hiss and the base tastes very dry, the yeast may have little sugar left. Move the next batch into a warmer, controlled area and add a measured fermentable addition rather than repeatedly opening the current bottle.
- Over-carbonated gushers: Chill the bottle fully, open it over a sink and let pressure release in stages. The likely causes are high residual sugar, too much juice, excessive fruit pulp or heat. Reduce the addition and shorten the warm stage next time.
- Off-flavours from fruit: Taste the base and fruit separately. Overripe fruit, bruised produce, excessive extraction or contaminated additions can create stale, vegetal or medicinal notes. Strain the batch if the flavour is clean but heavy, and discard it if the aroma is putrid or mouldy.
- Cloudy or stringy texture: Sediment can come from yeast, fruit pectin or culture fragments. Let the bottle settle cold, then pour gently. A rotten smell, visible mould or unusual surface growth means discard the batch rather than re-conditioning it.
- Bottles go flat in storage: Check the closure and fill level. A weak seal, too much headspace or repeated opening lets carbon dioxide escape. Re-condition only a clean, sound batch in pressure-rated packaging, and don't re-use a leaking bottle.
- Yeast floaters: Swirling sediment is common in living kombucha, especially with fruit. Chill, settle and pour carefully. If the particles look unusual or the smell is wrong, don't rely on appearance alone.
- Vinegar or solvent aroma: Excessive primary fermentation, oxygen exposure, heat stress or an unbalanced microbial population may be involved. A sharp but clean acidity can be a flavour issue, while solvent-like, rotten or mouldy aromas warrant dumping the batch.
| Symptom | Likely cause | Diagnostic check | Fix |
|---|---|---|---|
| Flat after five days | Low sugar or poor seal | Taste, inspect closure | Adjust sugar and seal next batch |
| Gusher | Too much sugar, fruit or heat | Chill and open slowly | Reduce addition and warm time |
| Harsh fruit flavour | Overripe fruit or long extraction | Taste strained liquid | Shorten contact time |
| Cloudy or stringy drink | Yeast, pectin or culture material | Settle cold and inspect | Strain if clean, discard if suspect |
| Flat in storage | Leaking closure or excess headspace | Inspect cap and gasket | Use sound packaging |
| Yeast floaters | Normal sediment or contamination | Check smell and appearance | Settle and pour, or discard |
| Vinegar or solvent aroma | Over-fermentation or contamination | Smell the base and bottle | Discard if solvent-like or mouldy |
Don't rescue a batch with mould, putrid odour, swollen packaging or a damaged bottle. Re-conditioning is appropriate only when the liquid smells clean, the container is sound and the fault is clearly low carbonation.
Storage, Scaling, and Café Recipe Ideas
Cold storage is the final control point. Refrigerating finished kombucha at 2 to 4°C slows yeast activity and helps hold the carbonation you've already created. It doesn't make an unsafe batch safe, so pH, hygiene, pressure history and alcohol control still need attention before retail or café service.
For a household, bottling a modest weekly quantity is manageable with written batch records. A café producing a larger weekly volume needs a different system, including pressure-rated vessels, sanitation records, pH checks, traceable flavour additions and a documented cold chain. Don't assign a best-before date by guesswork. Retail products need a date and labelling approach that aligns with applicable Food Standards Australia New Zealand requirements and the product's validated shelf-life evidence.
Move from kitchen batches to service-ready production
Bulk flavouring in a pressure-rated stainless-steel or PET vessel can make filling more organised before final bottling. It may reduce active labour by roughly 40 percent, but that figure is process-specific and should be validated against your own workflow, equipment and cleaning time rather than assumed.
A café menu also benefits from measured builds. Each serve below is designed around a 250 mL pour, with additions prepared in advance and the bottle opened only at service.
| Recipe | Base F2 Ratio | Flavour add-ins per 250 mL | Target carbonation | Menu price point (AUD) |
|---|---|---|---|---|
| Ginger lemon | Kombucha base with a restrained ginger infusion | Lemon juice and fine ginger, measured for balance | Light to medium | Set from local ingredient and labour costs |
| Strawberry basil | Kombucha base with strained strawberry infusion | Strawberry purée and basil aroma | Medium | Set from local ingredient and labour costs |
| Native finger lime and hibiscus | Hibiscus-infused kombucha | Finger lime pearls added at service | Medium | Set from local ingredient and labour costs |
| Low-sugar turmeric chai | Dry, tea-forward kombucha base | Turmeric, chai spices and minimal fermentable addition | Light | Set from local ingredient and labour costs |
A barista can pour the chilled base, add the prepared flavour component and garnish without leaving fruit fermenting in the service bottle. That keeps the menu more consistent and reduces the temptation to bottle unmeasured juice into pressure-sensitive packaging.
For storage procedures, see how to store kombucha safely. Cafés should also separate stock by batch, record opening dates and keep bottles cold from delivery through service.
Pep Tea offers Australian organic tea products and sugar-free organic kombucha for households and hospitality businesses, with options suited to clean, non-alcoholic menu development. Visit Pep Tea to explore the range and connect your second-fermentation practice with dependable brewing and wholesale resources.