
Kombucha Second Fermentation: A Practical Australian Guide

Most home guides treat kombucha second fermentation as a simple flavouring step. Add fruit, seal a bottle, wait a few days, and expect fizz. That advice misses the part that causes the most trouble in Australian kitchens: a sealed bottle is a pressure vessel, and the second ferment can also increase alcohol in the finished drink.
The common assumption that any sturdy-looking glass bottle will cope is unsafe. Bottle choice, residual sugar, temperature, pH, headspace, hygiene and storage all work together. A cool Tasmanian kitchen and a warm Queensland bench won't produce the same result from the same recipe. For home brewers, cafés and small producers, the right mindset is simple: treat second fermentation as a managed pressure operation, not a set-and-forget stage.
Why Second Fermentation Trips People Up
Once you add fruit, juice or sugar to finished kombucha and seal the container, the remaining yeast has access to fresh fermentable material. Yeast consumes that sugar and produces carbon dioxide. In an open vessel, the gas escapes. In a sealed bottle, it dissolves into the drink and raises internal pressure.
That pressure is what creates natural carbonation, but it can also cause leaking seals, cracked shoulders, broken swing-top hardware or shattered glass. Ordinary kitchen jars and decorative bottles aren't designed for this job. Even a bottle that looks thick may have weak seams, tired glass or a closure that can't safely release pressure.
Bench rule: If the container wasn't made for carbonated drinks, don't use it for a sealed second ferment.
The failures that appear in practice aren't always dramatic at first. A crown seal may pop, a swing-top may shear at the hinge, or a bottle may develop a fine stress fracture around the shoulder. A reused bottle can look perfectly sound until pressure exposes damage from earlier washing, thermal shock or repeated opening.
Australian heat changes the timing
Warm conditions accelerate yeast activity. Australian recipes written for cooler indoor temperatures can become unreliable during summer, particularly when bottles sit in a warm pantry, café storeroom or delivery vehicle. The Australian fermented-beverages issues paper identifies secondary fermentation, also called bottle conditioning, as a difficult process to standardise because the closed system retains carbon dioxide and changes the drink's alcohol and flavour profile. The Australian government issues paper on fermented beverages also explains that alcohol can't be converted to acetic acid inside the sealed system in the same way, so the drink can become carbonated while developing small amounts of alcohol.
That makes “leave it for a few days” poor control language. You need to know how much sugar went into each bottle, how warm the room is, how active the yeast is and how often you'll inspect the containers. A bottle that behaves calmly in a cool kitchen may over-carbonate quickly in a hot one.
The safest approach is to control the inputs first, choose packaging designed for pressure, inspect bottles daily and refrigerate as soon as the carbonation reaches the level you want. Second fermentation is useful for flavour and fizz, but it isn't harmless because the base drink began as tea.
Preparing Your Base Brew and Flavour Additions
A good second ferment starts with a stable primary brew. Don't bottle a sweet, barely acidified batch just because it tastes pleasant. Australian food-safety guidance recommends a tightly controlled first fermentation of about 7 days, with the pH checked by day 7 and driven below 3.0. Australian kombucha food-safety guidance also stresses clean equipment, warm airflow and covers that keep out fruit flies and wild microbes.
For a continuous brew, leave enough mature, acidic liquid behind to protect the next batch and keep the SCOBY covered. The exact volume depends on the vessel and working method, so use the established starter proportion for your system rather than draining it nearly dry. Draw off only the clarified portion you can bottle promptly, leaving heavy yeast sediment and loose culture material behind when a cleaner pour matters.
Check the base before flavouring
Use a calibrated pH meter rather than taste alone. A pleasant balance usually sits around pH 3.2 to 3.5, but safety control is broader than flavour preference. Food Standards Australia New Zealand guidance says kombucha should reach pH 4.2 or less during fermentation to become a non-potentially hazardous food, while finished products commonly sit at pH 2.5 or above. FSANZ guidance on fermented beverages also warns that continued fermentation can bring excess pressure, leakage and unsafe alcohol levels.
For a 750 mL bottle, a practical flavour trial might use:
- Juice and sugar: roughly 10 to 20 g sugar with 40 to 80 mL juice.
- Crushed fruit: roughly 30 to 50 g, strained later if sediment and pectin are a concern.
- Spice blends: ginger with turmeric, or hibiscus with lime, added in restrained amounts so the base tea remains recognisable.
- Low-sugar batches: flavour with aromatic herbs, citrus peel or tea infusions, but accept that less available sugar may mean less measurable carbonation.
A sugar-free second ferment is a contradiction if you expect strong natural fizz. Yeast needs accessible fermentable material. Cream of tartar, cold bottling and flavour-only additions can influence the result, but they don't replace a controlled sugar source.
Keep additions clean and predictable
Wash fruit, sanitise bottles, funnels and caps, and avoid additions that introduce unnecessary risk. Raw honey can carry variable microorganisms, fresh garlic is a poor fit for an acidic bottled drink, and untreated tap water can add contaminants or chlorine that disrupts flavour.
For repeatable café production, strain purées before filling and record the addition weight, bottle size, room temperature and bottling time. A PepTea kombucha tea kit can help newer brewers organise the core equipment, but no kit removes the need to measure pH and manage pressure.
Choosing Bottles and Managing Carbonation Pressure
Bottle selection is where popular advice often falls short. Flip-top glass is convenient, reusable and visually appealing, but it isn't automatically the safest choice. Australian food-safety material cautions that sealed glass vessels can become hazardous during secondary fermentation and points to high-quality BPA-free plastic bottles as easier to monitor for pressure.
The four formats below each solve a different problem. The cost column is qualitative because retail prices vary by supplier, pack size and bottle condition.
| Bottle type | Pressure tolerance | Reusability | Approx. cost (AUD) | Daily pressure check | Best use |
|---|---|---|---|---|---|
| 750 mL swing-top glass | Pressure-rated glass only, with conservative use | High if undamaged | Moderate | Listen for hiss and inspect the seal | Controlled, lower-sugar batches |
| Pry-off beer bottle | Depends on the bottle's carbonation rating and cap | Moderate | Low to moderate | Cap inspection is less convenient | Drier batches with suitable capping equipment |
| Soda-style PET | Thick PET gives visible expansion and pressure feedback | Limited to moderate | Low | Squeeze test is straightforward | Warm conditions and higher-flavour batches |
| Re-used kombucha bottle | Unknown unless the manufacturer confirms pressure suitability | Variable | Low if already owned | Difficult to assess reliably | Avoid for unverified second fermentation |
Choose monitoring over appearance
For glass, a conservative working ceiling is around 2 to 3 volumes of CO₂, while thick PET can tolerate 4 or more volumes in suitable designs. Those figures aren't a licence to chase maximum carbonation. Treat the lower end as a practical boundary, inspect every bottle and retire any container involved in a pressure event.
PET is the sensible choice for a high-sugar fruit batch in warm weather because the bottle gives you tactile feedback. As pressure rises, it becomes firmer. Glass gives no equivalent warning before failure. For lower-sugar, drier ferments, a purpose-made thick champagne-style bottle can work, but it still needs an intact closure and a conservative process.
Use a daily burp-and-test routine
Crack the closure carefully, listen for a controlled hiss and compare the result with a known-good batch. Don't shake the bottle before opening. Log the ambient temperature, because a small change in room conditions can alter the pace of carbonation.
A Brisbane kitchen at 28°C in July will drive activity faster than a Hobart kitchen at 18°C. The bottle doesn't know which recipe you copied. It responds to sugar, yeast and heat.
Serious small-scale producers should consider inexpensive pressure gauges on test containers or a pressure-rated vessel designed for beverage work. After any cracked bottle, blown seal or unexplained leak, retire the affected bottle and inspect the rest from the same batch. Never assume identical-looking bottles have identical histories.
Temperature, Timing, and Reading the Ferment
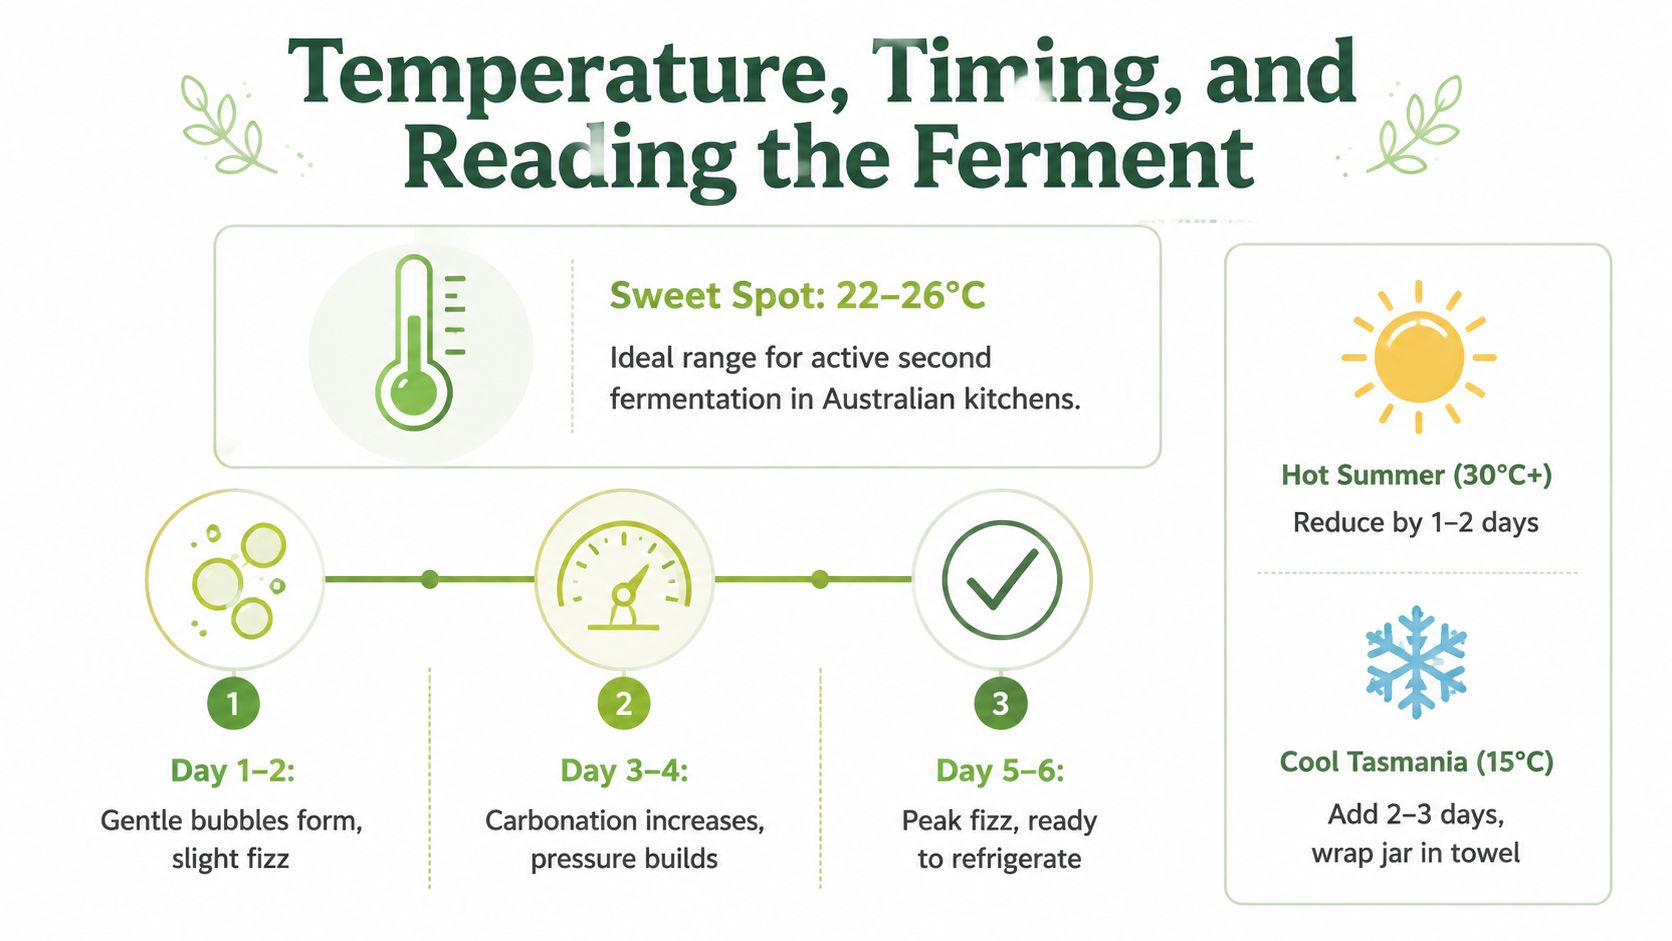
Second fermentation behaves best in a moderate indoor range of 22 to 26°C. At that temperature, yeast usually has enough activity to build carbonation without the rapid escalation that can occur in a hot room. In a cool Tasmanian kitchen, the same batch may need longer, while a summer pantry can move from flat to over-pressurised before the brewer expects it.
Use time as a guide, not a guarantee. For 250 to 500 mL bottles, a practical inspection pattern is:
- Around 15°C: allow a slower progression and check patiently rather than adding more sugar too early.
- Around 22 to 26°C: inspect from the first day and expect active carbonation to develop over several days.
- Above 30°C: shorten the room-temperature period and move to refrigeration earlier.
- Fruit additions: often need roughly 24 to 72 hours for flavour and carbonation to develop.
- Ginger additions: may take around 2 to 4 days, depending on sugar and yeast activity.
- Flavour-only infusions: can run around 4 to 7 days, but remove them sooner if the flavour becomes harsh.
Read the bottle, not just the calendar
A PET bottle should become noticeably firmer as carbonation builds. With glass, look for a soft hiss on opening, fine bubbles clinging to fruit and a flavour shift from sweet towards drier and more acidic. None of these signs replaces pH or alcohol testing, but they help you decide when to refrigerate.
Bottling at the full sweetness of a primary brew is a common cause of gushers. The yeast has too much accessible sugar, then continues working inside a sealed container. Start with a balanced base, add measured flavouring and avoid treating sweetness as harmless.
After the second day, burp swing-tops carefully if the bottle is building pressure. Refrigerate when the bottle feels suitably firm and the opening test gives the carbonation you want. Cold storage slows fermentation, but it doesn't erase the pressure already present, so chill bottles in a way that keeps them contained and handle them gently.
For accurate pH readings before bottling, use a digital pH meter for kombucha. A meter gives you a repeatable control point that taste and bubble size can't provide.
The following video shows the practical visual cues of a working ferment and carbonation stage.
Safety, Pressure, and Alcohol Control
Kombucha isn't automatically non-alcoholic because it contains tea, nor does refrigeration guarantee that a poorly controlled batch is compliant. During bottle conditioning, trapped carbon dioxide and ongoing yeast activity change the drink after the SCOBY has been removed.
Australian survey data shows the scale of the problem. Around 65% of tested kombucha samples exceeded 0.5% ABV, according to the Australian fermented-beverages issues paper. A separate Food Standards Australia New Zealand survey found 35.2% of kombucha samples below 0.5% ABV, 41.9% between 0.5% and 1.15% ABV, and 22.9% above 1.15% ABV. The FSANZ survey summary shows why a low-alcohol claim needs process control and verification, not confidence based on taste.
Compliance point: If you sell a bottle as non-alcoholic or low-alcohol, confirm the finished product through an appropriate testing and labelling process.
Treat pressure ratings as limits, not targets
A practical ceiling for PET is around 4 atmospheres, while standard glass swing-tops may be rated around 3 atmospheres. In real use, treat ordinary swing-top glass more conservatively, around 2 atmospheres, because bottle age, damage and closure condition reduce confidence.
| Bottle type | Safe working pressure | Best for | ABV risk at typical 3-day ferment |
|---|---|---|---|
| Thick PET | Up to about 4 atmospheres when suitable for carbonation | Warm rooms and easy pressure monitoring | Moderate to high if sugar remains available |
| Pressure-rated swing-top glass | Treat conservatively, around 2 atmospheres in practice | Measured, lower-sugar batches | Moderate |
| Thick beer bottle | Use only when pressure suitability is known | Controlled carbonation with reliable caps | Moderate |
| Mason jar or repurposed decorative glass | Unpredictable | Not recommended | Uncontrolled |
Keep added sugar restrained, with a practical target of 10 to 15 g per litre for batches where alcohol and pressure need tight management. Refrigerated starter liquid can reduce the active yeast load, and finishing the ferment cold slows further activity, but neither approach proves the final ABV.
Release pressure without creating a hazard
Wear eye protection for a suspicious bottle, keep it away from your face and open it outdoors or inside a contained sink. Cover the closure with a cloth, release pressure slowly, stop if the seal starts to deform and never force a swollen cap.
Discard bottles with cracked shoulders, leaking seals or gaskets that no longer spring back. If one bottle has failed, don't continue using the rest without checking their condition and reviewing the batch's sugar, temperature and timing. Australian guidance also notes that some manufacturers use carbonation instead of bottle fermentation specifically to reduce alcohol production. That option may suit cafés seeking more predictable non-alcoholic service.
Troubleshooting Common Second Fermentation Problems
A second ferment gives you useful clues if you read the bottle and liquid together. Start with the simplest controllable variable, usually sugar, temperature, seal or fruit load, before blaming the SCOBY.
Use this bench checklist
- No carbonation after five days: Check the bottle seal, then squeeze a PET bottle or open one glass bottle carefully. If there's no hiss and the base tastes very dry, the yeast may have little sugar left. Move the next batch into a warmer, controlled area and add a measured fermentable addition rather than repeatedly opening the current bottle.
- Over-carbonated gushers: Chill the bottle fully, open it over a sink and let pressure release in stages. The likely causes are high residual sugar, too much juice, excessive fruit pulp or heat. Reduce the addition and shorten the warm stage next time.
- Off-flavours from fruit: Taste the base and fruit separately. Overripe fruit, bruised produce, excessive extraction or contaminated additions can create stale, vegetal or medicinal notes. Strain the batch if the flavour is clean but heavy, and discard it if the aroma is putrid or mouldy.
- Cloudy or stringy texture: Sediment can come from yeast, fruit pectin or culture fragments. Let the bottle settle cold, then pour gently. A rotten smell, visible mould or unusual surface growth means discard the batch rather than re-conditioning it.
- Bottles go flat in storage: Check the closure and fill level. A weak seal, too much headspace or repeated opening lets carbon dioxide escape. Re-condition only a clean, sound batch in pressure-rated packaging, and don't re-use a leaking bottle.
- Yeast floaters: Swirling sediment is common in living kombucha, especially with fruit. Chill, settle and pour carefully. If the particles look unusual or the smell is wrong, don't rely on appearance alone.
- Vinegar or solvent aroma: Excessive primary fermentation, oxygen exposure, heat stress or an unbalanced microbial population may be involved. A sharp but clean acidity can be a flavour issue, while solvent-like, rotten or mouldy aromas warrant dumping the batch.
| Symptom | Likely cause | Diagnostic check | Fix |
|---|---|---|---|
| Flat after five days | Low sugar or poor seal | Taste, inspect closure | Adjust sugar and seal next batch |
| Gusher | Too much sugar, fruit or heat | Chill and open slowly | Reduce addition and warm time |
| Harsh fruit flavour | Overripe fruit or long extraction | Taste strained liquid | Shorten contact time |
| Cloudy or stringy drink | Yeast, pectin or culture material | Settle cold and inspect | Strain if clean, discard if suspect |
| Flat in storage | Leaking closure or excess headspace | Inspect cap and gasket | Use sound packaging |
| Yeast floaters | Normal sediment or contamination | Check smell and appearance | Settle and pour, or discard |
| Vinegar or solvent aroma | Over-fermentation or contamination | Smell the base and bottle | Discard if solvent-like or mouldy |
Don't rescue a batch with mould, putrid odour, swollen packaging or a damaged bottle. Re-conditioning is appropriate only when the liquid smells clean, the container is sound and the fault is clearly low carbonation.
Storage, Scaling, and Café Recipe Ideas
Cold storage is the final control point. Refrigerating finished kombucha at 2 to 4°C slows yeast activity and helps hold the carbonation you've already created. It doesn't make an unsafe batch safe, so pH, hygiene, pressure history and alcohol control still need attention before retail or café service.
For a household, bottling a modest weekly quantity is manageable with written batch records. A café producing a larger weekly volume needs a different system, including pressure-rated vessels, sanitation records, pH checks, traceable flavour additions and a documented cold chain. Don't assign a best-before date by guesswork. Retail products need a date and labelling approach that aligns with applicable Food Standards Australia New Zealand requirements and the product's validated shelf-life evidence.
Move from kitchen batches to service-ready production
Bulk flavouring in a pressure-rated stainless-steel or PET vessel can make filling more organised before final bottling. It may reduce active labour by roughly 40 percent, but that figure is process-specific and should be validated against your own workflow, equipment and cleaning time rather than assumed.
A café menu also benefits from measured builds. Each serve below is designed around a 250 mL pour, with additions prepared in advance and the bottle opened only at service.
| Recipe | Base F2 Ratio | Flavour add-ins per 250 mL | Target carbonation | Menu price point (AUD) |
|---|---|---|---|---|
| Ginger lemon | Kombucha base with a restrained ginger infusion | Lemon juice and fine ginger, measured for balance | Light to medium | Set from local ingredient and labour costs |
| Strawberry basil | Kombucha base with strained strawberry infusion | Strawberry purée and basil aroma | Medium | Set from local ingredient and labour costs |
| Native finger lime and hibiscus | Hibiscus-infused kombucha | Finger lime pearls added at service | Medium | Set from local ingredient and labour costs |
| Low-sugar turmeric chai | Dry, tea-forward kombucha base | Turmeric, chai spices and minimal fermentable addition | Light | Set from local ingredient and labour costs |
A barista can pour the chilled base, add the prepared flavour component and garnish without leaving fruit fermenting in the service bottle. That keeps the menu more consistent and reduces the temptation to bottle unmeasured juice into pressure-sensitive packaging.
For storage procedures, see how to store kombucha safely. Cafés should also separate stock by batch, record opening dates and keep bottles cold from delivery through service.
Pep Tea offers Australian organic tea products and sugar-free organic kombucha for households and hospitality businesses, with options suited to clean, non-alcoholic menu development. Visit Pep Tea to explore the range and connect your second-fermentation practice with dependable brewing and wholesale resources.