
Tag: scoby care
Kombucha Starter Recipe: A Practical Beginner’s Guide

You're at the kitchen bench with a clean jar, sweet tea and a new SCOBY, wondering whether the thin layer forming on top is healthy or whether something has gone wrong. That uncertainty is normal. A good kombucha starter recipe gives you more than a list of ingredients. It gives you a controlled starting point, sensible fermentation checks and clear rules for when a batch should be used, continued or discarded.
Australian guidance provides useful benchmarks for home brewers. The tea must cool before the culture is added, fermentation needs a suitable temperature range, and pH matters more than taste alone. Follow the process below as a practical framework, while remembering that home fermentation carries food-safety risks and should be approached carefully.
Why Your First Kombucha Starter Matters
Your first starter liquid becomes the acidic foundation for later batches. If it's mature and healthy, it helps the new sweet tea move into a safer acidic environment. If it's weak, contaminated or added to hot tea, the SCOBY may struggle and the brew may remain vulnerable to unwanted microbial growth.
A SCOBY is the living culture used to ferment sweet tea. You may see a rubbery pellicle floating on the surface, brown stringy material underneath or a new pale layer developing. Those visual changes can be part of normal fermentation, but appearance alone can't confirm that a batch is safe to drink.
Practical rule: Treat the starter liquid as a core ingredient, not a splash added at the end.
Australian food-safety guidance explains that the initial tea infusion can sit around pH 5 and may support contaminant growth. It recommends using a proven starter culture and cooling the tea quickly from 60°C to 20°C within 2 hours before inoculation. You can read the Australian food-safety guidance on kombucha starter culture and cooling for the reasoning behind those controls.
This guide focuses on the points that cause first batches to fail: the starter-to-tea ratio, cooling temperature, fermentation conditions, pH testing, SCOBY inspection and contamination control. You'll also learn how to respond to a slow brew, a sour brew, fruit flies or fuzzy growth without trying to rescue something unsafe.
The aim isn't to make every batch identical. Ambient conditions vary between a cool Melbourne kitchen, a warm Queensland pantry and a home near the Hunter Valley. The aim is to give you measurable checkpoints so you aren't relying on a calendar or a guess.
Ingredients and Starter Ratios for a Safe Batch
For a straightforward Australian baseline, use about 100 ml of mature starter tea per litre of sweet tea, with roughly 70 g sugar and 1 tea bag per litre, as reflected in Australian consumer brewing guidance. The Australian kombucha and kefir brewing guide also describes retaining fermented liquid for the next batch, reinforcing the importance of keeping enough mature starter aside.
For a 2-litre batch, the working quantities are:
| Ingredient | Per litre | 2 L batch | Purpose |
|---|---|---|---|
| Tea | 1 tea bag | 2 tea bags | Provides the tea base for fermentation |
| White sugar | About 70 g | About 140 g | Fuels the yeast and bacteria during fermentation |
| Mature starter tea | About 100 ml | About 200 ml | Brings acidic fermented liquid into the fresh tea |
| Water | 1 litre | 2 litres | Forms the sweet tea base |
| Healthy SCOBY | 1 culture | 1 healthy culture | Continues the fermentation |
The Australian baseline is deliberately simple. Black tea is a familiar starting point, while plain green tea can also be used. Avoid treating the sugar as a sweetener added only for flavour. It feeds the culture, and fermentation changes the balance of sweetness and acidity over time.
Use clean, filtered water where possible. Water with a strong chlorine smell may interfere with the culture, so allow treated water to stand according to your local water advice or use filtered water. Choose a clean glass fermentation jar with enough room for the liquid and surface growth, then cover it with clean, breathable cotton secured firmly with a food-safe rubber band.
You can use ordinary kitchen utensils, but avoid prolonged contact between fermenting kombucha and reactive metal. Wash your hands, jar, cover and utensils thoroughly before starting. If you need a measured source of acidic liquid, PepTea starter tea for kombucha is one option to consider alongside a mature homemade batch.
Brewing and Inoculating the Sweet Tea
Start with the tea base, not the SCOBY. Measure the water, heat it and dissolve the sugar completely while the liquid is hot. Add the tea and steep until the brew has developed a clear tea flavour, then remove the bags or strain the leaves.
Don't add the culture while the tea is warm from the kettle. Australian guidance says the tea should cool from 60°C to 20°C within 2 hours before starter culture is added, so use a clean, shallow pot or an ice bath if you need to speed cooling. The liquid should feel like room-temperature water, not warm tea.
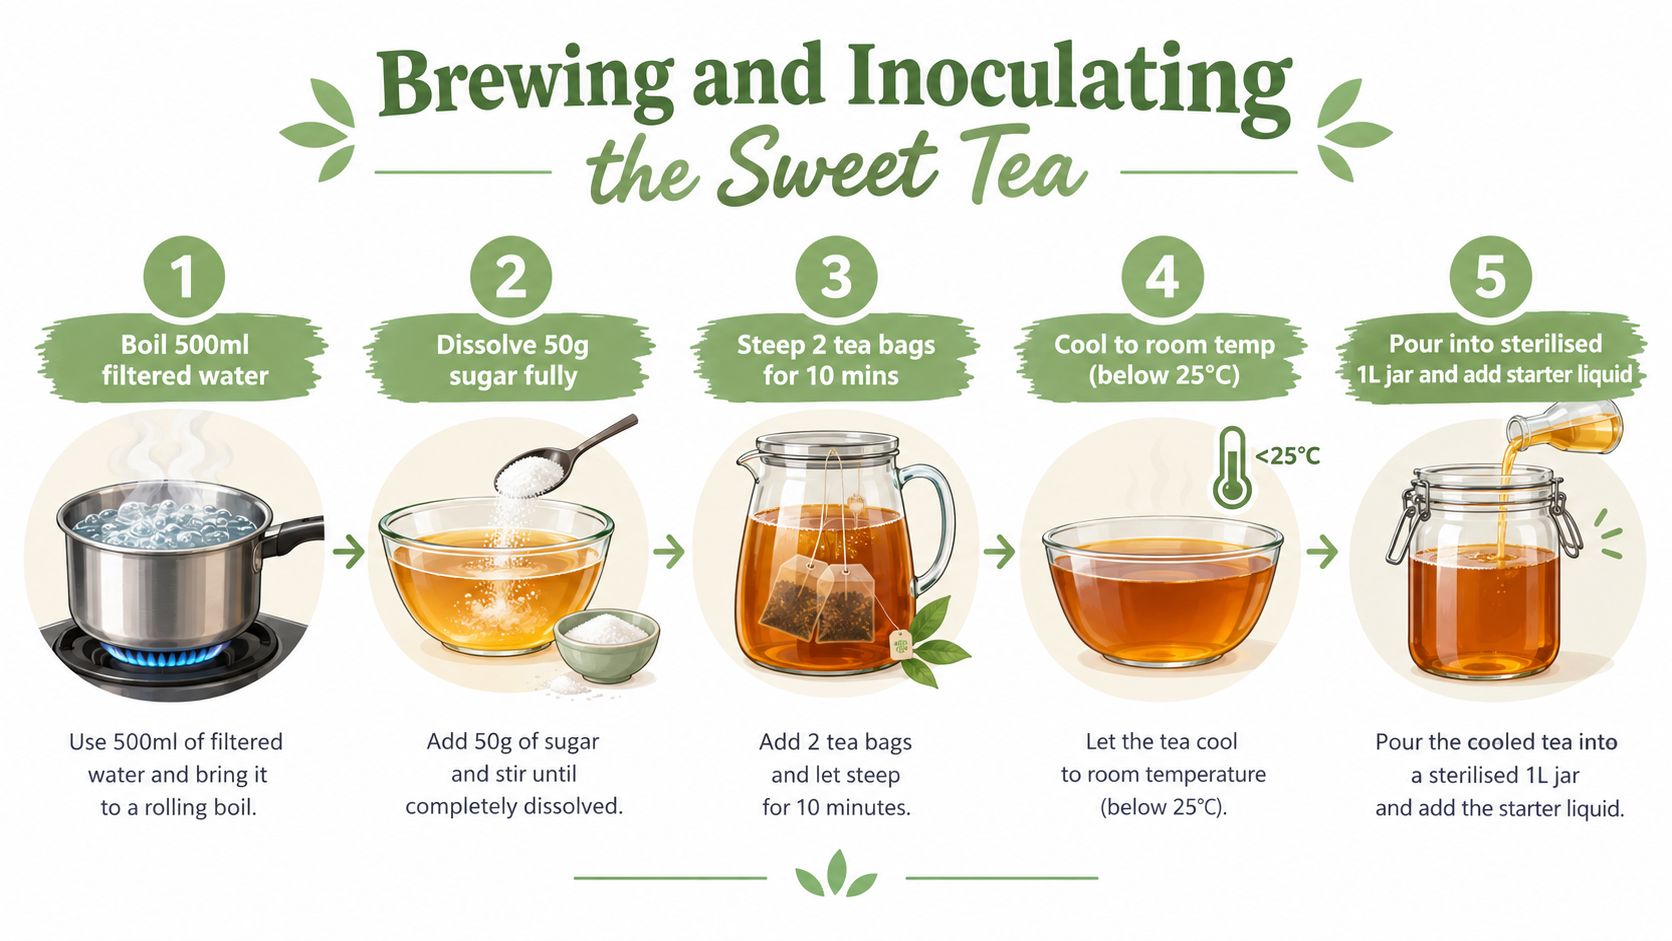
Once cooled, pour the sweet tea into your clean glass jar. Add the mature starter liquid, then place the SCOBY in with clean hands. It may float, sink or sit at an angle. That position isn't a reliable sign of failure.
Your inoculation checklist
- Cool the tea first. Don't compromise this step to save time.
- Add the starter liquid. Use about 100 ml per litre of sweet tea, giving a 2-litre batch about 200 ml.
- Add the SCOBY last. Handle it gently and inspect it before use.
- Cover the jar. Use breathable cotton or tightly woven cloth, secured so insects can't enter.
- Label the batch. Record the date, tea type and starter ratio so you can compare batches.
Keep the jar away from direct sunlight and avoid moving it unnecessarily. Don't seal it with an airtight lid during primary fermentation, because the culture needs airflow. For the first 48 hours, leave the brew undisturbed and don't taste it as a substitute for checking its acidity.
A short video can help you visualise the movement from sweet tea to inoculated jar:
Fermentation Window, Temperature and pH Checks
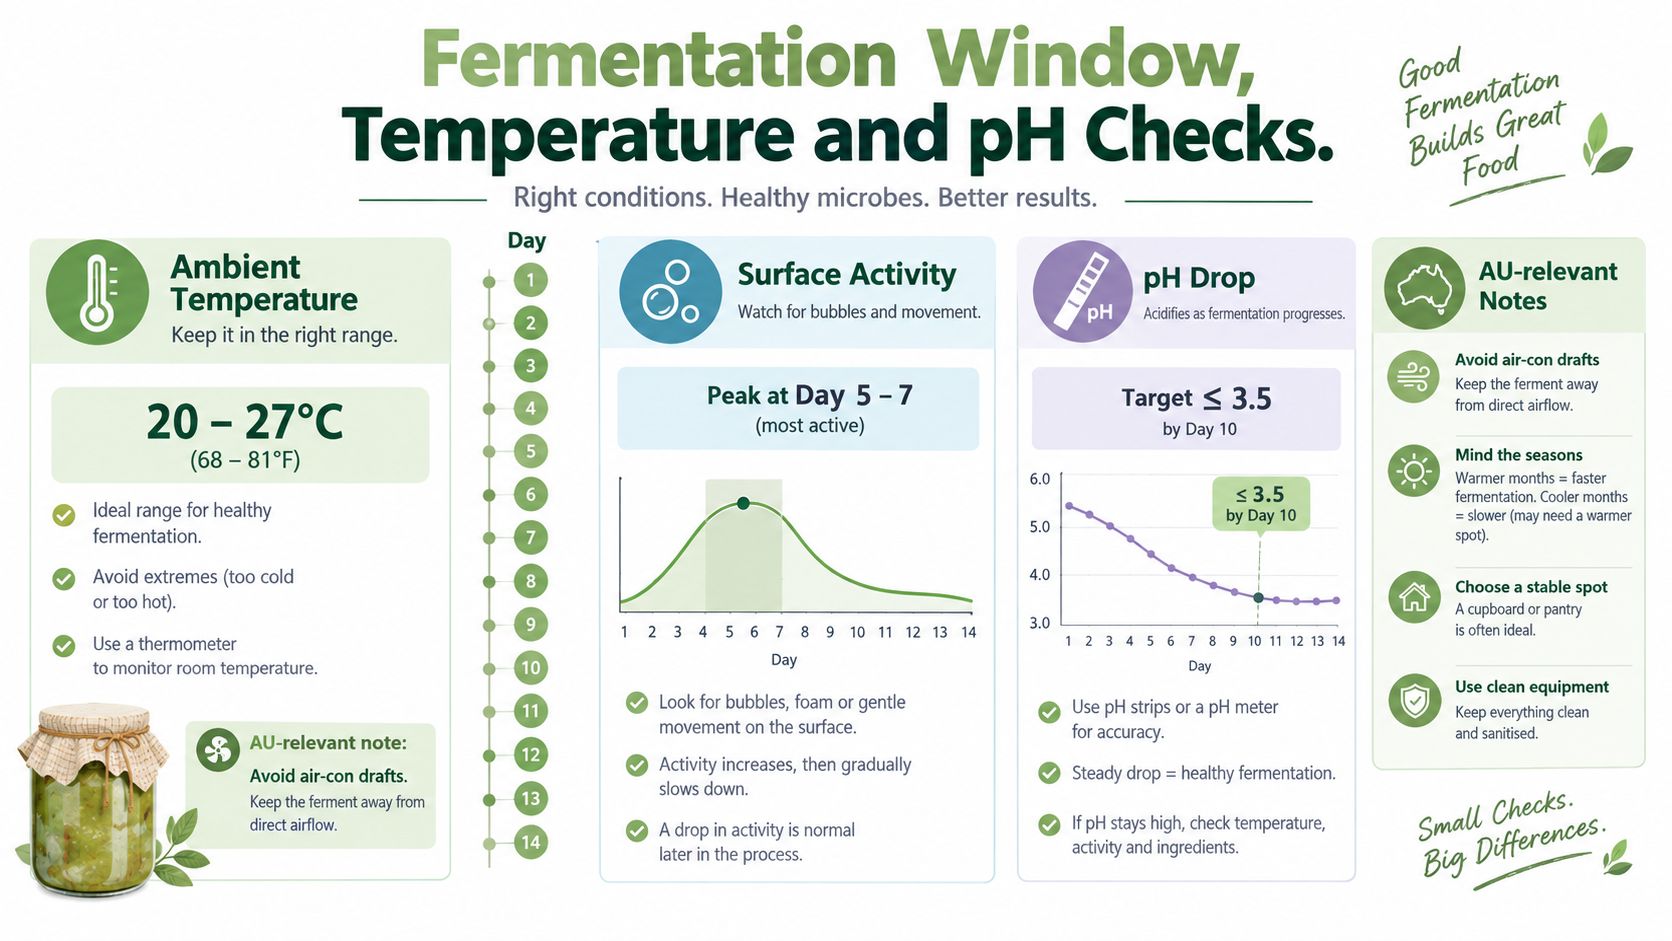
A fixed day count can't tell you whether your kombucha is ready. Temperature changes the pace, and the strength of the starter liquid affects how quickly acidity develops. Australian guidance commonly places fermentation at 7 to 10 days, with the brew held between 20°C and 23°C, and recommends checking the finished product until it reaches pH 4.2 or lower. Those benchmarks are set out in the Western Australian fermented-food safety guideline.
Use three signals together:
- Temperature: Keep the jar in a stable, moderate environment. A cold room can slow fermentation, while excessive heat can damage the culture or push the brew towards excessive acidity.
- Surface activity: A thin new layer, small bubbles or brown strands may appear as the culture works. A SCOBY that sinks isn't automatically unhealthy.
- pH: Test with fresh pH strips or a digital meter rather than judging safety by smell or sweetness.
A simple testing routine
Use a clean spoon or sampling vessel to take a small amount from the jar. Test that sample, not the whole batch, and avoid returning it to the fermentation vessel. Write the result beside the date so you can see whether acidity is changing.
If the pH remains above the Australian safety target, don't bottle or drink the batch. If the brew reaches the target, remove the starter culture and refrigerate the finished kombucha at 4°C, as described in Australian fermented-beverage safety material.
For a reliable testing setup, a digital pH meter for kombucha brewing can make readings easier to repeat, provided you clean, store and calibrate it according to the manufacturer's instructions. pH testing doesn't replace visual inspection. If you see green, white, black or grey discolouration, or notice an abnormal odour, discard the culture and the entire batch.
SCOBY Care Between Batches
A healthy SCOBY can become the reusable part of your brewing routine. After fermentation, lift it out with clean hands and keep it covered with enough mature starter liquid to prevent it drying out.
You can leave the culture in a brewing jar if you expect to start another batch soon. For a longer pause, place the SCOBY in a clean glass jar with starter tea and cover it appropriately. The liquid should be at least equal to the SCOBY's volume, so the culture remains surrounded by acidic liquid rather than exposed to air and drying.
A SCOBY hotel is a storage jar containing cultures and starter liquid. Keep it organised by labelling the jar and removing any culture that shows suspicious growth. Don't scrape mould from the surface and continue using the liquid. Fuzzy growth or unusual colours aren't cosmetic problems because contamination can spread through the batch.
When to retire a culture
- Persistent mould: Discard the culture and liquid rather than trying to clean and save them.
- No activity: If a warm, properly prepared batch shows no fermentation activity over an extended period, use fresh starter rather than repeatedly feeding the inactive culture.
- Returning off odour: A smell that remains unpleasant after cleaning and restarting is a reason to stop using the culture.
If you share a SCOBY, place it in a clean, food-safe container with enough starter liquid to keep it moist during transport. Give the recipient the tea type, approximate ratio and latest pH information, so they aren't trying to identify an unknown culture from appearance alone. Guidance on how to make a SCOBY can help a new brewer understand what they're receiving.
Troubleshooting Common Starter Problems
A slow brew doesn't always mean the SCOBY is dead. Before changing several variables at once, check the room temperature, water, starter strength and cleanliness of the vessel. Australian food-safety material warns that low temperatures can slow acidification, while excessive heat can harm the culture, so temperature drift is often the first place to investigate.
The six problems beginners see most often
- Slow fermentation: Move the jar away from cold drafts and check whether the starter liquid is mature and acidic. Don't compensate by adding random ingredients.
- Weak starter liquid: Use mature, unflavoured starter from a healthy batch. Australian consumer guidance warns against using previously fermented foods as a starter because back-slopping can reduce effectiveness and allow unwanted bacteria to grow. The Australian fermented-beverages issues paper provides the regulatory context for treating kombucha as a fermented sweetened tea rather than an ordinary cold drink.
- Under-pitched culture: Confirm that the SCOBY looks normal and that enough starter tea was included. A large pellicle alone doesn't guarantee a strong liquid culture.
- Chlorinated water: If your water smells strongly of chlorine, use filtered water for the next batch and keep your process consistent.
- Fuzzy mould: Blue, green, black, white or grey fuzzy growth means discard the entire batch, including the SCOBY. Don't scrape the patch away.
- Overly sour kombucha: The brew has gone further than your preferred drinking point. Shorten the next fermentation by checking pH earlier, and reserve a balanced batch as starter rather than using vinegar-like liquid.
Flat kombucha needs a separate check. Confirm that fermentation took place, test the pH and look for remaining sweetness. Carbonation develops later and can vary, so a flat first ferment isn't automatically evidence of contamination.
Fruit flies usually indicate that the cover isn't tight enough. Use a clean, tight-weave cloth secured with a rubber band, and never use an airtight lid during primary fermentation. If the smell is rotten, musty or otherwise abnormal, discard the liquid and restart with clean equipment and a healthy starter.
Safety-first decision: If you can't confidently identify the problem, throw the batch out and begin again.
Flavouring Your Starter Brew and Next Steps
Flavouring belongs after primary fermentation, not in the starter tea. Once the brew has reached the appropriate acidic endpoint, remove the SCOBY and reserve mature liquid for the next batch. Add flavourings to the finished kombucha in pressure-safe bottles, leaving room for carbonation and handling the bottles cautiously.
For a 2-litre batch, you can divide the liquid between flavour combinations such as:
- Ginger and lemon: Add sliced ginger and a small amount of lemon zest for a sharp, warming profile.
- Berry and mint: Use crushed berries with fresh mint, then strain before serving if you prefer a clearer drink.
- Native lemon myrtle: Add a modest amount of culinary lemon myrtle and taste carefully, because its aroma can become prominent quickly.
The provided Australian flavouring benchmark also lists passionfruit pulp, mint leaves, ginger slices, lemon zest and a cinnamon stick as practical additions. Keep additions clean, use food-safe bottles and monitor pressure. If a bottle becomes unusually hard or sprays when opened, chill it thoroughly and open it slowly over a sink.
Build a repeatable brewing rhythm
Reserve starter liquid before flavouring the rest of the batch. Start the next brew with the same tea, sugar and starter proportions, then change only one variable at a time. That approach helps you understand whether a change in flavour, speed or acidity came from the tea, the room or the fruit.
Not everyone wants to maintain a SCOBY between batches. A ready-made starter culture can be a practical shortcut when you want a consistent starting point without first growing or storing your own culture.
Pep Tea offers Australian organic tea and sugar-free organic kombucha, including flavours such as Ginger, Lime & Ginger and Mango, for readers who'd rather enjoy a finished fermented drink than manage a starter jar. Visit Pep Tea to explore the kombucha range and find a convenient option for your next glass.
How Does a Fermentation Airlock Work

You've sealed a jar of sweet tea and a SCOBY on the kitchen bench, and now you're waiting for the first sign of life. Then it happens: bloop. That small sound is satisfying, but it isn't the airlock “making” fermentation happen. It's carbon dioxide finding a safe exit while the fermenter stays protected.
So, how does a fermentation airlock work? Think of it as the immune system of the fermenter. It releases pressure from active cultures while helping keep oxygen, airborne microbes, mould spores and insects out. For delicate probiotic cultures, including kombucha SCOBYs, that controlled environment helps you avoid turning a carefully prepared brew into an unpredictable experiment.
The First Bloop and Why It Matters
The first bloop often arrives after a quiet stretch. Your jar looks unchanged, the tea is resting, and nothing seems to be happening. Then pressure from inside moves through the airlock and sends a bubble through the liquid trap. That sound tells you gas is escaping, not that the airlock is measuring the exact health or speed of fermentation.
In a Hunter Valley kitchen, where warm days can make a ferment feel lively, that little device gives the brew a safer outlet. Australian homebrewing guidance describes a fermentation airlock as a one-way pressure release device. It allows carbon dioxide to bubble out through water or sanitiser while helping prevent outside air, oxygen and airborne microbes from re-entering the fermenter. Green Living Australia's fermentation airlock guide explains this closed-system approach in practical terms.
More than a plastic accessory
A fermenting culture produces gas as it works through available sugars. If the vessel has no controlled release path, pressure can build inside. If the vessel is left wide open, the brew has a much easier route for unwanted exposure.
The airlock sits between those extremes. It keeps the main vessel closed, then gives internal gas a narrow, controlled pathway through a liquid or silicone seal. That balance matters for kombucha because the brew contains living cultures whose environment affects flavour, aroma and texture.
The first bloop is reassuring, but the real job is quieter. The airlock protects the fermenter even between bubbles.
A visible airlock also changes how you brew. Instead of repeatedly opening the lid to inspect the liquid, you can observe the setup from outside. The less you disturb the vessel, the easier it is to maintain the conditions you created at the start.
The important distinction is this: an airlock supports fermentation, but it doesn't replace clean equipment, a suitable vessel or sensible temperature management. It's one part of a controlled process, and a small part with a very important protective role.
The Science of the One-Way Water Trap
The classic liquid airlock works through a simple pressure difference. Fermenting yeast and bacteria produce carbon dioxide. As that gas accumulates in the headspace, pressure inside the vessel becomes greater than the pressure outside.
The gas then pushes into the airlock's internal tube. It travels through the liquid chamber and escapes as bubbles. Once the pressure equalises, the liquid settles back into place, ready to resist air moving in the opposite direction.
A simple way to picture the mechanism
Think of the water trap as a doorway with a spring that only opens when pressure comes from inside. Carbon dioxide can push through because the fermenter is producing it. Outside air doesn't have the same pressure advantage, so it can't travel backwards through the liquid and into the jar.
Australian guidance commonly recommends filling the chamber with water or sanitiser, often to about half full or to the marked line. The liquid column forms the barrier. If evaporation lowers the level too far, the seal can weaken, so the airlock needs occasional visual attention. Pantry Culture's explanation of fermentation airlocks also highlights why a bubbling airlock shouldn't be treated as a calibrated fermentation meter.
The airlock must remain above the fermenting liquid. It isn't designed to touch the brine, wort or kombucha itself. Keeping it raised reduces the chance of dirty liquid travelling back into the airlock chamber and helps prevent contamination from entering through the pressure-release path.
Why low oxygen matters
A closed fermenter doesn't mean the contents are isolated from every biological process. It means you're limiting unnecessary contact with the outside environment while the culture develops.
Oxygen exposure can alter the balance you're trying to create. Unwanted airborne organisms can enter through an unprotected opening, and insects can carry contamination into a sweet ferment. The airlock creates a practical boundary, allowing the culture to release gas without leaving the vessel exposed.
That doesn't mean every kombucha process must use an airlock in exactly the same way. Vessel design, fermentation stage and recipe all matter. The useful principle is consistent: give carbon dioxide an exit while making re-entry difficult.
For readers exploring other botanical ingredients, organic hops flowers can be a useful resource when learning how different plants contribute aroma and character to fermentation-inspired drinks. Keep additions appropriate to the recipe and remember that an airlock protects the process, not the ingredients themselves.
The key sequence is straightforward:
- Fermentation produces CO2. Internal pressure begins to rise.
- Pressure enters the airlock. Gas moves through the central passage.
- The liquid barrier releases gas. CO2 bubbles through and escapes.
- The seal discourages reverse flow. Outside air and airborne contaminants remain outside.
That's the whole principle. The design is simple, but the result is a more controlled environment for your ferment.
Choosing the Right Airlock for Your Vessel
Your vessel determines which airlock will feel easiest to live with. A wide-mouth Mason jar needs a different fitting from a bucket or demijohn, and a vigorous ferment may benefit from a design that's easy to inspect and clean.
Australian suppliers describe two broad approaches: traditional liquid-seal airlocks, such as S-shaped models, and waterless silicone valves that self-seal. Nourish Me Organics' pickle pipe listing describes a silicone design that screws onto wide-mouth Mason jars and doesn't need daily burping, while S-shaped airlocks use pre-boiled water or sanitiser as the barrier.
Airlock types compared
| Airlock Type | Best For | Maintenance Level | Key Advantage |
|---|---|---|---|
| S-shaped airlock | Standard buckets, carboys and demijohns | Moderate | Simple liquid barrier and familiar design |
| Three-piece airlock | Ferments where easy disassembly matters | Moderate | Parts separate for cleaning and inspection |
| Silicone waterless airlock | Wide-mouth Mason jars and compact setups | Low | Self-sealing valve without a liquid chamber |
The S-shaped model
The S-shaped airlock is the traditional bubbler. You add liquid to the chamber, fit it into a bung or grommet, and watch for bubbles as gas moves through. It works well with common brewing vessels and makes the pressure-release process visible.
Its main drawback is cleaning the curves. Sediment or foam can collect in places you can't easily see, so you'll want to rinse it thoroughly after use.
The three-piece version
A three-piece airlock has separate components inside the chamber. That makes it easier to take apart, wash and inspect than a single curved tube. It can be a practical choice for brewers who prefer to see every surface before sanitising.
For a larger fermenter, the most important question isn't whether the airlock looks impressive. Check whether the bung, grommet and lid opening match, and whether the vessel gives active fermentation enough room.
The silicone waterless valve
A silicone valve suits a different style of brewing. It uses a self-sealing slit rather than a water chamber, which means there's no liquid level to monitor or refill. This can be handy for a small Mason jar ferment where a low-profile lid is part of the appeal.
The trade-off is that you lose the visible water-trap bubbles. You'll need to judge progress using the ferment itself and your chosen process checks rather than relying on movement in the valve.
For a suitable starting point, explore Pep Tea's kombucha brewing container and compare its vessel design with the airlock style you already use. Match the hardware to the lid, the batch size and the amount of monitoring you're realistically prepared to do.
Setting Up Your Airlock for a Perfect Seal
A good airlock can only work when the rest of the vessel is sealed properly. If the lid leaks around its rim, carbon dioxide may escape through that gap instead of passing through the airlock. The brew can still be fermenting, but the airlock may remain quiet and the vessel may have less protection from outside exposure.
Five checks before fermentation begins
Clean and sanitise the parts. Wash the vessel, lid, bung or grommet, and airlock so residue doesn't interfere with the seal or introduce unwanted organisms.
Confirm the lid opening. Australian brewing documentation commonly specifies a 13–14 mm hole for the grommet or bung used with standard airlock fittings. Pitch & Pour's first beer guide gives this practical fitting detail alongside the recommendation to use a half-filled sanitiser solution.
Fill the chamber correctly. Add water or sanitiser to the marked line, or approximately half full where the airlock design uses that guidance. Don't overfill, because vigorous fermentation can push liquid into places you don't want it.
Insert the airlock upright. Press the bung or grommet firmly into place, then fit the airlock vertically. The upright position helps the liquid remain in the intended channels.
Seal the vessel firmly. Tighten or secure the lid before fermentation becomes active. A loose lid gives gas an easier escape route and can make the airlock appear inactive.
Keep the airlock above the liquid
The airlock should sit above the kombucha, wort or brine, not down in it. That arrangement gives pressure a clear route out and reduces the risk of liquid travelling into the chamber.
Leave enough headspace for foam and movement. A vigorous ferment can send krausen or other foamy material into the airlock, particularly when the ferment is warmer and more active. If foam reaches the chamber, clean and sanitise the airlock before returning it to service.
For a dedicated vessel, Pep Tea's fermenting glass jar is another option to consider when you're choosing a container and planning how the lid, seal and airlock will work together.
Practical rule: A silent airlock with a properly sealed vessel deserves a closer look, not immediate panic. A bubbling airlock with a poorly fitted lid deserves attention too.
Reading the Bubbles and Managing Temperature
A lively stream of bubbles can be reassuring when you are watching a new ferment, but it is not a speedometer. A quiet airlock is not proof that fermentation has stopped either. The airlock is better understood as the fermenter's immune system: it helps keep fresh oxygen and unwanted microbes out while allowing pressure to escape. That protection matters especially for delicate probiotic cultures, such as a kombucha SCOBY, which can be affected by unnecessary oxygen exposure and contamination.
The airlock only displays gas passing through its liquid or valve. If carbon dioxide slips around a loose lid, a damaged seal or another leak, fermentation may continue without visible activity. Judge progress with the evidence suited to the brew, such as gravity readings, recipe timing and sensory checks, rather than bubbles alone. Pantry Culture's airlock guidance also points brewers towards gravity readings when assessing completion.
What bubbles can tell you
Bubbles show that pressure is changing inside a sealed vessel and that gas has found the intended exit. That is useful information, but it answers only one question.
They cannot reliably tell you:
- Fermentation speed. Bubble frequency shifts with pressure, temperature and seal quality.
- Completion. A quiet airlock may indicate a slower ferment, a finished ferment or gas escaping elsewhere.
- Culture health. Bubble activity cannot reveal the brew's flavour balance, acidity or wider microbial activity.
For beer, the Pitch & Pour brewing workflow keeps wort at 18–22°C, lets primary fermentation run for 10–14 days, then checks final gravity, with a suggested finishing target around 1.010–1.014. Those figures apply to that beer process, not to every kombucha recipe. The brew-day checklist emphasises checking gravity instead of repeatedly opening the fermenter.
Temperature changes the rhythm
Temperature changes how actively a culture produces gas. Australian brewing guidance commonly targets 18–20°C for ale fermentations and notes that active fermentation can raise wort temperature by about 2–4°C above ambient. Pitch & Pour's four-week fermentation plan links warmer conditions with increased CO2 production and a greater chance of krausen reaching the airlock when headspace is limited.
The same principle helps with non-beer ferments. Warm conditions can make activity more vigorous, so allow more room above the liquid and check the airlock more often. Cooler conditions can quiet the bubbling without stopping the culture.
If a ferment appears stuck, inspect the seal and temperature, then look for process evidence before changing the recipe. Pep Tea's guide on how to restart a stuck fermentation offers a practical way to work through an inactive ferment without relying on bubbles alone.
Read the ferment, not just the plastic. Use recipe timing, sensory checks and suitable measurements to work out what is happening.
Pressure fermentation uses different equipment. A spunding valve holds controlled pressure, with KegLand guidance recommending 10–12 psi for most fermentations and warning that pressure should never reach or exceed 35 psi. The guidance also says pressure may need checking and adjustment every 15 minutes while the target is being reached. KegLand's pressure fermentation guidance highlights the difference: a basic airlock vents gas, while a spunding valve controls internal pressure.
Maintenance Habits for Long-Term Brewing Success
An airlock is reusable, but it isn't maintenance-free. Liquid can evaporate, foam can enter the chamber and residue can hide in narrow channels. A quick visual check protects the function of the device and helps you catch problems before the next batch.
During active fermentation, look at the liquid level and confirm that the airlock remains upright. If the chamber is drying out or the seal has been disturbed, correct it with the appropriate water or sanitiser solution for that design.
A simple cleaning routine
Australian retailers recommend cleaning reusable airlocks between uses with warm soapy water, followed by thorough rinsing and complete drying before sanitising. Pitch & Pour's brewing checklist provides that cleaning sequence as part of its equipment care guidance.
- Rinse promptly: Remove residue before it dries inside the chamber.
- Wash carefully: Move warm soapy water through every channel and removable part.
- Rinse completely: Don't leave detergent behind.
- Dry fully: Allow the parts to dry before the next sanitisation step.
- Sanitise before use: Reassemble only after the components are ready for the new ferment.
If a sudden temperature change pulls sanitiser or water back towards the vessel, stop and assess the batch rather than ignoring it. Clean the airlock, check the liquid level and review the seal before continuing. The best response depends on what entered the ferment and the stage of your process.
A well-maintained airlock won't make every ferment identical, but it gives your living cultures a cleaner, steadier environment. Once you understand that, the bloop becomes more than a cheerful kitchen sound. It's a small sign that your fermenter has a safe route for pressure and a protective barrier against the outside world.
Pep Tea offers Australian-brewed, sugar-free organic kombucha from the Hunter Valley, NSW, alongside organic Japanese Matcha for everyday tea rituals and café menus. Visit Pep Tea to explore the range, learn more about fermentation, and choose a clean, naturally brewed drink for your next pour.
Home Brew Kombucha the Right Way

You're standing in the kitchen, watching a SCOBY drift through a glass jar and wondering whether that sharp, vinegary smell means the batch is working or heading for the sink. With home brew kombucha, both outcomes are possible. The difference usually comes down to sanitation, temperature, acidity, time and careful observation, not luck.
A SCOBY is a living culture, not a magic ingredient. Treat it like a small fermentation system, and you can produce a bright, tart drink with controlled sweetness and flavour. Treat it casually, and you can end up with mould, excessive pressure or alcohol content that isn't obvious from taste alone. This guide focuses on what works in Australian homes, including the safety details that many beginner recipes leave out.
Why Home Brew Kombucha Is Worth the Effort
The first successful batch often changes how you see fermentation. You begin with sweet tea, starter liquid and a rubbery culture. A week later, the tea has developed acidity, aroma and a completely different texture on the palate. The SCOBY hasn't performed a miracle. Yeasts and bacteria have transformed the liquid because you gave them a suitable environment.
That makes kombucha closer to bread baking or beer brewing than to a simple wellness ritual. You control the ingredients, provide the right conditions and make decisions based on the result. A two-litre batch can cost far less than buying individual boutique bottles, while the same process lets you adjust sugar, acidity, fizz and flavour to suit your household.
A healthy SCOBY can continue producing batches for a long time when you keep it supplied with suitable sweet tea and mature starter liquid. The practical trade-off is that fermentation needs space, stable room conditions and patience. Depending on your method, a batch may take seven to fourteen days before primary fermentation is ready for bottling, with additional time required for carbonation.
What you can control
Home brewing gives you useful levers:
- Sweetness: Stop primary fermentation earlier for a softer drink, or continue it for a drier, sharper profile.
- Carbonation: Use secondary fermentation, fruit or a measured sugar addition to build fizz.
- Flavour: Keep the base clean and add ginger, citrus, herbs or fruit after primary fermentation.
- Batch size: Start with a manageable jar before moving to continuous brewing.
The process also fits neatly into broader healthy-living routines. Kombucha isn't a substitute for a varied diet, and gut health depends on more than one drink, but readers looking at fermentation alongside fibre, hydration and daily food choices may find these fibre intake and gut health strategies useful.
Practical rule: Fermentation is observation plus adjustment. The calendar can guide you, but the jar, pH reading and taste tell you what to do.
Before buying a SCOBY, compare the practical differences between a homemade batch and a reliable packaged product in store-bought kombucha versus homemade. The comparison helps clarify whether home brewing suits your kitchen, schedule and tolerance for variable results.
Equipment and Ingredients You Actually Need
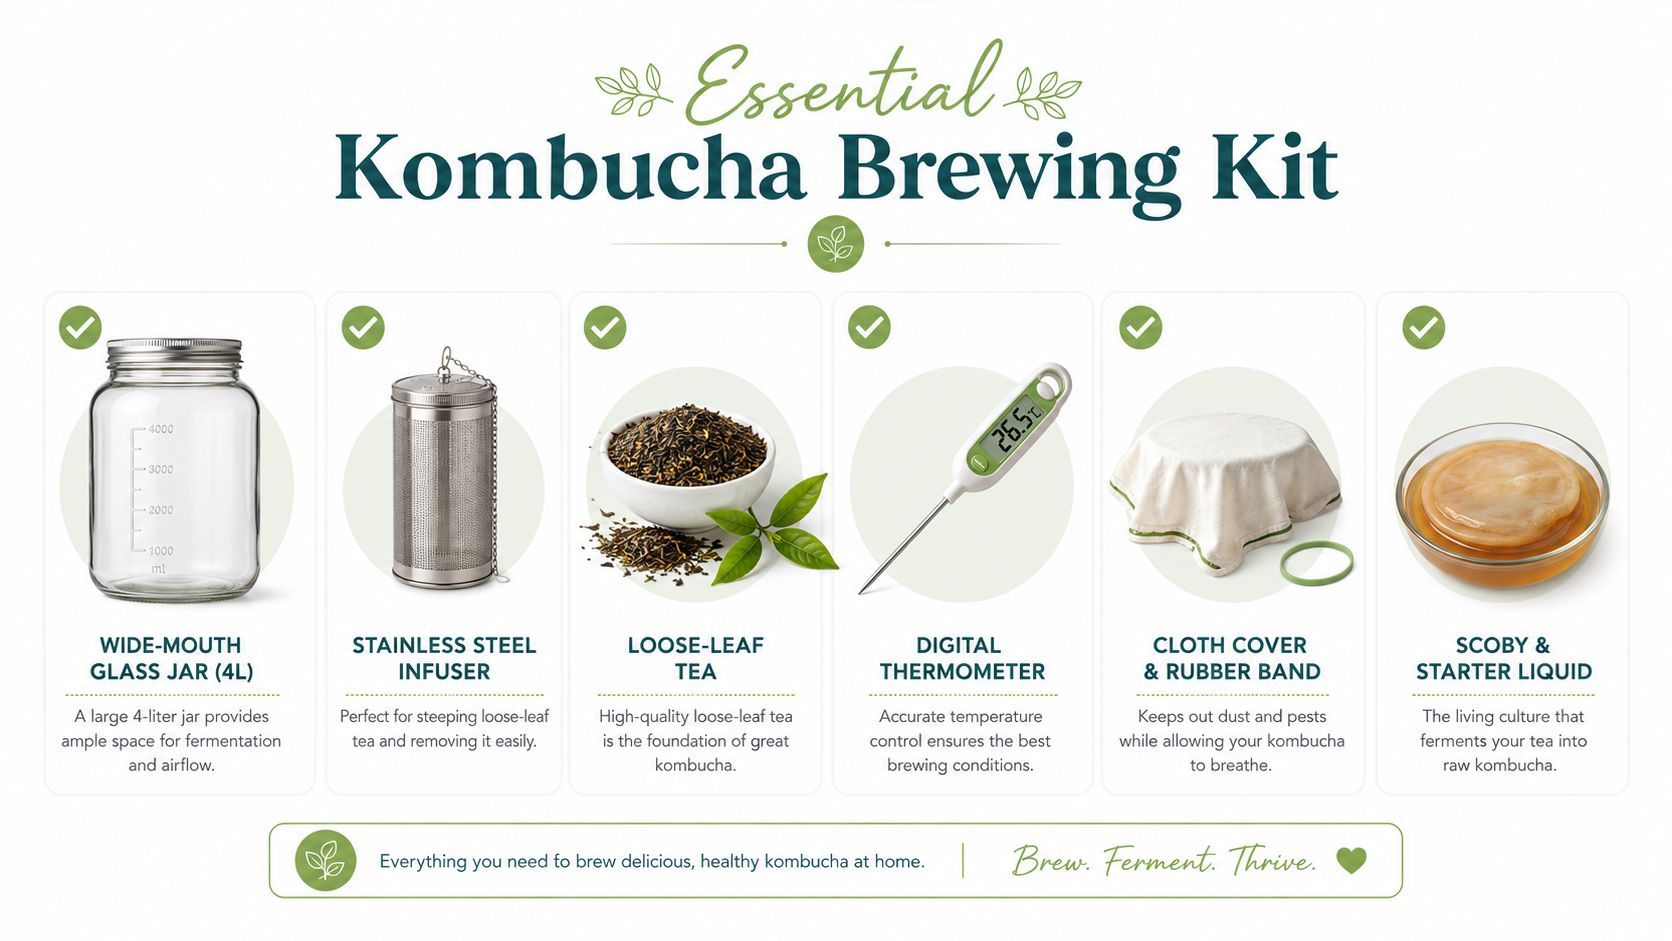
A successful home brew kombucha setup doesn't require a specialist laboratory, but the items you choose matter. Start with a wide-mouth glass brewing jar, ideally around four litres, because glass is non-reactive and the opening makes it easier to clean the walls and handle the culture. Food-grade stainless steel is also suitable. Avoid aluminium and other reactive metals, which can interact with acidic kombucha and affect the brew.
Australian food-safety guidance recommends food-grade glass or stainless steel, a covered vessel that allows gas to escape, and tea cooled to about 20 to 25°C within two hours before culture is added. The Food Safety Information Council's kombucha guidance is a useful reference to keep beside your brewing notes.
Build the kit around control
Use a tight-weave cloth, paper coffee filter or purpose-made fermenting lid secured with a rubber band. A loose kitchen towel can admit fruit flies and airborne debris, while a sealed lid during primary fermentation can trap gas. Keep a thermometer nearby, because guessing whether tea has cooled enough is an avoidable error.
A digital pH meter gives more precise readings when calibrated and maintained correctly. pH strips are cheaper and convenient, but their colour blocks can be difficult to read against dark tea. Add a long-handled stainless steel spoon, a fine mesh strainer, clean swing-top bottles or thick PET bottles, and a kitchen scale for repeatable sugar and flavour additions.
For tea, plain loose-leaf black tea is the dependable starting point. Tea bags work well too. Green tea can ferment successfully, but it tends to need gentler brewing temperatures and may produce a lighter, more delicate base. Avoid strongly perfumed teas and blends containing added oils until you understand how your culture responds.
Use ordinary cane sugar as the culture's food. Most sugar substitutes won't provide the same fermentable material, so a sugar-free final drink still begins with sugar in the brewing tea. Filtered water is preferable where tap water is heavily chlorinated, since chlorine can interfere with a living culture.
A SCOBY and starter liquid are not the same thing. The rubbery pellicle provides structure and microbial activity, while mature acidic kombucha helps lower the starting pH and establish the new batch. Source both from a brewer who can explain how the culture has been maintained, rather than accepting a dry pellicle with little or no starter liquid. Pep Tea's kombucha tea kit is one packaged option for people who want the core supplies together.
Making the Sweet Tea and Starting the Brew
The sweet tea and starter liquid should be treated as one connected sequence. Every stage affects the next one, so prepare the tea, dissolve the sugar, cool it properly and add the culture without leaving the mixture exposed unnecessarily.
Prepare the base
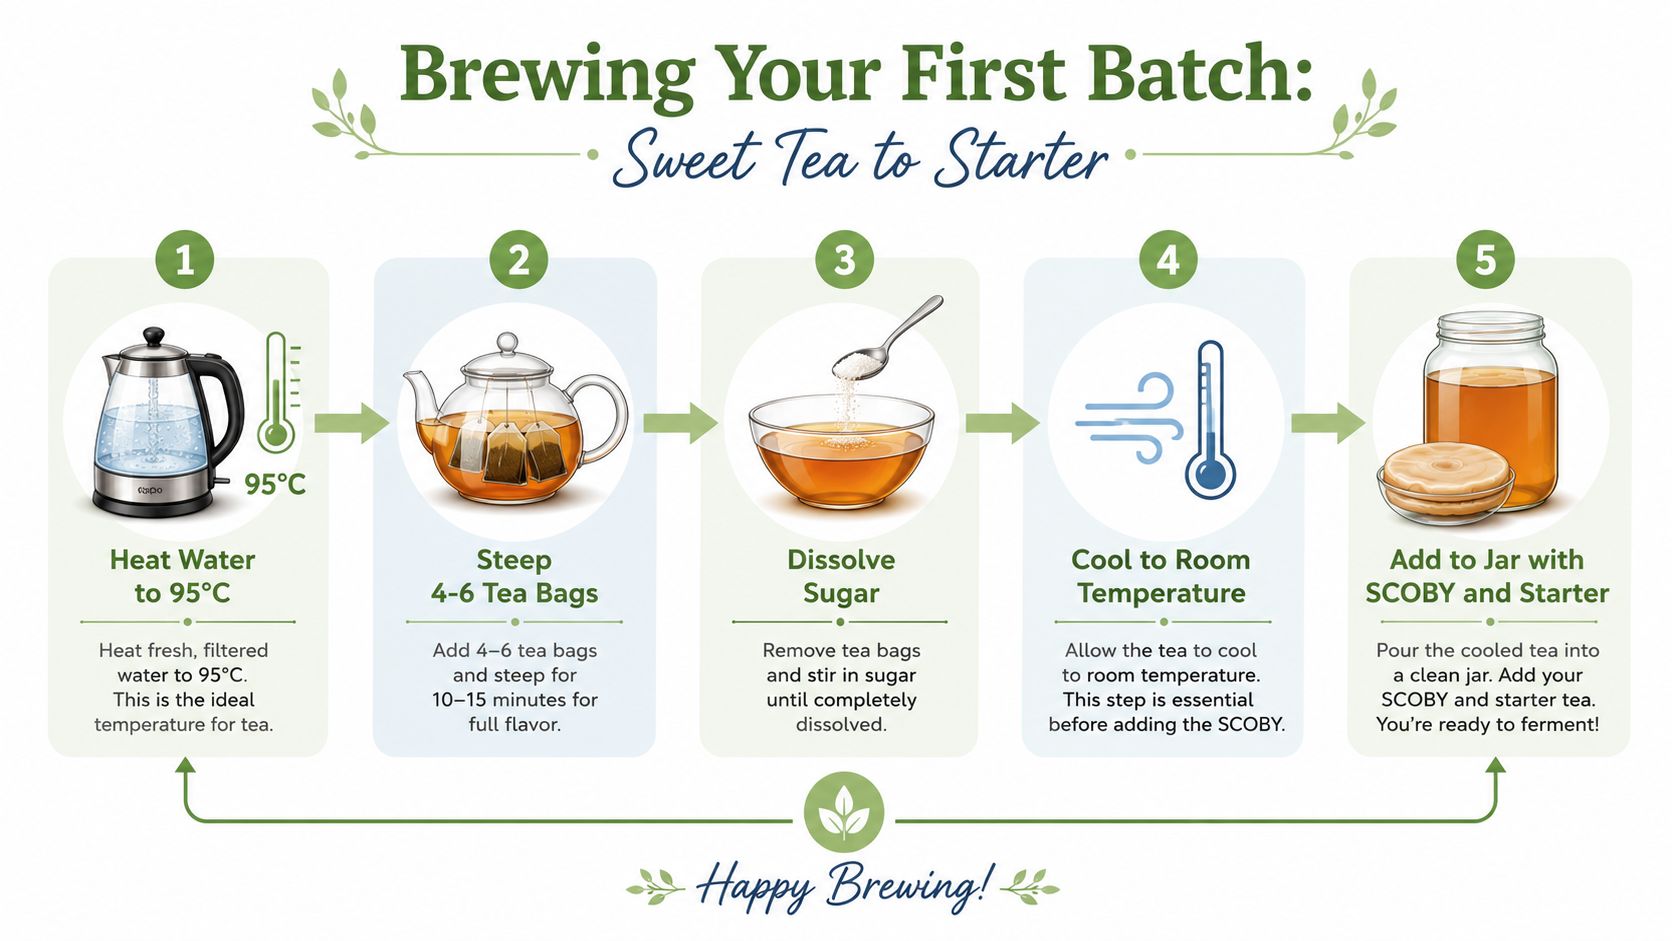
Heat filtered water to about 95°C, then steep four to six tea bags per litre for ten to fifteen minutes. Remove the tea bags or strain the loose leaves before the brew becomes harsh. While the tea is still hot, dissolve roughly 70 to 90 grams of cane sugar per four litres. Stir until no crystals remain on the base of the vessel.
Cool the sweet tea below 30°C before adding starter liquid or the SCOBY. Temperatures above 40°C can damage or kill the culture, so don't rely on a warm-to-the-touch test. An ice bath around the saucepan or brewing pot speeds cooling, but keep unboiled water out of the tea.
Pour the cooled tea into a sanitised brewing jar. Add starter liquid at roughly 10% of the batch volume, which is typically 400 ml for a four-litre brew, then place the SCOBY on top. It may float, sink or sit at an angle. Its position isn't a reliable measure of health.
Within the first day, a healthy culture may bring the brew to around pH 4.0 to 4.5. The useful temperature window for starting is approximately 22 to 28°C. If the tea remains warm, sweet and unchanged, check the thermometer, starter quality, sanitation and pH rather than adding more sugar at random.
Keep the jar away from direct sunlight, strong kitchen odours and high-traffic areas. Cover it with the breathable material described above, label the batch with the date and tea blend, and record the initial temperature and pH. That small record makes later troubleshooting far easier.
This video can help visual learners see the broad sequence, but use the Australian safety milestones in this guide when deciding whether your own batch is ready.
Primary and Secondary Fermentation Explained
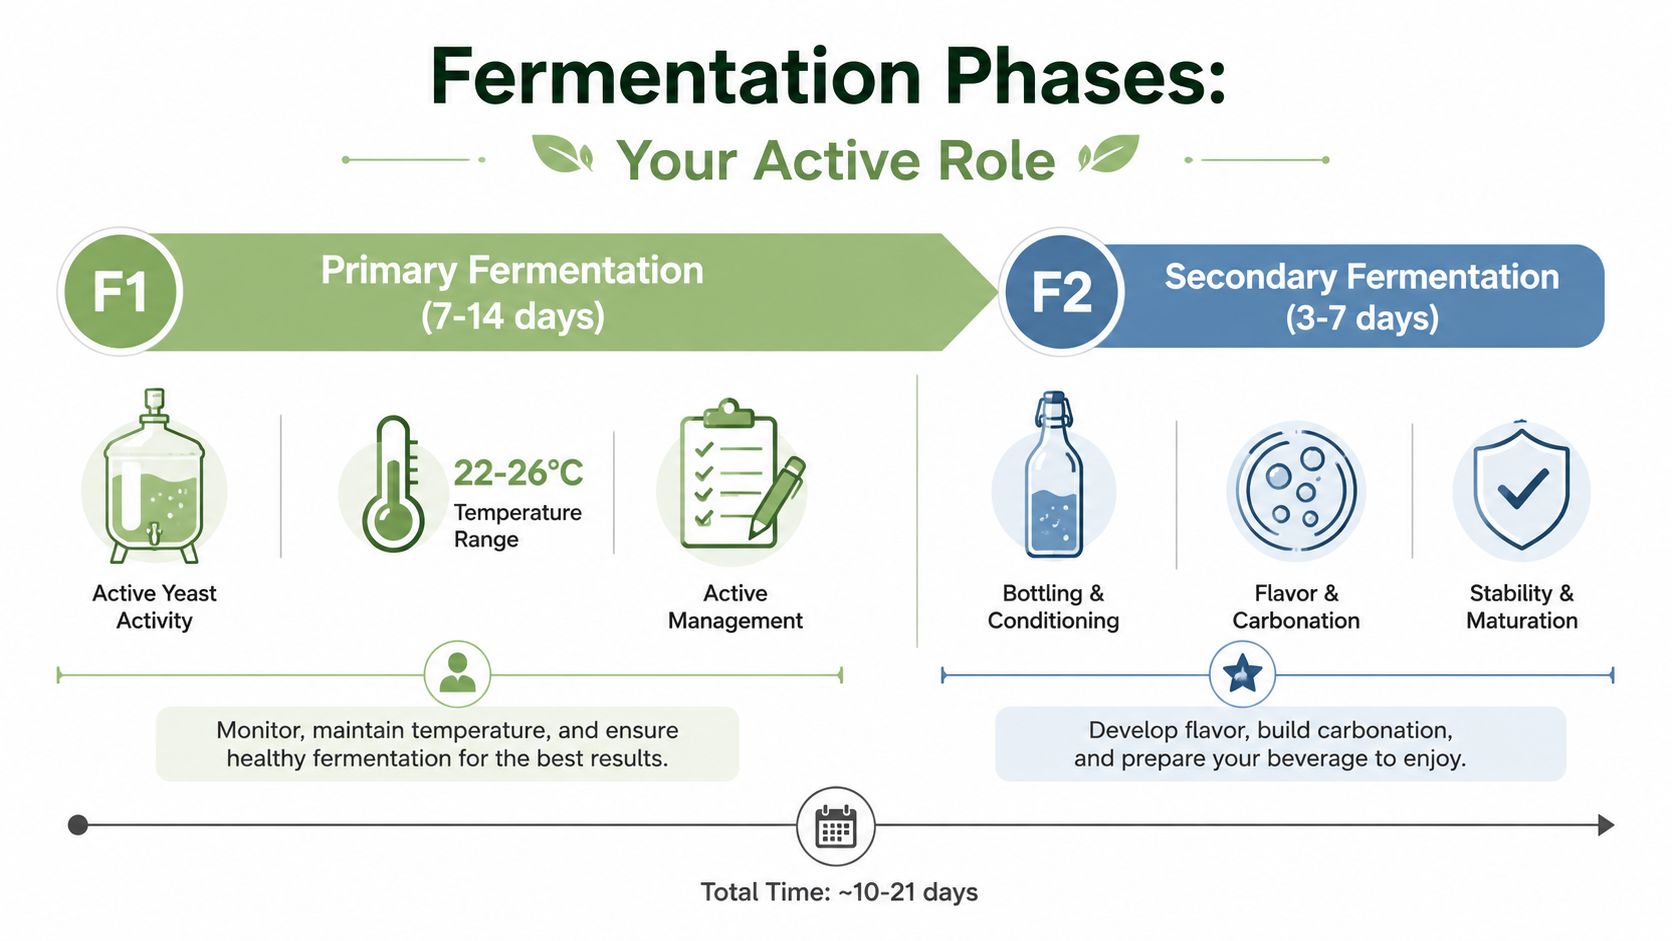
Primary fermentation, often called F1, is where the culture converts sweet tea into kombucha. Secondary fermentation, or F2, happens after you remove the SCOBY and bottle the liquid for flavour development and carbonation. Treating them as separate checkpoints prevents a common mistake, adding fruit or sealing the jar before the base has developed enough acidity.
F1 is an active phase
A practical Australian home-brewing window is seven to fourteen days at 22 to 26°C. Below 20°C, the culture can slow substantially, while a warmer room can accelerate fermentation and change the balance between sweetness, acidity and alcohol production.
Taste the liquid as it develops. A ready base is usually less sweet, lightly tart and sometimes slightly vinegary, with tea still present. Cheap pH strips may show approximately 3.2 to 3.8 at this stage, but don't use taste or the calendar alone to make a safety decision.
Fruit flies are a serious contamination risk. Secure a fine cloth with a rubber band, and inspect the cover regularly. A solid lid may seem cleaner, but it can trap carbon dioxide during an active ferment and create pressure in a vessel not designed to manage it.
F2 builds flavour and pressure
When F1 tastes balanced, remove the SCOBY and reserve mature starter liquid for the next batch. Strain the kombucha if needed, then decant it into clean swing-top bottles or thick PET bottles, leaving three to four centimetres of headspace.
Add fruit, juice, ginger, herbs or a carefully measured sugar addition. Seal the bottles and leave them at room temperature for two to five days, checking pressure as the liquid carbonates. Then refrigerate for a 24 to 48 hour cold crash. Cold storage slows yeast activity and makes opening less dramatic.
For glass bottles, use a cautious burp test. Open slightly over a sink, listen for pressure and close the cap if the release is aggressive. A leaking seal, bulging PET bottle, unusually hard glass bottle or forceful spray indicates over-pressurisation. Don't shake the bottle or open it near your face.
For a more detailed explanation of flavour development and bottle conditioning, use Pep Tea's guide to kombucha second fermentation. The important principle is simple: F1 develops the base, while F2 adds variables, so don't combine both phases when you're still learning to read your culture.
The Australian Alcohol Question Most Guides Skip
Kombucha can contain alcohol because yeast produces alcohol during fermentation. The amount varies with the culture, sugar availability, temperature, fermentation time and storage conditions. Australian regulatory material makes clear that this variation isn't theoretical.
A nationally coordinated Australian survey of fermented soft drinks found 35.2% were under 0.5% ABV, 41.9% were between 0.5% and 1.15% ABV, and 22.9% were above 1.15% ABV. These figures come from the Food Standards Australia New Zealand survey summary, and they show why a recipe alone can't guarantee a no-alcohol result.
In Australia, fermented soft drinks containing more than 0.5% ABV must carry an alcohol-content statement, while NSW Health says products above 1.15% ABV are treated as alcoholic drinks under NSW rules. NSW Health also warns that fermented drinks can contain varying alcohol levels and advises vulnerable consumers, including pregnant women, drivers and machine operators, to check labels before drinking. Read the NSW Health guidance on fermented drinks and alcohol before serving home brew to anyone who needs to avoid alcohol.
Factors That Increase ABV in Home Brewed Kombucha
| Factor | Effect on ABV | Practical control |
|---|---|---|
| Longer F1 fermentation | Gives yeast more time to ferment available sugar | Taste regularly and use pH records |
| Warmer room conditions | Can accelerate microbial activity | Keep the jar in a stable, moderate location |
| Extra sugar in F2 | Provides more fermentable material in a sealed bottle | Keep additions measured and conservative |
| Extended storage | Fermentation can continue if the drink stays warm | Refrigerate finished bottles promptly |
| Unpredictable culture balance | Yeast and bacteria may behave differently between batches | Keep batch notes and test when certainty matters |
Home controls can improve consistency, but they can't prove a batch is alcohol-free. Keep primary fermentation within a shorter, closely observed window, avoid excessive F2 sugar and refrigerate promptly. If you're serving pregnant guests, drivers, people taking medication or anyone avoiding alcohol for religious reasons, a laboratory test is more dependable than taste, a recipe or a home assumption.
People choosing mindful alternatives can also explore non-alcoholic beer options for 2026, while recognising that home brew kombucha needs its own fermentation controls.
Flavouring, Bottling, and Storing Your Batch
Flavouring is where a plain tea base becomes your house kombucha. A clean F1 gives you a better canvas than an over-fermented base, so taste the liquid before adding anything. If it already tastes sharply vinegary, fruit won't hide the imbalance. It will usually make the drink busier and harder to correct.
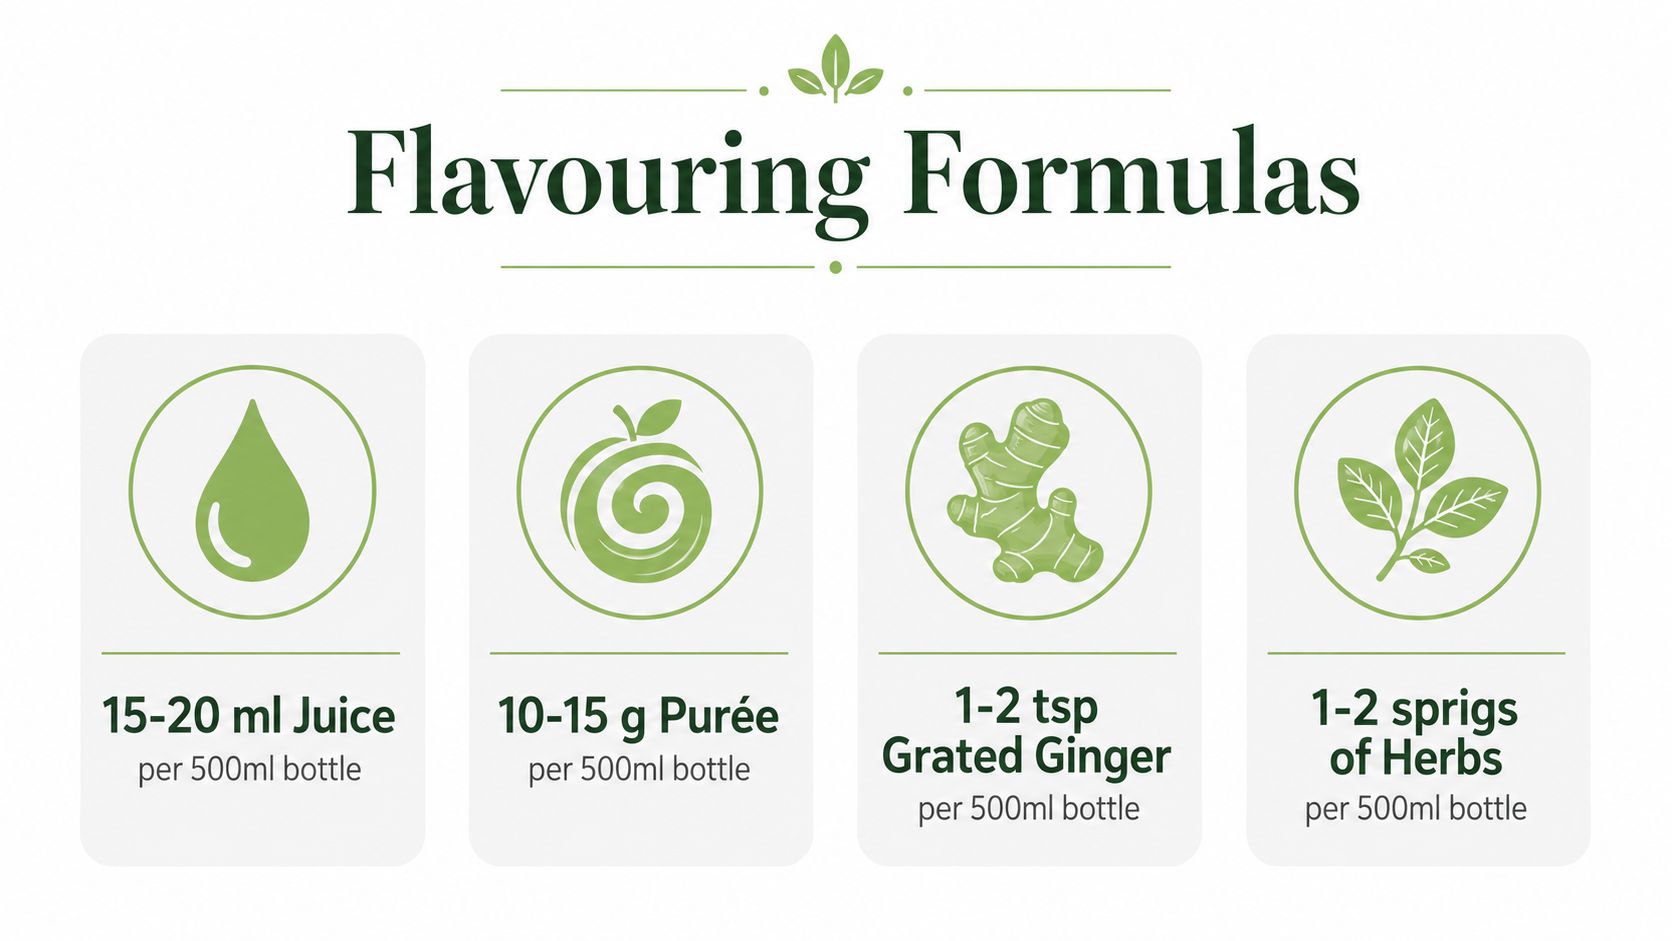
For a 500 ml bottle, start with one of these measured formulas:
- Juice: Add 15 to 20 ml for a clear fruit note.
- Purée: Use 10 to 15 grams for a fuller fruit texture.
- Dried botanicals: Try one to two teaspoons of ginger or hibiscus.
- Extra carbonation: Add five to ten grams of sugar only when you understand how quickly your bottles build pressure.
The most useful habit is a flavour log. Write down the tea, F1 taste, pH, fruit amount, room conditions, bottling date and carbonation result. A bottle that works beautifully with lime and ginger becomes a repeatable recipe instead of a one-off accident.
Choose bottles for the pressure you create
Swing-top glass looks good and works well when you monitor pressure, but it demands care. Thick PET bottles let you squeeze the sides and feel carbonation building, making them useful while learning. Repurposed commercial bottles are less predictable, especially if they weren't designed for secondary fermentation, so they shouldn't be your default.
Once the flavour is right, refrigerate finished bottles at 4°C. Cold slows yeast activity and helps preserve carbonation. An unopened bottle can remain at peak carbonation for three to six months, while an opened bottle should be consumed within three days.
A mature F1 vessel can also support continuous brewing. Remove a portion of finished kombucha and replace it with fresh sweet tea every seven to ten days, while keeping the vessel clean and monitoring acidity. Continuous brewing saves handling time, but it also makes contamination and drift harder to notice, so it suits organised brewers rather than anyone seeking a completely hands-off setup.
Troubleshooting Common Fermentation Problems
Fermentation faults are detective work. A new shape on the SCOBY doesn't automatically mean failure, and a pleasant smell doesn't automatically prove safety. Look at when the problem appeared, check pH, smell the liquid carefully and compare the batch with your records.
What happens early
During the first days, the surface may remain quiet. The SCOBY can sink, float, tilt or develop a thin new layer, and those changes don't by themselves diagnose a problem. A brown, stringy material is often yeast sediment or culture growth, especially when it appears without fuzzy patches or an unpleasant smell.
A sharp vinegar aroma usually means the acid-producing organisms are active. A lack of visible pellicle formation may reflect a culture adapting to a new tea, temperature or vessel. Check the temperature and pH before changing the recipe.
The Food Safety Information Council recommends fermentation at 18 to 26°C for about seven days, with pH falling below 3.0 by day seven. If it hasn't reached that point, the guidance says to continue fermentation with daily pH checks. Follow the Australian kombucha safety guidance rather than relying on appearance.
Recognise contamination
Mould usually appears as dry, fuzzy growth in colours such as blue, white or black. Fuzzy bubbles and spreading surface patches are not the same as smooth yeast strands or a new wet pellicle. If mould is present, discard the entire batch, including the SCOBY and starter liquid. Don't skim the surface and continue.
Kahm yeast can form a pale, wrinkled film and may smell yeasty. It isn't the same visual pattern as mould, but a questionable culture isn't worth rescuing when you're unsure. Strong cheesy odours, rotten aromas or bread-like smells that have gone wrong are discard signals.
Don't use a batch that remains above pH 4.6 after seven days. The Australian guidance's lower pH milestone is a useful safety checkpoint, while a persistently high reading suggests the culture hasn't acidified the tea as expected. Clean the equipment thoroughly and restart with fresh ingredients and reliable starter liquid.
Solve end-of-cycle problems
Flat kombucha usually means F2 lacked fermentable material, the bottle seal leaked or the drink was refrigerated before carbonation developed. Over-carbonation points to too much fermentable sugar, excessive time at room temperature or an active culture in a tightly sealed bottle. Open pressure-heavy bottles slowly over a sink, and don't keep them warm while hoping for more fizz.
A sour beer-like flavour can reflect an imbalanced or overextended ferment. A slimy texture may signal culture stress, excessive polysaccharide production or contamination. If the texture is accompanied by an off smell, unusual colour or uncertain pH, discard rather than trying to filter the batch.
Don't rescue a batch because you dislike wasting ingredients. Rescue it only when the evidence says the batch is sound and the fault is clearly flavour or carbonation.
Maintain a SCOBY hotel
A SCOBY hotel is a separate jar containing spare pellicles submerged in mature kombucha. It gives you backup cultures and a place to store layers you aren't using, but it still needs a breathable cover, clean handling and regular pH checks. Remove old layers when the vessel becomes crowded or the culture looks neglected.
A hotel isn't a substitute for fresh starter liquid. The liquid itself provides the acidic inoculation needed for a new batch, so reserve mature kombucha each time you brew. If the hotel smells foul, develops mould or fails to maintain suitable acidity, discard it and restart rather than treating it as an emergency supply.
Scale only when the process is repeatable
Moving from a home jar to a continuous-brew vessel changes the operational risk. Moving from there to café or retail volumes adds food-safety registration, documented sanitation, pH logging, ABV testing, batch traceability and consistent starter ratios. A larger vessel doesn't forgive inconsistent habits. It magnifies them.
Cafés should also plan for refrigeration, bottle pressure, staff handling and customer questions about alcohol. Commercial supplier support can help with SCOBY cultures and ongoing technical backup, including the type of support Pep Tea provides to cafés, but the venue still needs its own documented procedures and compliance checks.
Reliable brewers tend to share a few habits:
- Record every batch: Note ingredients, temperature, pH, taste and dates.
- Trust measurements over the calendar: A scheduled day isn't proof that fermentation is ready.
- Keep the culture fed: A hungry or repeatedly stressed SCOBY produces less predictable results.
- Inspect before tasting: Appearance, aroma and vessel condition come first.
- Refrigerate deliberately: Cold storage slows ongoing fermentation but doesn't erase alcohol already produced.
Pep Tea offers Australian-brewed sugar-free organic kombucha from the Hunter Valley, NSW, alongside organic Japanese matcha and kombucha-focused resources for home users and cafés. Visit Pep Tea to explore the range, learn more about dependable fermentation and choose a practical option for your next mindful drink.
Your Ultimate Guide to Using a Kombucha Tea Kit

If you've ever thought about brewing your own kombucha, a tea kit is the perfect way to begin. It cuts through the noise and gives you everything you need—most importantly, the living SCOBY culture—to turn sweet tea into that tangy, probiotic-rich drink you love. Think of it as your entry point into a seriously rewarding wellness practice, right from your own kitchen.
Your Home-Brew Kombucha Journey Starts Here
So, you're ready to dive into the world of home-brewed kombucha. Good on you! What might seem like a complicated science experiment is actually a simple, enjoyable process, and it all begins with your kombucha tea kit. Here at PepTea, we're passionate about authentic fermentation and natural ingredients, just like the proudly Australian, sugar-free kombucha we brew right here in the Hunter Valley, NSW.

More and more Aussies are discovering the satisfaction of home brewing, and for good reason. It’s about more than just making a drink; it's about connecting with your food, knowing exactly what’s going into your body, and unlocking some fantastic gut health benefits along the way. You’re the brewer now. You control the sweetness, the flavour, and the fizz.
Why Brew Your Own Kombucha?
Diving into home brewing isn't just a hobby; it’s a smart move towards a healthier lifestyle with a genuine sense of accomplishment.
- Total Control Over Ingredients: You pick the tea, the sugar, and the natural flavourings. That means no hidden preservatives or artificial junk.
- A Seriously Cost-Effective Habit: Brewing at home is dramatically cheaper than buying bottles from your local café, making daily kombucha an affordable wellness routine.
- An Endless Supply of 'Booch': Once you get started, your SCOBY will keep growing and reproducing. You’ll have a continuous supply for yourself, your family, and maybe even some friends.
- Endless Flavour Experiments: This is where the fun really begins. You can play around with seasonal fruits, fresh herbs, and spices to create your own signature blends.
Think of this guide as having a knowledgeable friend right there with you. We’ll walk you through every step, from unboxing your kit to that first fizzy sip. Your journey to becoming a confident home brewer starts now.
What's Inside Your Kombucha Tea Kit
Opening a new kombucha tea kit for the first time has a certain kind of magic to it. Let’s walk through what’s inside so you know exactly what you’re working with from day one. Each piece has a very specific job to do in turning simple sweet tea into that fizzy, probiotic-rich drink you’re after.
Think of it like getting the ingredients ready for a favourite recipe. The quality of each part directly shapes the taste and health of your final brew, which is why we’re big believers in starting with the best possible gear.
The Heart of Your Brew: The SCOBY and Starter Tea
The absolute centrepiece of your kombucha tea kit is the SCOBY. That stands for Symbiotic Culture of Bacteria and Yeast, and this rubbery, pancake-like disc is the living engine that drives the whole process. It’s not just an ingredient; it's a bustling little ecosystem of good bacteria and yeast that work together to ferment your sweet tea.
Your SCOBY will arrive swimming in a bit of strong, mature kombucha. This isn't just for keeping it safe during travel—it's your starter tea. This liquid is non-negotiable for a successful first batch. It immediately drops the pH of your sweet tea, creating an acidic environment that acts as a bodyguard, protecting your brew from mould and other unwanted microbes.
Always handle your SCOBY with clean hands. It's a living thing, and giving it a healthy, clean start is the single most important thing you can do for your first brew.
Your Brewing Essentials
Beyond the SCOBY, your kit has everything else you need to get fermentation started. We've chosen each item to make the process as straightforward and successful as possible.
- Glass Brewing Jar: This is your SCOBY's new home. Glass is the perfect material because it’s non-reactive and won’t hold onto weird odours or bacteria from previous uses.
- Organic Tea: The SCOBY literally feeds on the nutrients and tannins found in tea. Using a high-quality organic black or green tea—like the ones we use at PepTea—provides the best "food" for a healthy, thriving culture. To learn more about this crucial relationship, check out our guide on why kombucha needs real tea.
- Raw Organic Sugar: Don't stress about the sugar content! The SCOBY consumes almost all of it during fermentation, turning it into the beneficial organic acids that give kombucha its signature tangy kick. Most of this sugar is long gone by the time your brew is ready to drink.
- Cloth Cover and Tie: Your brew needs to breathe, but you also need to keep out dust and pesky fruit flies. A tightly woven, breathable cloth cover allows for that essential airflow while keeping your kombucha protected.
A good kombucha tea kit sets you up for success from the get-go. Here’s a quick inventory of what you'll find and why each part is so important.
Your Kombucha Tea Kit Inventory
A breakdown of each component in your kit, its function, and our tips for getting the best results.
| Component | Primary Function | PepTea Pro-Tip |
|---|---|---|
| SCOBY & Starter Tea | The living culture that ferments the tea. | Always add the starter tea to your brew. It's essential for creating the right acidic environment from the start. |
| Glass Brewing Vessel | Provides a safe, non-reactive home for fermentation. | Avoid metal or plastic containers. A wide-mouth jar makes it easier to access your SCOBY. |
| Organic Tea Leaves | The primary food source of nutrients for the SCOBY. | Stick with plain black or green tea. Flavoured teas with oils (like Earl Grey) can harm your SCOBY. |
| Organic Raw Sugar | The fuel the SCOBY consumes to produce acids and probiotics. | Don't substitute with honey or artificial sweeteners, as they can damage the culture. |
| Breathable Cloth Cover | Allows airflow while protecting the brew from contaminants. | Secure it tightly with a rubber band to keep curious fruit flies out. They love kombucha! |
| pH Strips (Optional) | Helps you monitor the acidity of your brew for safety. | A healthy brew should have a pH of 4.5 or lower within the first few days and finish between 2.5 and 3.5. |
With these components, you have a complete brewing ecosystem ready to go. Now, let’s get it set up.
Setting Up Your First Brew For Success
Getting your first brew right is more than half the battle. This is where you lay the foundation for a healthy, vibrant kombucha, and a little bit of care at this stage goes an incredibly long way. Think of it less as following a recipe and more as creating the perfect environment for your SCOBY to do its work.
We’ll walk through the hands-on process, but more importantly, we'll explain the 'why' behind each step. Understanding this from day one is how you build real brewing intuition.
The Golden Rule: Sanitation
Before you even think about boiling water, we need to talk about cleanliness. This is the single most critical part of home brewing, period. Your SCOBY is a living colony of good bacteria and yeast, and the last thing you want is for it to compete with unwanted airborne mould or other nasties.
A successful brew starts with a spotless setup. Before you begin, you need to know how to properly sterilize jars and all your equipment. For most brewing, a simple wash with hot, soapy water followed by a very thorough rinse is enough. If you want extra peace of mind, a final rinse with plain white vinegar creates an acidic barrier that contaminants hate.
- Wash Everything: Your big glass jar, spoons, and measuring cups all need a good wash with hot water and a little dish soap.
- Rinse Thoroughly: Make absolutely sure no soap residue is left. Soap can seriously harm your SCOBY.
- Clean Hands: Wash your hands well before you handle your SCOBY or any other part of your kombucha tea kit.
Brewing The Perfect Sweet Tea
With a clean station, it’s time to make the food for your SCOBY: sweet tea. It’s important to remember the sugar isn't for you—it’s the fuel your culture will consume during fermentation. Don't be tempted to cut the sugar, as an underfed SCOBY won't ferment properly and can become weak.
First, bring about 1 litre of filtered water to a rolling boil. Using filtered water is a smart move; the chlorine found in some tap water can be tough on the delicate microorganisms in your SCOBY.
Pour the boiled water into your brewing jar, add the organic tea, and let it steep for 10–15 minutes. This isn't just for flavour; it extracts the vital nutrients the SCOBY needs to thrive.
Next, remove the tea bags. Add the raw sugar and stir with a clean spoon until every last crystal is dissolved. You can't have any sugar settling at the bottom, as the SCOBY won't be able to get to it. Finally, top it up with the remaining cool, filtered water to help bring the temperature down.
CRITICAL STEP: You must wait for the sweet tea to cool completely to room temperature, which is somewhere between 20-29°C. Adding your SCOBY to hot or even warm tea will kill it. Seriously. Be patient here; it’s absolutely worth the wait.
This simple flowchart shows how the core components of your kombucha tea kit come together.

As you can see, fermentation is a process of transformation. The SCOBY takes the simple sweet tea you've made and turns it into delicious, living kombucha.
Introducing Your SCOBY To Its New Home
This is the moment it all comes together. Your tea is cool, and your SCOBY is ready to get to work.
Gently pour the entire contents of the SCOBY package—the disc itself and all of the starter liquid—into your jar of sweet tea. That starter liquid is non-negotiable. It’s a measure of strong, mature kombucha that immediately drops the pH of your brew, making the environment acidic enough to welcome your SCOBY and ward off mould.
Don't worry if your SCOBY sinks to the bottom, floats on top, or even turns sideways. This is completely normal. A new baby SCOBY will eventually form at the surface, no matter what the original one decides to do.
Finally, cover the mouth of the jar with the breathable cloth from your kombucha tea kit and secure it tightly with the rubber band. This keeps out dust and pesky fruit flies but allows your brew to breathe. Now, find a warm, dark spot away from direct sunlight, and let the magic begin.
Kicking Off the First Fermentation (F1)
Alright, your brewing jar is set up and tucked away. Now for the magic. This is the first fermentation, or F1, where your SCOBY gets to work, turning that sweet tea into the tangy, probiotic-rich drink you’re after. It’s a quiet but incredibly active process.

During this stage, the yeast and bacteria in your SCOBY are feasting on the sugar you added. They’re converting it into beneficial organic acids, a whole spectrum of B vitamins, and of course, those gut-friendly probiotics. Your only job right now is to let it do its thing.
How Long Does It Take?
Patience is a brewer’s most useful tool. A standard F1 can take anywhere from 7 to 21 days, but that’s just a rough guide. The single biggest factor is temperature.
Think of your SCOBY as a tiny engine. In a warmer Aussie kitchen, say in Brisbane, its metabolism will be in high gear, and you might have finished kombucha in just a week. But in a cooler spot, like a Melbourne pantry in winter, things will slow right down, possibly stretching to three weeks or more.
Don't get fixated on the calendar. The best kombucha is brewed to taste, not to a schedule. Your palate is the most important tool you have.
You’re part of a massive shift in how Australians think about drinks. The local kombucha market is booming, with projections showing it could hit USD 650.4 million by 2033. This isn't just a niche trend; it's a mainstream move powered by a 15.1% CAGR from 2026 to 2033 as people swap sugary soft drinks for something better. You can dive deeper into the numbers in this comprehensive market analysis by Grand View Research.
What to Look For: Signs of a Healthy Brew
It’s completely normal to feel a bit anxious with your first batch. Is it working? Is that normal? Here’s what a healthy, happy fermentation looks like:
- A New SCOBY Forming: After a few days, you should see a thin, almost clear film spreading across the surface. This is your brand new 'baby' SCOBY! It might look patchy at first but will soon grow into a solid, creamy layer.
- Tiny Bubbles: Look closely. You might spot tiny bubbles rising to the surface. That’s carbon dioxide, a natural sign that the yeast is actively fermenting the sugar. It’s alive!
- The Smell is Changing: Your brew will slowly transform from smelling like sweet tea to having a sharper, slightly vinegary aroma. That’s the smell of success—it means those healthy acids are developing.
- Brown, Stringy Bits: Don’t panic if you see brown, stringy strands dangling from your SCOBY or settling at the bottom. These are just bits of healthy yeast and are a completely normal part of the process.
The All-Important Taste Test
Around day seven, it’s time to start tasting. This is how you’ll know exactly when your kombucha is ready for the next step.
Gently push a clean straw or pipette down the side of your SCOBY, past the new growth, and draw out a small sample. You’re looking for a flavour balance that’s right for you.
- Too sweet? It tastes more like sweet tea than kombucha. The SCOBY needs more time. Pop the cloth cover back on and let it keep working its magic.
- Too tart? It’s a bit too sharp or vinegary for your liking. You’ve just let it ferment a little long. No drama at all—this extra-strong brew is the perfect starter tea for your next batch.
- Just right? It has that perfect mix of sweet and tangy. Congratulations! Your first fermentation is done.
Once you get a few brews under your belt, you might want to get a bit more precise. Using a pH meter can help you dial in your process. A finished F1 typically sits in the 2.5 to 3.5 pH range. For brewers looking to achieve that next level of consistency, you can explore the digital pH meters available to help standardise your results.
When you hit that perfect flavour profile, you’re ready for the really fun part.
Mastering Flavour and Fizz with a Second Fermentation (F2)
Right, this is where the real fun begins. The first fermentation gave you kombucha, but the second fermentation, or F2, is where you get to turn it into something special. This is the step that creates that signature fizz and lets you infuse all kinds of creative flavours. It’s how you go from just making kombucha to making your kombucha.

The science is simple. You bottle your finished kombucha in an airtight container with a small sugar source—usually fruit. The yeast that’s still active in your brew gets to work on this new sugar, producing carbon dioxide. Because the gas has nowhere to go, it dissolves into the liquid, creating that lovely natural carbonation.
Bottling for a Perfect Fizz
Before you start experimenting with flavours, we need to talk about bottles. This is the most important safety step in the entire process. Carbonation builds a surprising amount of pressure, and you have to respect it.
- Use Proper Bottles: This is absolutely non-negotiable. You must use pressure-rated, swing-top (Grolsch-style) bottles designed to hold carbonated drinks. Never, ever use regular decorative jars or thin glass bottles. They can and do explode, which is both dangerous and incredibly messy.
- Leave Some Headspace: Don't fill the bottles all the way to the top. Always leave about 2-3 centimetres of empty space. This little air pocket gives the CO2 room to build up without putting too much stress on the glass.
- Get a Good Seal: Make sure the seals on your swing-top bottles are in good condition and create an airtight lock. If the seal is weak, all that lovely carbonation you’re trying to create will just leak out, and you’ll end up with flat, flavoured tea.
Think of the second fermentation as a mini-ecosystem in a bottle. You are providing the yeast with a final meal and trapping the results. The right bottle is your most important piece of safety equipment.
Infusing with Natural Flavours
Now you get to be the artist. The Australian market for wellness drinks is booming, with a projected 9.5% CAGR from 2026 to 2032. A huge driver of that growth is the demand for exciting, natural flavour combinations. You can read more about how flavour is shaping the industry in this insightful Australian kombucha market report.
This is your chance to tap into that trend right in your own kitchen. Here are a few simple ideas to get you started, inspired by our own sugar-free PepTea range and the fantastic fresh produce we have in Australia.
- Classic Ginger: Add 1-2 teaspoons of finely grated fresh ginger to a 500ml bottle. It’s a classic for a reason, delivering a spicy, warming kick that never gets old.
- Zesty Lime & Ginger: Take the classic ginger and add a squeeze of fresh lime juice. It creates a vibrant, sharp combination that is unbelievably refreshing.
- Tropical Mango: Add 1-2 tablespoons of puréed ripe Queensland mango. The natural sugars in the fruit give the yeast plenty to work with, resulting in a fantastic fizz and a beautiful tropical flavour.
Achieving That Signature Carbonation
Once you’ve bottled and flavoured your brew, leave the bottles at room temperature for another 1-3 days. The warmer the room, the faster the carbonation will build.
You'll need to check the fizz level daily. The best way to do this is to "burp" one of the bottles—just carefully and slowly crack the seal. If you hear that satisfying psst, they’re ready. Be warned: a very active brew can gush out like a shaken soft drink, so open it over the sink.
As soon as you’re happy with the level of fizz, get all the bottles into the refrigerator immediately. The cold halts the fermentation process, stopping it from becoming over-carbonated and locking in that perfect sparkle.
And that's it. Your delicious, flavourful, fizzy home-brewed kombucha is ready to drink. Cheers to that.
SCOBY Care and Solving Common Brewing Problems
Your SCOBY is a living thing, and it’s pretty self-sufficient. As you brew more batches with your kombucha tea kit, you'll notice it growing new layers. This is a great sign—it means your culture is healthy and active.
Eventually, you’ll have more SCOBY than you need for one brew. Don’t throw the extra bits away. You can start what brewers call a “SCOBY hotel”. It’s just a spare jar where you keep your extra cultures submerged in some mature kombucha from a previous batch. This keeps them healthy and ready for your next brew or for sharing with a friend.
Your Brewing Troubleshooting Guide
Even experienced brewers run into small issues. Don't worry; most common problems are easy fixes and are just part of the learning curve. Here’s what to look out for.
A slow brew is a frequent concern. If it feels like fermentation is dragging on, temperature is almost always the reason. Your SCOBY is less active when it’s cool, so try moving your jar to a warmer spot. The top of the fridge or near another running appliance often works well, just be sure to keep it out of direct sunlight.
Another thing new brewers notice is a SCOBY that sinks, floats sideways, or just hovers in the middle of the jar. This is completely normal and doesn’t affect the fermentation. A new baby SCOBY will form on the surface, no matter what the mother culture is doing below.
Identifying and Handling Mould
The biggest fear for any new brewer is mould. Thankfully, with basic hygiene, it's quite rare. Mould looks exactly like you'd expect—fuzzy, dry, and often colourful. It will always grow on the surface of the liquid and can be white, green, blue, or black.
Good hygiene is the best defence. Learning how to prevent cross-contamination in your kitchen is a non-negotiable skill for any home brewer. This really just means washing your hands and equipment thoroughly before you start.
What isn't mould? Brown, stringy bits hanging off your SCOBY, cloudy sediment at the bottom of the jar, or even dark patches within the culture itself are usually harmless yeast strands. These are all signs of a healthy, active brew.
If you are 100% certain you have mould, the batch can't be saved. You have to throw out the entire brew, SCOBY included. Don't ever try to scoop the mould off; microscopic spores will have already contaminated the entire liquid. It happens. Just sterilise your equipment thoroughly and start again with a new culture.
Caring for your SCOBY is a hands-on learning process. For a closer look, you can learn more about the life of your kombucha SCOBY in our dedicated guide.
Your Kombucha Brewing Questions Answered
When you're just starting out with a kombucha tea kit, a few questions always come up. It's completely normal. As tea and kombucha specialists, we’ve put together the straightforward advice we give every new brewer.
Think of this as your cheat sheet for a confident and successful first brew.
Is It Actually Safe to Brew Kombucha at Home?
Yes, it’s incredibly safe. When you follow the basic sanitisation steps and start with a quality kombucha tea kit, you're creating an environment where only the good stuff can thrive.
The real magic is in the brew itself. Kombucha naturally develops a low pH, creating an acidic liquid where harmful pathogens just can't get a foothold. It’s the brew’s own clever way of protecting itself, and you.
How Much Homemade Kombucha Should I Drink a Day?
If you’re new to the world of kombucha, start slow. A small glass of about 125ml (a half cup) per day is the perfect starting point. This gives your gut a chance to get acquainted with all those new, beneficial probiotics without feeling overwhelmed.
Once your body adjusts, you can gradually work your way up. Many long-time kombucha drinkers enjoy anywhere from 250–500ml daily. The most important thing? Listen to your body. It knows best.
Can I Use Different Teas for My Kombucha?
You can, but there are a few things you need to know first. For a healthy, thriving SCOBY, nothing beats plain, unflavoured black or green tea. These teas, from the Camellia sinensis plant, provide the specific nutrients and nitrogen your culture needs to do its job properly.
Herbal teas might sound like a fun experiment, but they lack the essential compounds to keep your SCOBY strong, and can weaken it over time. Teas that contain oils, like Earl Grey or other flavoured blends, are a definite no-go for your primary fermentation—the oils can coat and damage the culture. For the best results, stick with a high-quality organic tea.
Ready to get started? PepTea has everything you need to begin brewing authentic, delicious kombucha in your own kitchen.