
Tag: kombucha troubleshooting
Kombucha from Scoby

Your first jar of kombucha from a SCOBY may look lively: a pale layer is forming on top, bubbles cling to the glass, and the tea smells sharper than it did when you brewed it. But is it ready, or just getting sour? For a careful home brewer, success isn't a taste test alone. It's a fermentation process you can observe, measure and repeat.
Kombucha can be rewarding to make, but a living culture doesn't follow an exact timetable. Cooling, acidity, oxygen, cleanliness and fermentation conditions all shape the result. Here's how to work with those variables, recognise what you can't confirm by sight, and make safer decisions about each batch.
Why SCOBY Kombucha Needs Careful Control
A jar can be busy on day three and still be early: bubbles rise, the aroma turns sharper, and a pale film spreads across the surface. Useful signs, all of them. They show fermentation is active; they do not prove the tea has cooled safely, acidified enough, or stayed below an alcohol level that suits your household.
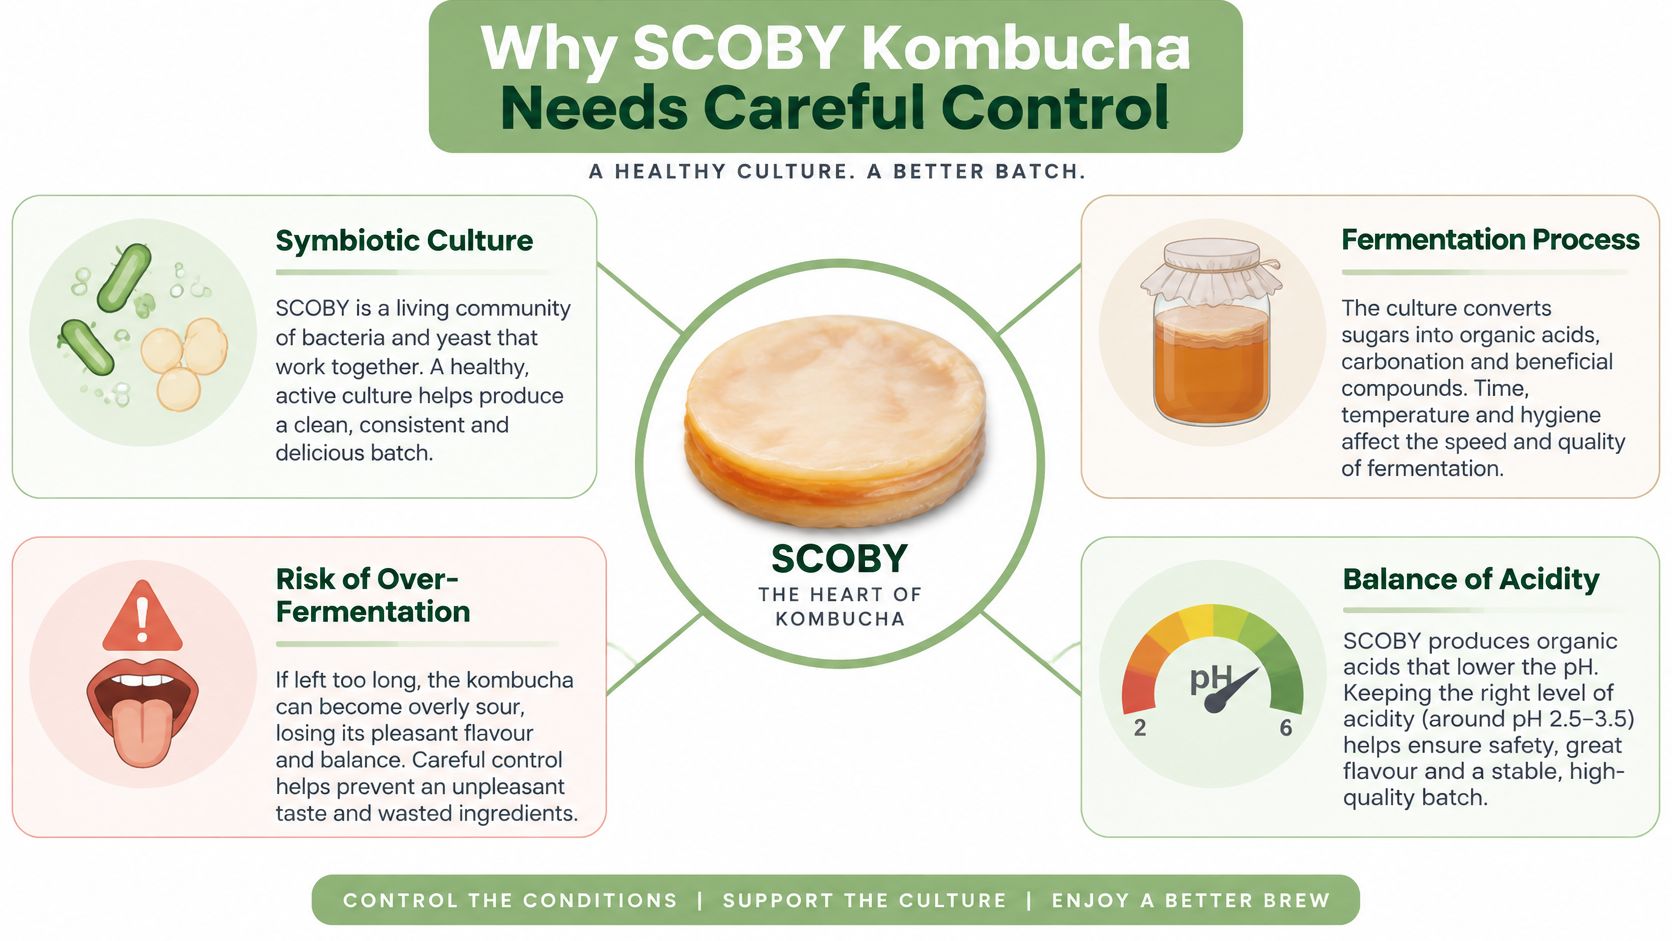
Treat the brew as a controlled process rather than a recipe that finishes itself. A SCOBY is a symbiotic culture of bacteria and yeast. The yeast portion converts sucrose into glucose and fructose, then makes ethanol and carbon dioxide. Acetic-acid bacteria need oxygen to turn that ethanol through acetaldehyde into acetic acid, which is why airflow through a tight cloth, temperature and time all change the same batch.
Treat sensory signs as clues, then measure
Australian food-safety guidance puts numbers around those stages, from fresh tea around pH 5 before the culture brings it down, to hot tea cooling from 60°C to 20°C within two hours before inoculation, to pH 4.2 or below during fermentation as an acidity checkpoint for limiting pathogen growth and toxin production, with a typical finished kombucha described as pH of at least 2.5 and a common final alcohol target less than 1% while some state rules are stricter: Australian fermented-beverages food-safety guidance
Those figures work like gauges on a dashboard. Sweetness, fizz and a pleasant tang are the warning lights that tell you something is happening; pH, cooling time and an alcohol-aware endpoint tell you whether the batch is moving in the right direction. If alcohol content matters for children, pregnancy, driving or medication in your home, decide that limit before bottling rather than after the flavour seems right.
This guide is educational and cannot make a home batch commercially validated or automatically safe. A written cooling time, a clean routine and recorded pH give you a firmer basis for each decision than bubbles, smell or a brave sip.
Prepare Your SCOBY Brew
Before brewing, set up a clean workspace and gather the equipment you'll use to make and monitor the batch. You don't need a complicated laboratory, but you do need a consistent routine.
Choose a culture from a batch that has fermented normally and smells clean and pleasantly tart. The culture is present in the liquid as well as in the familiar rubbery surface layer, so keep some fermented starter liquid with the SCOBY. A new surface layer may form during brewing, but its shape or thickness isn't a reliable test of safety.
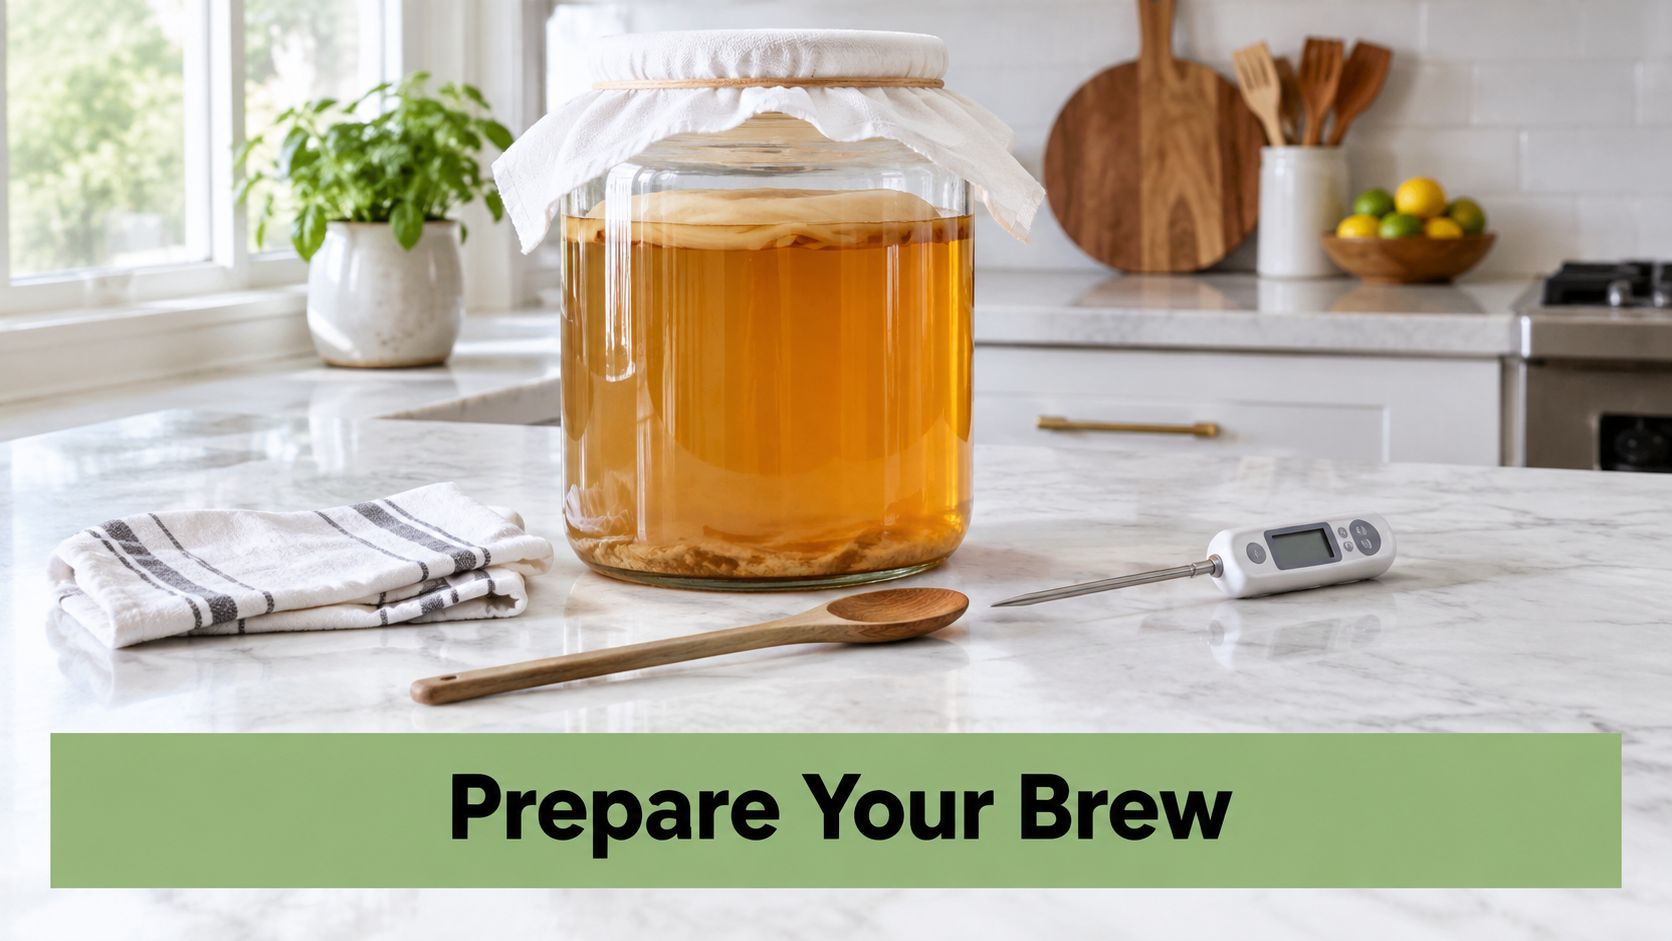
Gather a practical setup
- A clean fermentation vessel: Choose a food-safe vessel that's easy to inspect. A wide opening makes it simpler to add the culture and take samples.
- A breathable cover: Use a clean, tightly secured cloth to keep out insects and debris while allowing air to reach the brew.
- A strainer and clean utensils: These help you handle tea leaves and culture without introducing unwanted residue.
- A way to test pH: Use a calibrated meter or validated pH strips, following the product instructions. Keep testing equipment clean and suitable for food use.
- A batch log: Record ingredients, cooling and inoculation times, temperature observations and pH readings.
For a base formula, use clean water, tea, sugar, a SCOBY and fermented starter liquid from a reliable batch. There isn't one ratio that suits every culture or tea; a recipe that works in one kitchen may behave differently with another tea, a different amount of starter or changed room conditions. Treat the sugar as food for fermentation, not as a sweetener you can remove without changing the process.
Black and green tea are common choices, and other suitable teas may be used if they support a healthy culture. Choose clean, food-grade ingredients, and opt for organic tea and sugar if that fits your preferences. Most of all, don't add the culture to hot tea. Build a routine around measured cooling and clean handling rather than improvising when the kettle is already on.
Brew Kombucha With a SCOBY
Brew the sweet tea and dissolve the sugar fully while the liquid is still hot, then strain out the leaves. Undissolved sugar sinks to the bottom of the vessel and gives the culture an uneven starting point, which makes the batch harder to interpret later on.
Cool the infusion promptly. Australian home-brewing pH and temperature guidance recommends moving the liquid from 60°C to 20°C within two hours, the same cooling logic a commercial kitchen applies to cooked food: a warm, sweet, unacidified liquid gives contaminants time to multiply before fermentation can protect it. Once the tea has cooled, add the SCOBY and starter liquid straight away rather than letting the vessel stand.
The starter liquid earns its place here. It carries acid from a finished batch into the fresh tea, so the pH begins falling immediately instead of drifting in the vulnerable range while the culture wakes up.
Pour everything into the fermentation vessel and leave headspace at the top. Secure a breathable cloth over the opening so insects stay out but air still reaches the surface. Oxygen matters at this stage because the acetic-acid bacteria need it to convert the alcohol the yeast produce into acetic acid. A sealed lid would stall the very reaction that makes the brew acidic and safe.
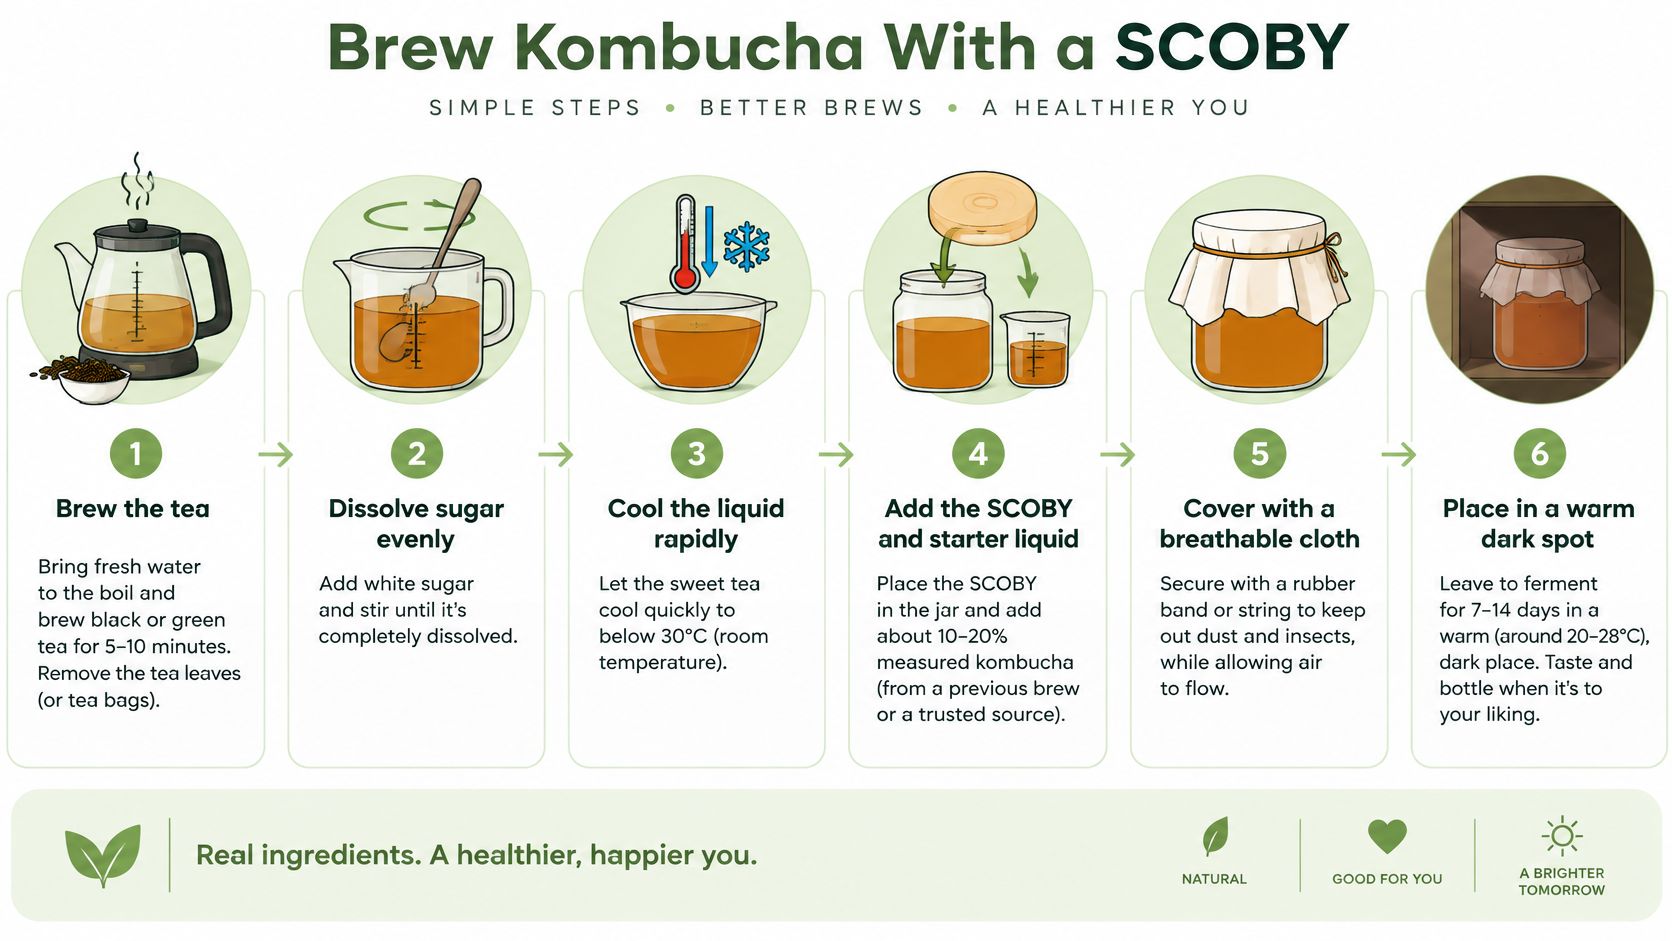
Label the vessel and write down the ingredients, when the tea was brewed, when it finished cooling and when the culture went in. That start time is your reference point for every reading that follows.
Keep the record with the jar. A taste note can describe the flavour, but a process log can help explain why this batch behaved differently from the last one.
A video can help you visualise the handling sequence before your first batch.
For another perspective on fermented and other digestive drinks, see AloeCure's guide to gut drinks. Use any general drink ideas as inspiration only, not as a replacement for monitoring a live fermentation.
Guide Fermentation With pH and Time
During primary fermentation, the yeast and bacteria steadily transform the sweet tea. You may see bubbles, a surface film or shifts in colour, and the smell may turn sharper. These signs tell you the culture is alive, but they can't tell you how acidic the liquid has become or how much alcohol it holds. Treat them the way a teacher treats a student's raised hand: a signal to look closer, not proof of understanding.
The reliable check is a measured one. Take pH readings with a clean, sample-safe method and log each result beside your temperature observations, working from the start time you recorded when the culture went in. The acidity checkpoints described earlier still apply: fresh sweet tea sits in a range where contaminants can grow, so your job is to confirm the brew acidifies promptly. For a controlled home process, a practical benchmark is reaching the safe-acidity threshold by about day 7, though this isn't a universal schedule. Culture strength, sugar concentration, temperature, tea type and starter volume all shift the pace. A slow batch isn't automatically unsafe, but a reading that barely moves across a week deserves attention rather than patience.
A calibrated meter gives you a precise number, while validated strips offer a workable alternative when you follow their instructions. Whichever you use, pull the sample cleanly and never return it to the vessel. If you're weighing up equipment, a digital pH meter for kombucha testing removes the guesswork of matching a strip's colour to a chart.
Decide on the endpoint, not just the flavour
Once the primary ferment has cleared the acidity checkpoint, taste becomes a preference question rather than a safety test. As covered earlier, finished kombucha typically sits at pH 2.5 or lower; what matters here is deciding when to stop. Letting the ferment run longer won't make it safer. It pushes the flavour towards vinegar and makes the batch harder to predict.
Secondary fermentation is a separate stage with its own risks. Bottling for flavour or carbonation removes the oxygen the primary vessel allowed, so the acetic-acid bacteria slow down while yeast keeps producing carbon dioxide in a sealed space. Pressure builds. Use bottles rated for carbonation, open them carefully, and treat refrigeration as a brake on fermentation rather than a stop button.
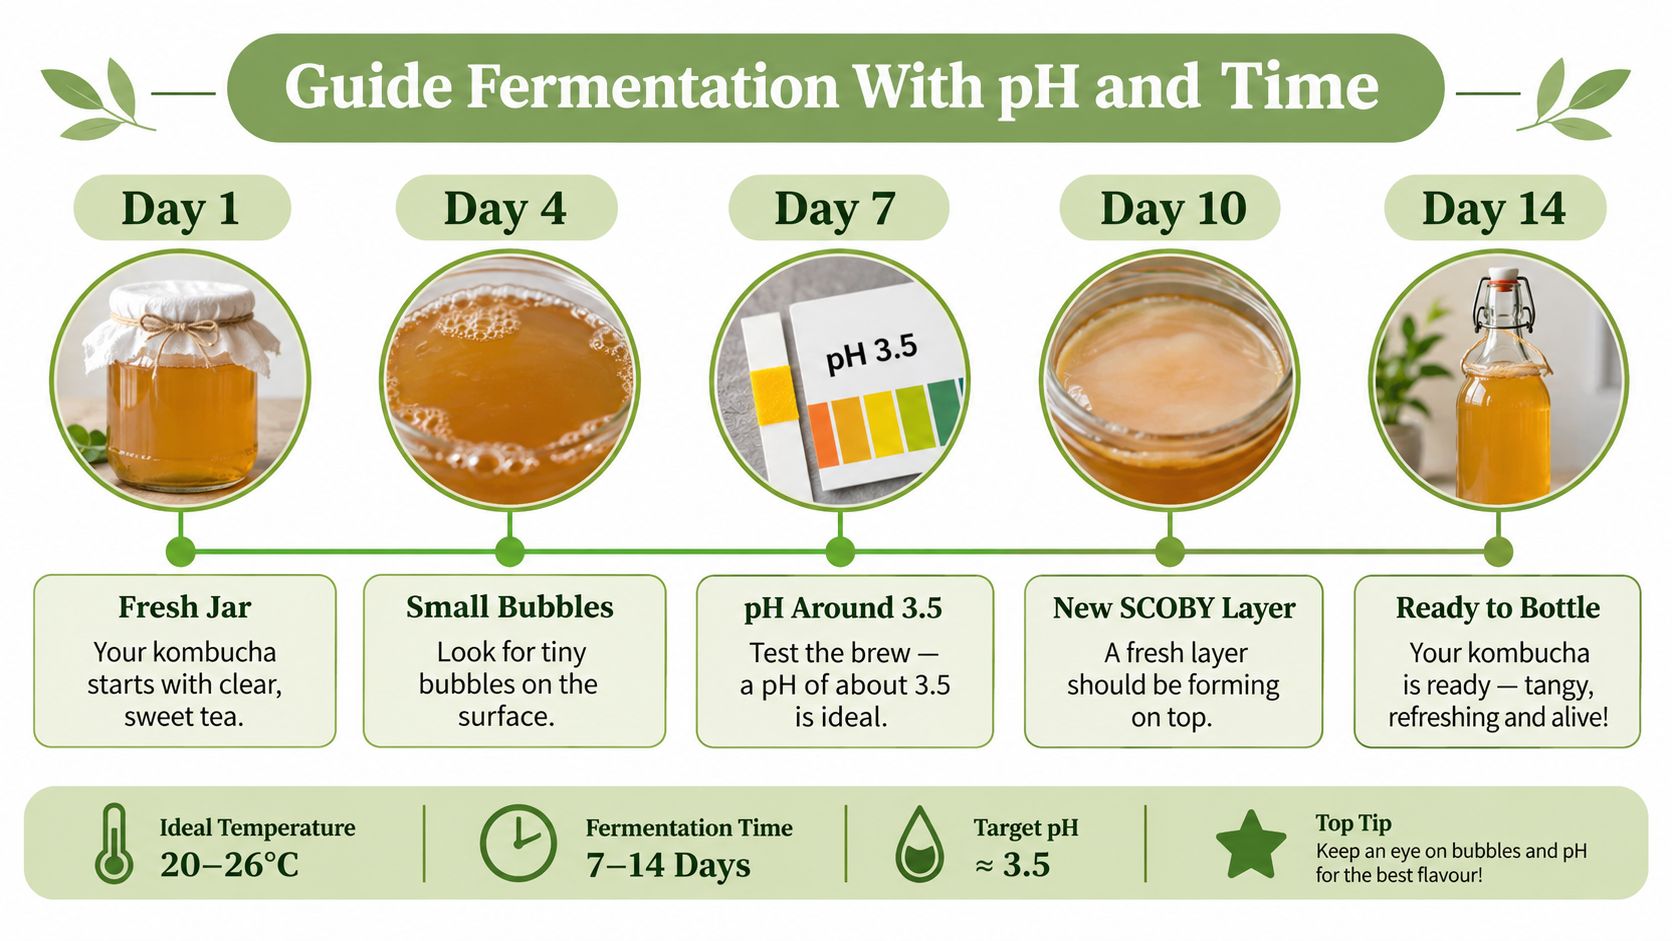
Strain or transfer the drink with clean equipment, then chill it to slow further change. Write down the final pH and what you did next, and keep that record with the batch. The goal isn't an identical number of days every time; it's learning how your culture behaves so each batch improves on the last.
Keep Hygiene Under Control
A clean routine won't turn a home kitchen into a sterile laboratory, and it doesn't need to. Its purpose is to reduce avoidable contamination by making every handling step deliberate.
Before brewing, wash your hands and clean the work surface, vessel, cover, strainer and utensils. Rinse cleaning products away where needed, and let equipment dry or use it as directed. If you use a thermometer or pH meter, keep the parts that touch the sample clean, and don't return a used sample to the vessel.
When moving the SCOBY, use clean hands or a clean utensil. Keep it away from fresh ingredients, used cloths and surfaces where raw food or dirty dishes have been handled. Don't share tools between the fermenting jar and other foods without washing them first. A brewing container with a suitable opening and cover can make handling easier; see this guide to a kombucha brewing container.
Know when not to reuse a culture
A new surface layer may look uneven, folded or thin, and that alone doesn't tell you the batch has failed. By contrast, fuzzy growth, an unusual appearance you can't confidently assess, or a persistent musty or rotten smell should prompt caution. Don't scrape off suspicious growth and keep the liquid. If the batch looks contaminated or otherwise questionable, discard the contents and culture rather than trying to rescue them.
Home fermentation carries risks. If you're immunocompromised or otherwise vulnerable, ask a health professional whether home-fermented drinks are appropriate for you. If alcohol content is a concern, don't rely on home observations or a recipe alone to establish it.
Before each batch, check:
- Hands and surfaces: Wash hands and clean the workspace before handling the culture.
- Equipment: Use clean vessels, covers, strainers and sample tools.
- Culture: Return only a culture from a batch you're comfortable reusing.
- Records: Write down the batch details and keep pH results together.
- Uncertainty: Discard a batch if contamination or its condition is unclear.
Troubleshoot SCOBY Fermentation Problems
Diagnosis starts with your records, not the surface of the jar. A quiet fermenter can still be acidifying, and a lively one can still produce something you shouldn't drink. Before changing anything, pull out the batch log and compare it with your earlier brews.
If no new surface layer has formed, that alone doesn't mean failure. The visible film is only part of the culture; the microbes working through the liquid matter more than what floats on top. Check the pH trend first. If acidity is falling steadily, the batch is fermenting, just without the cosmetic layer some brewers expect.
Weak activity usually traces back to the start of the batch. Revisit the cooling and inoculation notes: tea that went in too hot can damage the culture, a late inoculation delays acidification, and too little starter liquid leaves the sweet tea less acidic at the outset, which widens the window where competing microbes can establish themselves.
For a slow or inconsistent batch, compare temperature observations, starter quantity and pH readings against earlier brews. A different tea, a changed sugar concentration or an older culture can each shift the pace. Records let you separate a batch that is slow from one you can't explain, and unexplained is the category that deserves caution.
For excessive acidity, stop fermenting rather than waiting for the flavour to come back. A very low reading, below the finished range discussed earlier, calls for caution rather than more time on the bench.
For something you can't identify, the useful question here is why it happened rather than what to do with it, since the discard rules are covered above. Look for the route in: airborne spores settling on an uncovered jar, a fruit fly breach through a loose cover, or tools that touched other foods. The oxygen exposure at the surface that kombucha relies on is also what lets mould colonise the top of a poorly acidified brew. Find the cause before brewing again, or the next batch may repeat it.
Alcohol is the last thing to check. An Australian government review reported that 64.8% of surveyed samples in Queensland, Tasmania and Victoria exceeded the 0.5% ABV threshold used there for alcoholic beverages, while in states and territories using the 1.15% ABV threshold, 22.9% exceeded it and 77.1% were below it. Australian fermented-beverages outcomes review Survey figures are not a prediction for your jar. They show why a home brewer can't assume fermentation stopped producing alcohol, so if strength matters to someone drinking it, treat an unusual batch accordingly rather than tasting your way to an answer.
Store Kombucha and Reuse the SCOBY
A finished brew keeps fermenting on the bench, so chilling is the first decision. Cold slows the yeast and bacteria enough to hold flavour close to where you left it, which is why the move to the fridge matters more than the move to a bottle. Transfer the kombucha with clean equipment into clean glass containers filled close to the top, since less headspace means less oxygen and slower change. For a fuller walkthrough of chilling and holding the finished drink, see our guide on how to store kombucha.
If alcohol content matters to someone drinking it, hold the batch to the alcohol target discussed earlier. An unusually warm or long ferment deserves caution, and neither taste nor refrigeration alone confirms where the alcohol level ended up.
Then turn to the culture. A SCOBY hotel works like a pantry for future batches, holding spare cultures until you need them. Keep only cultures from sound, mould-free batches, and store them in a clean glass jar with at least 200 ml of starter liquid per culture, covered with a breathable cloth. Refresh the liquid every few weeks so the culture stays fed and acidic. Discard anything that smells off or shows fuzzy growth, because a questionable culture carries its problems into the next brew.
Before you start again, confirm the vessel and tools are clean, the culture looks healthy, and you are ready to record cooling time and pH. If you would rather skip the next cycle, Pep Tea offers sugar-free organic kombucha brewed in the Hunter Valley, NSW.
Explore Pep Tea's sugar-free organic kombucha range if you'd like a ready-to-drink alternative to a home SCOBY brew. Visit Pep Tea to browse its kombucha and organic tea offerings.
Kombucha Starter Recipe: A Practical Beginner’s Guide

You're at the kitchen bench with a clean jar, sweet tea and a new SCOBY, wondering whether the thin layer forming on top is healthy or whether something has gone wrong. That uncertainty is normal. A good kombucha starter recipe gives you more than a list of ingredients. It gives you a controlled starting point, sensible fermentation checks and clear rules for when a batch should be used, continued or discarded.
Australian guidance provides useful benchmarks for home brewers. The tea must cool before the culture is added, fermentation needs a suitable temperature range, and pH matters more than taste alone. Follow the process below as a practical framework, while remembering that home fermentation carries food-safety risks and should be approached carefully.
Why Your First Kombucha Starter Matters
Your first starter liquid becomes the acidic foundation for later batches. If it's mature and healthy, it helps the new sweet tea move into a safer acidic environment. If it's weak, contaminated or added to hot tea, the SCOBY may struggle and the brew may remain vulnerable to unwanted microbial growth.
A SCOBY is the living culture used to ferment sweet tea. You may see a rubbery pellicle floating on the surface, brown stringy material underneath or a new pale layer developing. Those visual changes can be part of normal fermentation, but appearance alone can't confirm that a batch is safe to drink.
Practical rule: Treat the starter liquid as a core ingredient, not a splash added at the end.
Australian food-safety guidance explains that the initial tea infusion can sit around pH 5 and may support contaminant growth. It recommends using a proven starter culture and cooling the tea quickly from 60°C to 20°C within 2 hours before inoculation. You can read the Australian food-safety guidance on kombucha starter culture and cooling for the reasoning behind those controls.
This guide focuses on the points that cause first batches to fail: the starter-to-tea ratio, cooling temperature, fermentation conditions, pH testing, SCOBY inspection and contamination control. You'll also learn how to respond to a slow brew, a sour brew, fruit flies or fuzzy growth without trying to rescue something unsafe.
The aim isn't to make every batch identical. Ambient conditions vary between a cool Melbourne kitchen, a warm Queensland pantry and a home near the Hunter Valley. The aim is to give you measurable checkpoints so you aren't relying on a calendar or a guess.
Ingredients and Starter Ratios for a Safe Batch
For a straightforward Australian baseline, use about 100 ml of mature starter tea per litre of sweet tea, with roughly 70 g sugar and 1 tea bag per litre, as reflected in Australian consumer brewing guidance. The Australian kombucha and kefir brewing guide also describes retaining fermented liquid for the next batch, reinforcing the importance of keeping enough mature starter aside.
For a 2-litre batch, the working quantities are:
| Ingredient | Per litre | 2 L batch | Purpose |
|---|---|---|---|
| Tea | 1 tea bag | 2 tea bags | Provides the tea base for fermentation |
| White sugar | About 70 g | About 140 g | Fuels the yeast and bacteria during fermentation |
| Mature starter tea | About 100 ml | About 200 ml | Brings acidic fermented liquid into the fresh tea |
| Water | 1 litre | 2 litres | Forms the sweet tea base |
| Healthy SCOBY | 1 culture | 1 healthy culture | Continues the fermentation |
The Australian baseline is deliberately simple. Black tea is a familiar starting point, while plain green tea can also be used. Avoid treating the sugar as a sweetener added only for flavour. It feeds the culture, and fermentation changes the balance of sweetness and acidity over time.
Use clean, filtered water where possible. Water with a strong chlorine smell may interfere with the culture, so allow treated water to stand according to your local water advice or use filtered water. Choose a clean glass fermentation jar with enough room for the liquid and surface growth, then cover it with clean, breathable cotton secured firmly with a food-safe rubber band.
You can use ordinary kitchen utensils, but avoid prolonged contact between fermenting kombucha and reactive metal. Wash your hands, jar, cover and utensils thoroughly before starting. If you need a measured source of acidic liquid, PepTea starter tea for kombucha is one option to consider alongside a mature homemade batch.
Brewing and Inoculating the Sweet Tea
Start with the tea base, not the SCOBY. Measure the water, heat it and dissolve the sugar completely while the liquid is hot. Add the tea and steep until the brew has developed a clear tea flavour, then remove the bags or strain the leaves.
Don't add the culture while the tea is warm from the kettle. Australian guidance says the tea should cool from 60°C to 20°C within 2 hours before starter culture is added, so use a clean, shallow pot or an ice bath if you need to speed cooling. The liquid should feel like room-temperature water, not warm tea.
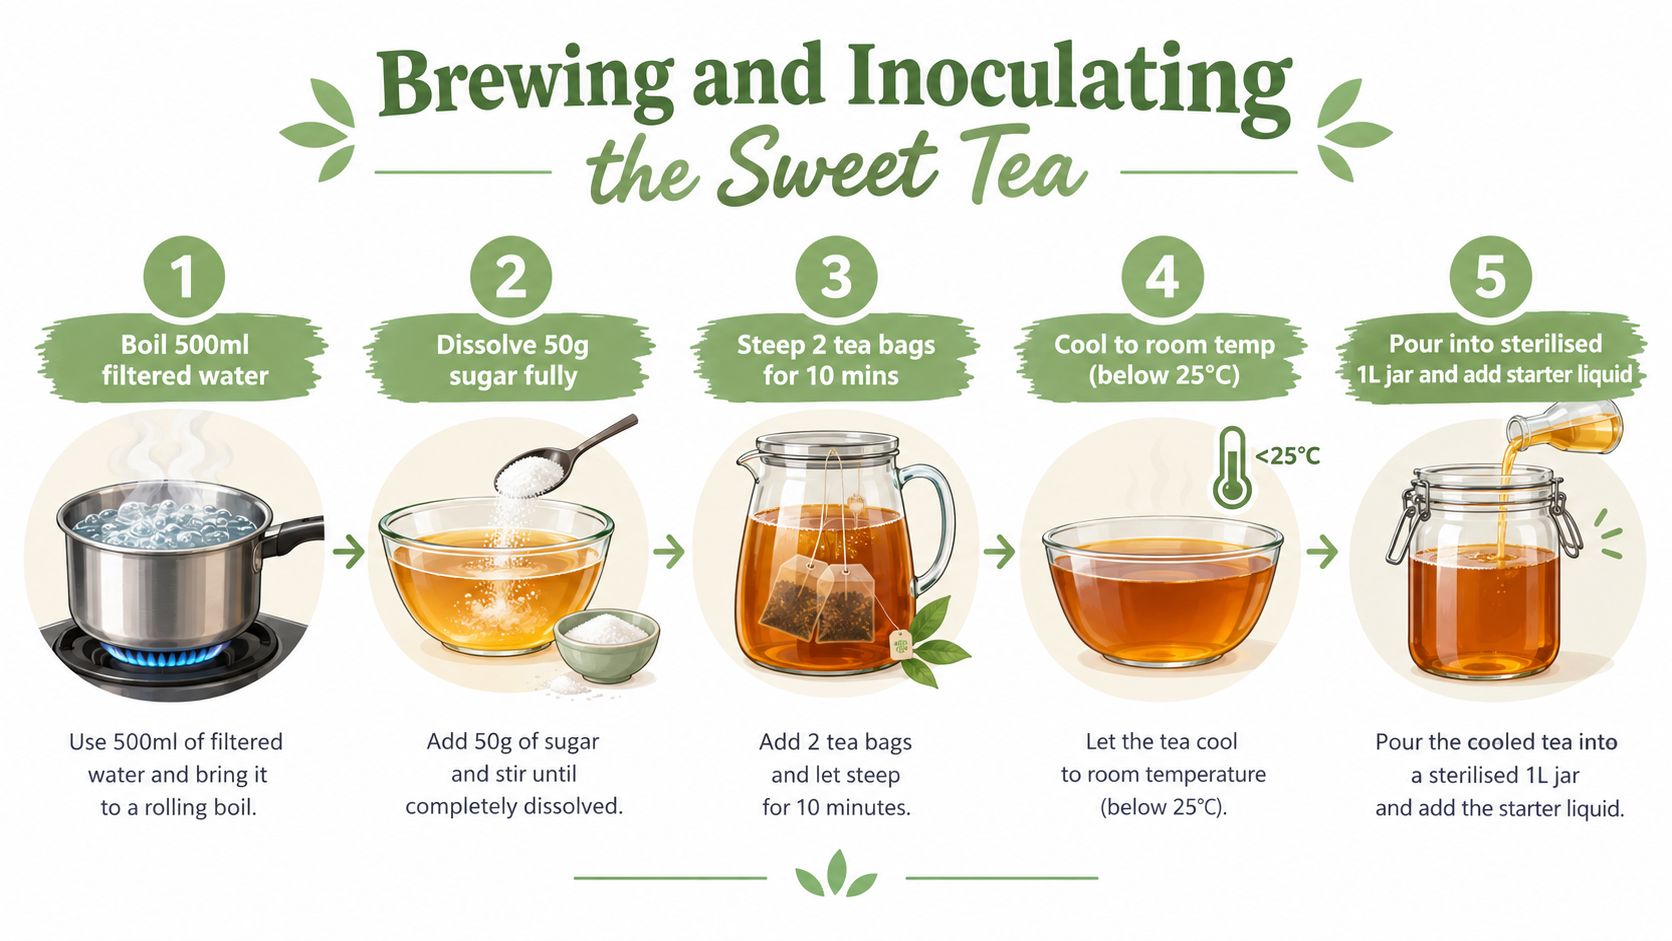
Once cooled, pour the sweet tea into your clean glass jar. Add the mature starter liquid, then place the SCOBY in with clean hands. It may float, sink or sit at an angle. That position isn't a reliable sign of failure.
Your inoculation checklist
- Cool the tea first. Don't compromise this step to save time.
- Add the starter liquid. Use about 100 ml per litre of sweet tea, giving a 2-litre batch about 200 ml.
- Add the SCOBY last. Handle it gently and inspect it before use.
- Cover the jar. Use breathable cotton or tightly woven cloth, secured so insects can't enter.
- Label the batch. Record the date, tea type and starter ratio so you can compare batches.
Keep the jar away from direct sunlight and avoid moving it unnecessarily. Don't seal it with an airtight lid during primary fermentation, because the culture needs airflow. For the first 48 hours, leave the brew undisturbed and don't taste it as a substitute for checking its acidity.
A short video can help you visualise the movement from sweet tea to inoculated jar:
Fermentation Window, Temperature and pH Checks
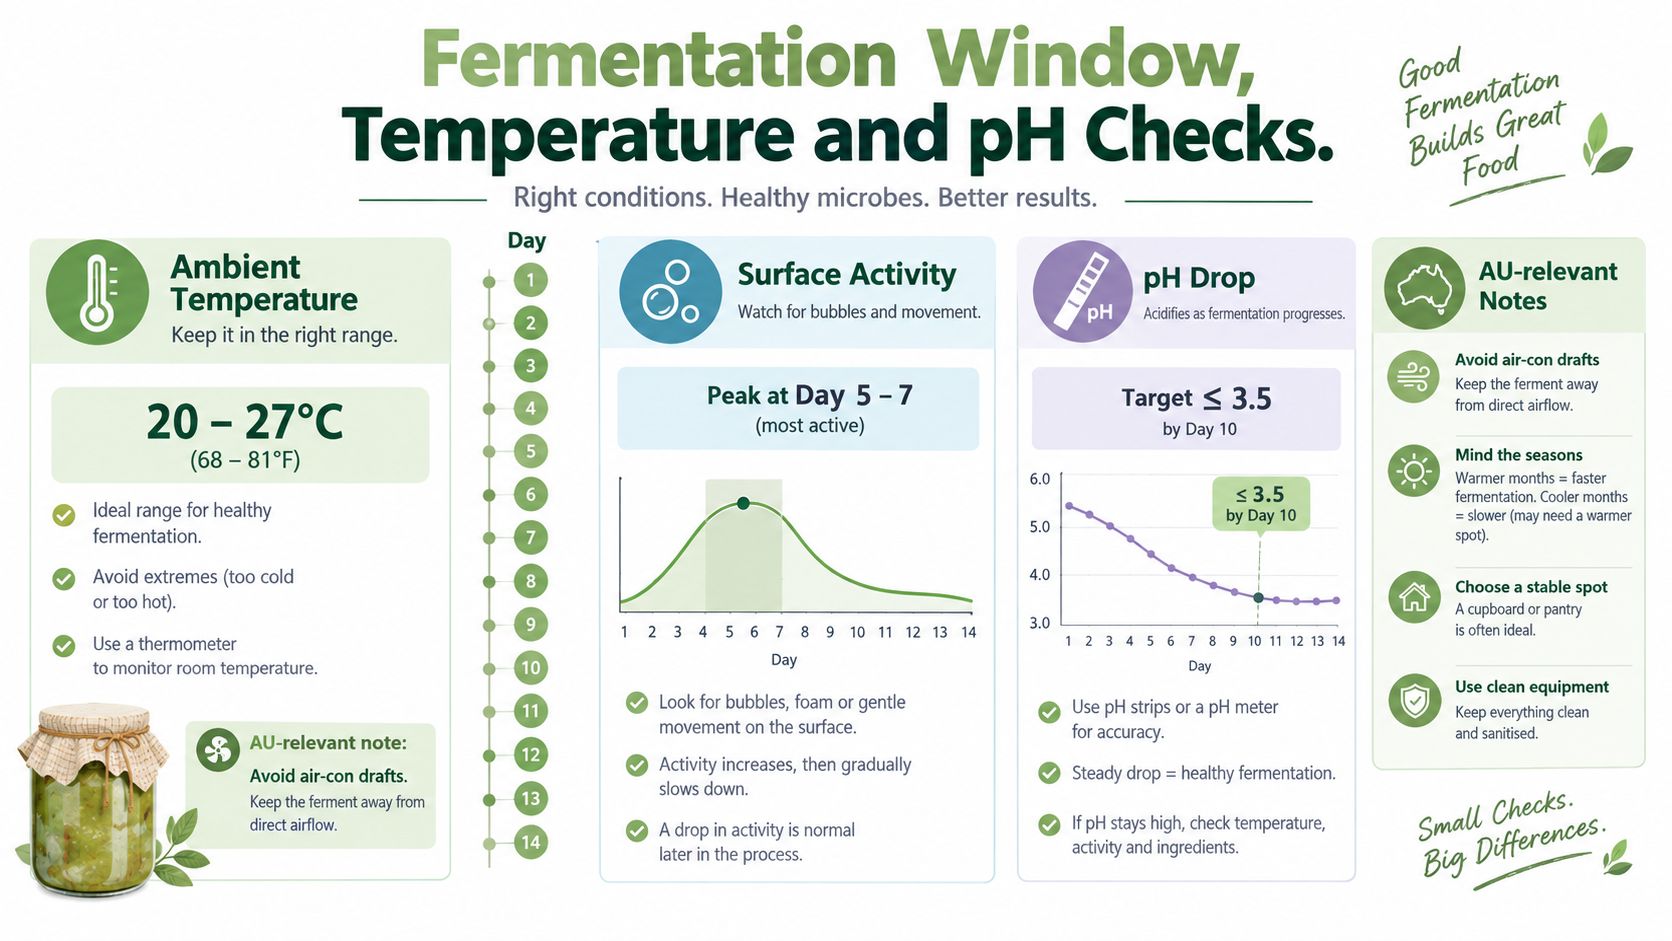
A fixed day count can't tell you whether your kombucha is ready. Temperature changes the pace, and the strength of the starter liquid affects how quickly acidity develops. Australian guidance commonly places fermentation at 7 to 10 days, with the brew held between 20°C and 23°C, and recommends checking the finished product until it reaches pH 4.2 or lower. Those benchmarks are set out in the Western Australian fermented-food safety guideline.
Use three signals together:
- Temperature: Keep the jar in a stable, moderate environment. A cold room can slow fermentation, while excessive heat can damage the culture or push the brew towards excessive acidity.
- Surface activity: A thin new layer, small bubbles or brown strands may appear as the culture works. A SCOBY that sinks isn't automatically unhealthy.
- pH: Test with fresh pH strips or a digital meter rather than judging safety by smell or sweetness.
A simple testing routine
Use a clean spoon or sampling vessel to take a small amount from the jar. Test that sample, not the whole batch, and avoid returning it to the fermentation vessel. Write the result beside the date so you can see whether acidity is changing.
If the pH remains above the Australian safety target, don't bottle or drink the batch. If the brew reaches the target, remove the starter culture and refrigerate the finished kombucha at 4°C, as described in Australian fermented-beverage safety material.
For a reliable testing setup, a digital pH meter for kombucha brewing can make readings easier to repeat, provided you clean, store and calibrate it according to the manufacturer's instructions. pH testing doesn't replace visual inspection. If you see green, white, black or grey discolouration, or notice an abnormal odour, discard the culture and the entire batch.
SCOBY Care Between Batches
A healthy SCOBY can become the reusable part of your brewing routine. After fermentation, lift it out with clean hands and keep it covered with enough mature starter liquid to prevent it drying out.
You can leave the culture in a brewing jar if you expect to start another batch soon. For a longer pause, place the SCOBY in a clean glass jar with starter tea and cover it appropriately. The liquid should be at least equal to the SCOBY's volume, so the culture remains surrounded by acidic liquid rather than exposed to air and drying.
A SCOBY hotel is a storage jar containing cultures and starter liquid. Keep it organised by labelling the jar and removing any culture that shows suspicious growth. Don't scrape mould from the surface and continue using the liquid. Fuzzy growth or unusual colours aren't cosmetic problems because contamination can spread through the batch.
When to retire a culture
- Persistent mould: Discard the culture and liquid rather than trying to clean and save them.
- No activity: If a warm, properly prepared batch shows no fermentation activity over an extended period, use fresh starter rather than repeatedly feeding the inactive culture.
- Returning off odour: A smell that remains unpleasant after cleaning and restarting is a reason to stop using the culture.
If you share a SCOBY, place it in a clean, food-safe container with enough starter liquid to keep it moist during transport. Give the recipient the tea type, approximate ratio and latest pH information, so they aren't trying to identify an unknown culture from appearance alone. Guidance on how to make a SCOBY can help a new brewer understand what they're receiving.
Troubleshooting Common Starter Problems
A slow brew doesn't always mean the SCOBY is dead. Before changing several variables at once, check the room temperature, water, starter strength and cleanliness of the vessel. Australian food-safety material warns that low temperatures can slow acidification, while excessive heat can harm the culture, so temperature drift is often the first place to investigate.
The six problems beginners see most often
- Slow fermentation: Move the jar away from cold drafts and check whether the starter liquid is mature and acidic. Don't compensate by adding random ingredients.
- Weak starter liquid: Use mature, unflavoured starter from a healthy batch. Australian consumer guidance warns against using previously fermented foods as a starter because back-slopping can reduce effectiveness and allow unwanted bacteria to grow. The Australian fermented-beverages issues paper provides the regulatory context for treating kombucha as a fermented sweetened tea rather than an ordinary cold drink.
- Under-pitched culture: Confirm that the SCOBY looks normal and that enough starter tea was included. A large pellicle alone doesn't guarantee a strong liquid culture.
- Chlorinated water: If your water smells strongly of chlorine, use filtered water for the next batch and keep your process consistent.
- Fuzzy mould: Blue, green, black, white or grey fuzzy growth means discard the entire batch, including the SCOBY. Don't scrape the patch away.
- Overly sour kombucha: The brew has gone further than your preferred drinking point. Shorten the next fermentation by checking pH earlier, and reserve a balanced batch as starter rather than using vinegar-like liquid.
Flat kombucha needs a separate check. Confirm that fermentation took place, test the pH and look for remaining sweetness. Carbonation develops later and can vary, so a flat first ferment isn't automatically evidence of contamination.
Fruit flies usually indicate that the cover isn't tight enough. Use a clean, tight-weave cloth secured with a rubber band, and never use an airtight lid during primary fermentation. If the smell is rotten, musty or otherwise abnormal, discard the liquid and restart with clean equipment and a healthy starter.
Safety-first decision: If you can't confidently identify the problem, throw the batch out and begin again.
Flavouring Your Starter Brew and Next Steps
Flavouring belongs after primary fermentation, not in the starter tea. Once the brew has reached the appropriate acidic endpoint, remove the SCOBY and reserve mature liquid for the next batch. Add flavourings to the finished kombucha in pressure-safe bottles, leaving room for carbonation and handling the bottles cautiously.
For a 2-litre batch, you can divide the liquid between flavour combinations such as:
- Ginger and lemon: Add sliced ginger and a small amount of lemon zest for a sharp, warming profile.
- Berry and mint: Use crushed berries with fresh mint, then strain before serving if you prefer a clearer drink.
- Native lemon myrtle: Add a modest amount of culinary lemon myrtle and taste carefully, because its aroma can become prominent quickly.
The provided Australian flavouring benchmark also lists passionfruit pulp, mint leaves, ginger slices, lemon zest and a cinnamon stick as practical additions. Keep additions clean, use food-safe bottles and monitor pressure. If a bottle becomes unusually hard or sprays when opened, chill it thoroughly and open it slowly over a sink.
Build a repeatable brewing rhythm
Reserve starter liquid before flavouring the rest of the batch. Start the next brew with the same tea, sugar and starter proportions, then change only one variable at a time. That approach helps you understand whether a change in flavour, speed or acidity came from the tea, the room or the fruit.
Not everyone wants to maintain a SCOBY between batches. A ready-made starter culture can be a practical shortcut when you want a consistent starting point without first growing or storing your own culture.
Pep Tea offers Australian organic tea and sugar-free organic kombucha, including flavours such as Ginger, Lime & Ginger and Mango, for readers who'd rather enjoy a finished fermented drink than manage a starter jar. Visit Pep Tea to explore the kombucha range and find a convenient option for your next glass.
How to Restart a Stuck Fermentation at Home
You lift the lid expecting movement and find a quiet surface. The airlock has stopped, the kombucha culture is sitting still, or the hydrometer has delivered the same reading for days. That silence doesn't automatically mean the batch is lost, but it does mean you should stop guessing.
The practical approach to how to restart a stuck fermentation begins with diagnosis, not another handful of yeast. Australian wine-industry guidance places particular emphasis on prompt action, controlled temperature, oxygen management and gradual re-inoculation, while kombucha makers need an added safety check because a stalled, low-acid beverage can become a food-safety concern. The methods below connect those principles for home brewers, with clear limits on when rescue is sensible and when discarding is the better decision.
When Your Ferment Goes Quiet
The first reaction is usually hopeful denial. You move the fermenter, check the airlock seal, or wait for the SCOBY to shift. In wine, you take another hydrometer reading. In kombucha, you look for a new pellicle and wonder whether the culture is merely taking a rest.
Sometimes it is. A loose lid or imperfect airlock can hide active fermentation, and a surface culture can work without dramatic movement. The decisive clue is a flat gravity reading, supported by temperature, aroma and pH observations. A quiet airlock alone isn't proof of a stuck ferment.
The cost of waiting
A stalled batch still contains fermentable material. Residual sugar in a warm vessel can support unwanted microbial activity, particularly when the culture has weakened and protective acidity or alcohol hasn't developed as intended. That doesn't mean every quiet batch is spoiled, but it does mean the vessel shouldn't be left unattended while you hope for a recovery.
Australian guidance from the Australian Wine Research Institute advises that problematic ferments shouldn't be left to resolve by themselves. Its rescue approach keeps the ferment under controlled conditions and uses a staged culture acclimatisation process rather than shocking fresh yeast with the entire difficult environment at once.
Practical rule: Diagnose promptly, then make one controlled change at a time. Random warming, aeration and repeated yeast additions make the original problem harder to identify.
For wine, the payoff of quick action is a cleaner restart with less oxidation and less time for spoilage organisms to establish themselves. For kombucha, the payoff is different. You may decide that the batch isn't suitable for rescue, especially if the pH hasn't reached a sufficiently acidic level or the aroma has moved beyond a clean tart profile.
A stuck fermentation is an inflection point, not a verdict. The brewers who rescue the most batches don't rely on bubbling as their only signal. They measure, smell carefully, protect the liquid from unnecessary oxygen and choose an intervention that matches the cause.
Reading the Signs of a Stuck Fermentation
Before adding nutrient or pitching a rescue culture, establish whether fermentation has stopped. Use three checks in order: sensory condition, gravity movement and acidity.
Start with the sensory read
Open the vessel only as much as necessary. A healthy ferment may smell fruity, yeasty, tart or grain-like, depending on the beverage. A sharp vinegar character, solvent-like aroma, persistent sulphur, rotten-egg notes or a harsh chemical smell points towards stress or contamination rather than a simple temperature-related pause.
Look at the surface and sediment. A settled SCOBY with no fresh pellicle development can support the suspicion of inactivity, but it doesn't prove failure. Ropey or stringy texture, visible mould, unusual colours or a surface that looks dry and contaminated should move the batch towards discard rather than experimentation.
Measure movement, not bubbles
Take a hydrometer reading using a sanitised sample, record the temperature, and repeat the reading after enough time has passed to show whether the liquid is moving. A flat line across 48 to 72 hours is the useful warning interval described in fermentation troubleshooting guidance from Precision Fermentation. Bubbling can stop because of a seal problem, but gravity tells you whether sugar conversion is continuing.
A refractometer can help with quick checks, though alcohol affects its reading. Use a hydrometer for the clearest home decision when alcohol is already present.
Check pH before you intervene
The supplied home-brewing ranges commonly used for diagnosis are:
- Kombucha: approximately 2.5 to 3.5
- Wine: approximately 3.0 to 3.8
- Beer: approximately 4.0 to 4.5
Treat these as practical comparison ranges, not universal guarantees. The key Australian food-safety point is that fermented beverages need to reach pH ≤ 4.2 to meet the cited safety requirement discussed by Food Regulation Australia New Zealand. A batch above that level after stalling deserves caution, not an automatic warm restart.
| Ferment Type | Healthy Gravity Drop | Stuck Threshold | Safe pH Window | Warning Signs |
|---|---|---|---|---|
| Kombucha | A downward trend with active acidity development | No meaningful gravity movement over the monitoring period | Approximately 2.5 to 3.5, with pH ≤ 4.2 a key safety requirement | Mould, ropey texture, vinegar, solvent or rotten aromas |
| Wine | A continuing downward hydrometer trend | A flat reading across 48 to 72 hours | Approximately 3.0 to 3.8 | Sulphur, solvent, vinegar, oxidation or unusual surface growth |
| Beer | A continuing gravity decline during active fermentation | A flat reading across 48 to 72 hours | Approximately 4.0 to 4.5 | Harsh acidity, solvent character, contamination or stalled krausen |
Why Fermentations Stall in the First Place
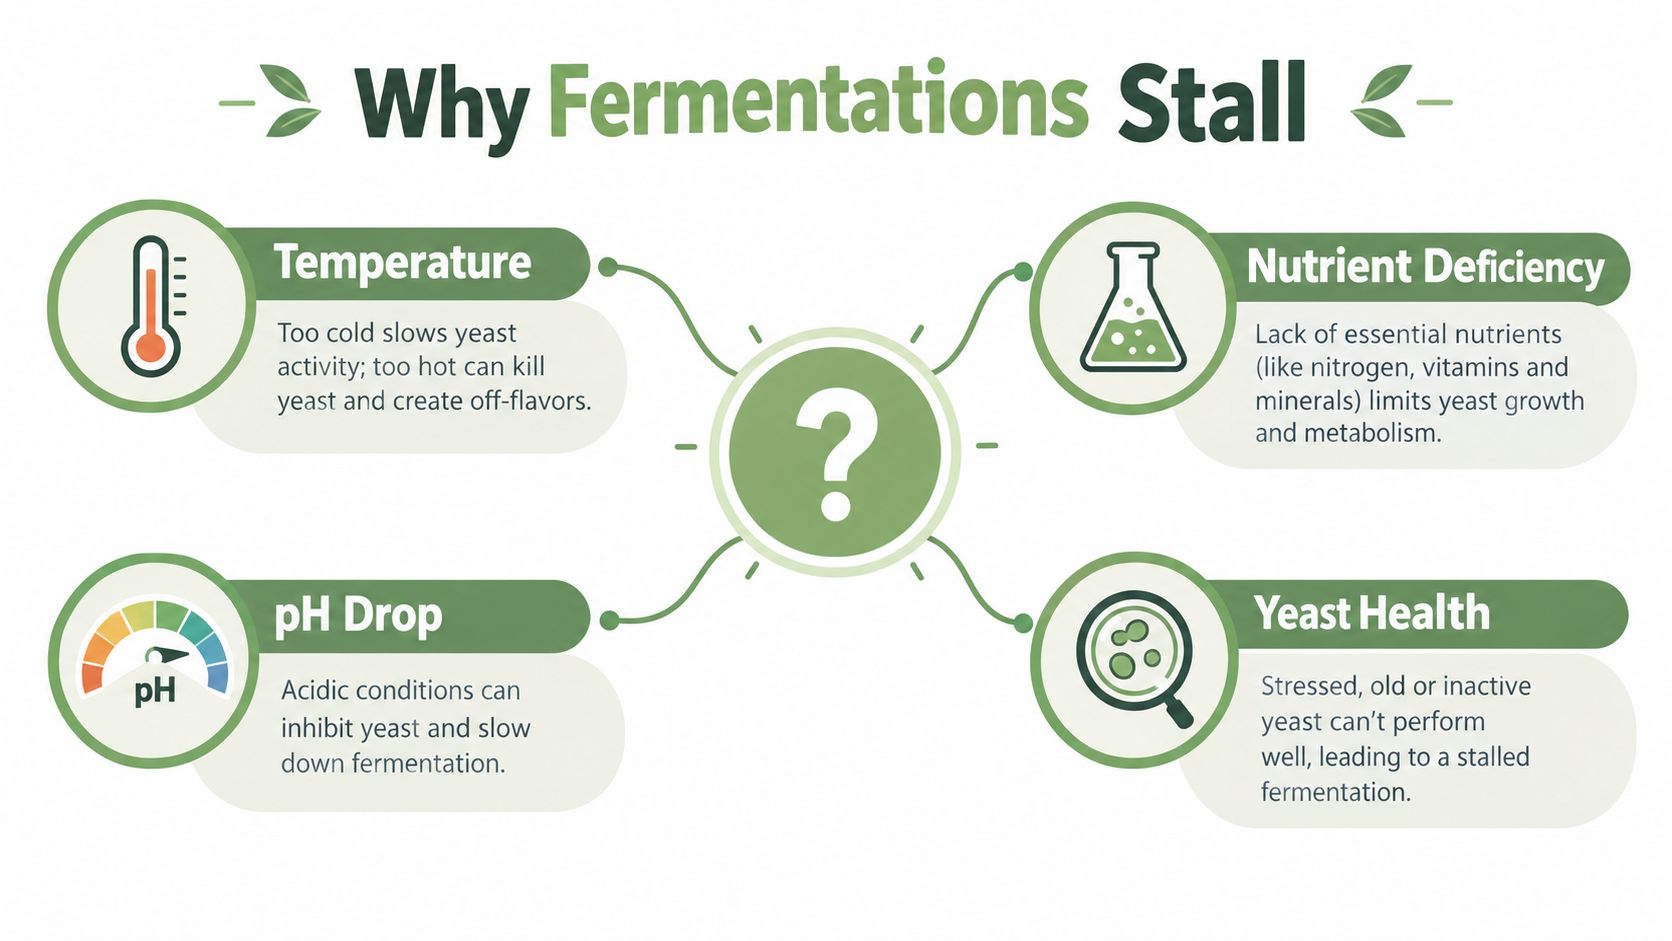
Every stalled ferment leaves a fingerprint. Temperature problems look different from nutrient exhaustion, and a weak culture behaves differently from bacterial competition. Identify that fingerprint before choosing the fix.
Temperature stress
Yeast work within a tolerance range. A sudden cold spell can make cells dormant, while excessive heat can damage viability or drive harsh flavours. In a cool, clean-smelling ferment with low turbidity and no obvious contamination, gentle warming may be enough to bring the existing population back into suspension.
Australian wine rescue guidance is more specific than the usual “warm it up” advice. It recommends bringing a stuck or sluggish bulk ferment to about 18 to 22°C, keeping it off ullage and protecting it with inert gas to reduce oxidation risk. For problematic ferments, the AWRI wine fermentation resources emphasise rapid management and controlled conditions rather than passive waiting.
Nutrient limitation
Yeast need more than sugar. A nutrient-poor must, wort or tea base can support an energetic start and then fail to sustain the culture. The pattern often includes strong early activity followed by a sharp slowdown, with the aroma remaining relatively clean while gravity stays high.
Nutrient additions aren't a universal cure. Adding more nutrient to a contaminated or excessively acidic batch can feed competing organisms as readily as it supports yeast. Use your measurements and the beverage's stage to decide whether nutrition is the limiting factor.
Yeast health and pitch strength
Old wine yeast, poorly rehydrated dried yeast, an under-pitched culture or a tired kombucha SCOBY may not contain enough healthy cells to finish. Rapid flocculation can also remove yeast from suspension before the available sugar has been consumed.
For kombucha, the culture's age and handling history matter, but don't assume a SCOBY is automatically a rescue culture. If the liquid around it smells wrong or hasn't acidified safely, transferring the culture into a fresh batch can spread the problem.
Oxygen and microbial competition
Alcoholic fermentation needs careful oxygen management. Once fermentation is established, unnecessary splashing can encourage oxidation and expose the liquid to organisms that produce unwanted acidity. Kombucha is a mixed culture, so oxygen management differs from wine, but contamination and pH imbalance can still redirect the process.
Brewers working with living cultures can also benefit from general colonisation troubleshooting principles, particularly around environment, contamination control and culture vitality. The Colorado Cultures colonization tips are written for a different fermentation context, but the diagnostic habit is useful: inspect the conditions before blaming the culture.
For basic kombucha culture preparation and handling, follow the practical steps in this kombucha SCOBY guide. The central lesson is simple. Temperature, nutrition, acidity, oxygen and culture health interact, so a single symptom rarely identifies the cause on its own.
A Stepwise Restart That Respects the Yeast
A rescue culture enters a hostile environment. The stuck liquid may contain alcohol, depleted nutrients, high osmotic pressure or an unfriendly pH. Dumping a small amount of fresh yeast straight into that liquid often fails because the new cells experience the full stress immediately.
Australian AWRI-linked procedures use stepwise acclimatisation. The starter begins in a friendlier medium, then receives portions of the stuck wine only after its sugar has dropped by half. That gradual exposure lets yeast adapt to alcohol stress instead of facing a sudden full-volume repitch.
Prepare before pitching
Rouse gently. Mix the vessel carefully to lift settled yeast without aggressive splashing. In an alcoholic ferment, protect against oxidation rather than treating aeration as a default remedy.
Record baseline conditions. Measure gravity, pH and temperature. Work out how far the batch is from its intended finish, but don't use a gravity figure alone to justify a restart.
Set the temperature. AWRI guidance places rescue conditions around 20 to 22°C, while an Australian restart protocol specifies 20 to 24°C during the restart phase. A separate Lallemand procedure uses a starter mixture at 25 to 30°C, then requires tighter control as the culture is introduced to the wine.
Prepare a healthy starter. Use a selected, alcohol-tolerant rescue yeast. The detailed Lallemand restart procedure specifies hydration in 40 to 43°C water with GoFerm Protect Evolution at 30 g/hL, followed by 50 g/hL Uvaferm 43 Restart. Follow the product label and winery protocol rather than improvising equivalent quantities.
Acclimatise in stages. Add a small portion of stuck wine to the active starter. Wait until the starter's sugar has dropped by half, then add another portion. Repeat until the culture can handle the full batch. The AWRI-linked Australian guidance also specifies 25 g/hL of Nutrient Vit END before each restart batch, with only the final batch allowed to finish to dryness.
Keep the transition gentle
Don't create a sharp temperature shock. The Lallemand procedure advises that the wine temperature shouldn't change by more than 10°C during inoculation and recommends maintaining free SO2 near 7 to 8 ppm before restarting. Those details matter because a vigorous-looking starter can still collapse when it enters a chemically stressful wine.
For small home batches, the important principle is the sequence rather than pretending that a winery protocol can be copied without adjustment. Work with clean equipment, use measured additions, keep the starter active and add the difficult liquid progressively. Avoid adding extra fermentable sugar to force activity unless your recipe and nutrient plan specifically require it.
Monitor the restart
Check the starter and main vessel at regular intervals for:
- Temperature: Is it staying inside the chosen restart range?
- Gravity: Has the reading begun to move?
- Aroma: Is the clean ferment character returning, or is volatile acidity increasing?
- Surface activity: Are you seeing renewed foam, bubbles or culture development appropriate to the beverage?
- pH: Is acidity moving in a safe and expected direction?
- Oxidation: Has unnecessary headspace exposure or splashing changed colour or aroma?
The Carbon 6 Brewing fermentation blog provides useful background on observing fermentation as a process rather than relying on a single visual sign. If the starter never becomes active, stop escalating. Repeatedly pitching into an unsuitable batch doesn't make the environment more hospitable.
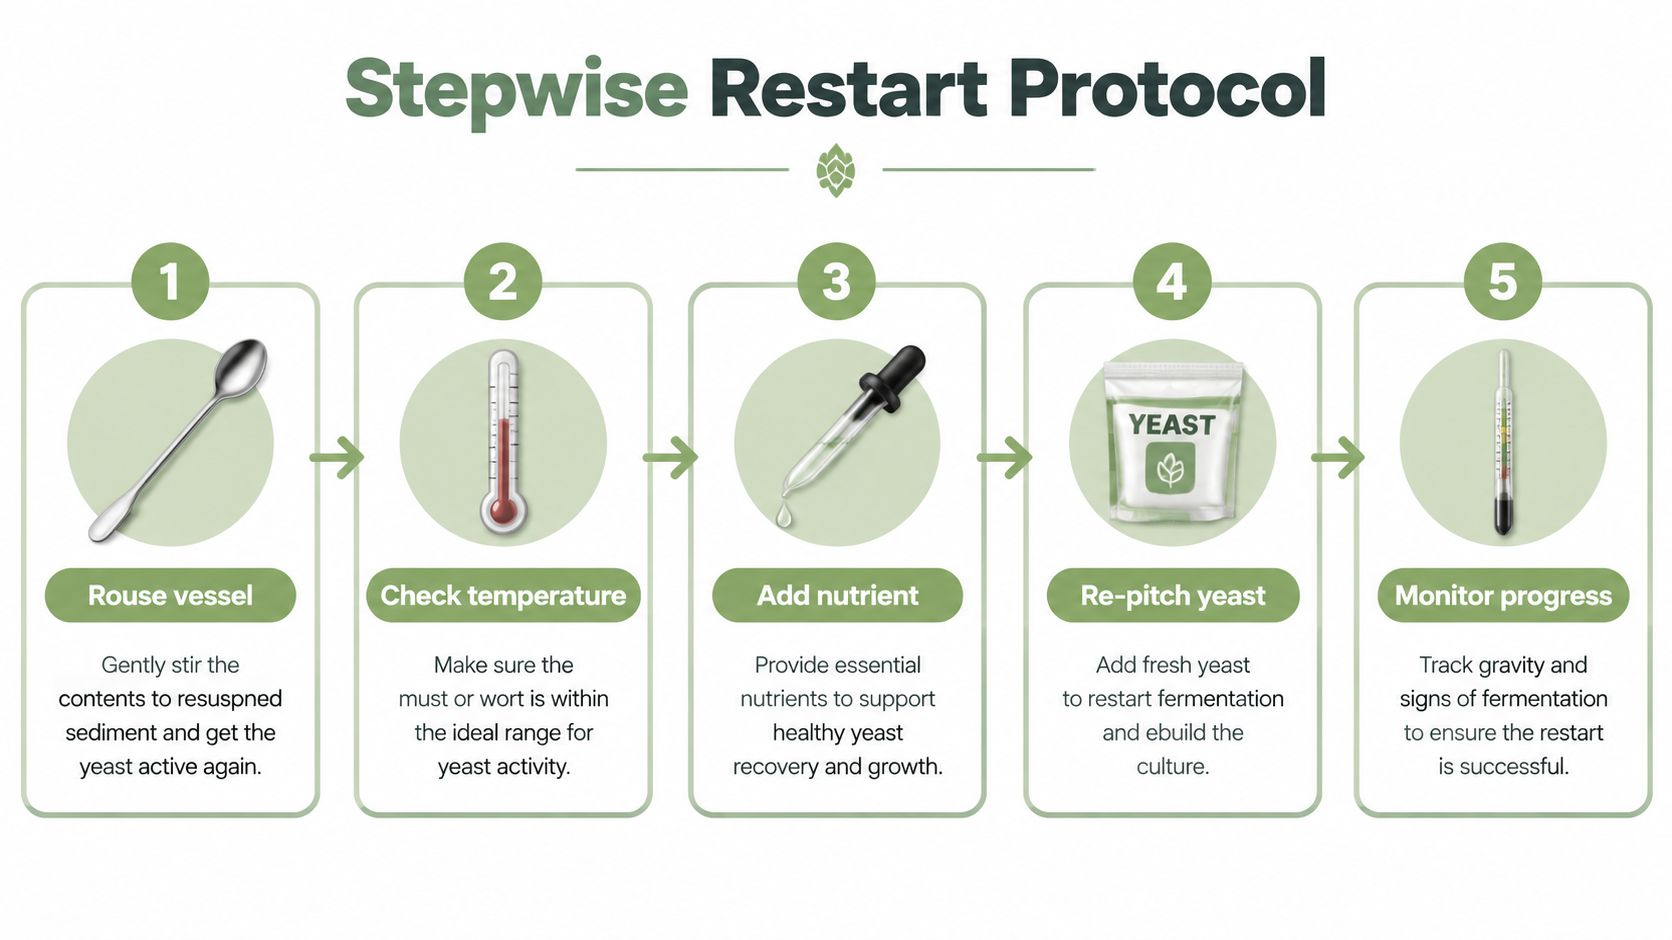
The following video provides a visual companion to the restart sequence.
Matching the Fix to the Cause
The best intervention is usually the least disruptive one that addresses the measured cause. A clean ferment that became quiet after a cold change doesn't need the same treatment as an acidic kombucha batch with bacterial competition.
Use the signal to choose the first move
| Likely Cause | Diagnostic Signal | Best Fix |
|---|---|---|
| Cold temperature | Clean aroma, low activity and a temperature below the culture's working range | Warm gradually and rouse gently |
| Nutrient deficiency | Strong early activity, then a stall with a relatively clean aroma and remaining fermentable material | Add a suitable complete nutrient only after checking pH and contamination |
| Oxygen starvation or poor yeast suspension | Yeast has settled, gravity is flat and the ferment looks unusually clear | Gentle rousing, with oxygen exposure kept appropriate to the beverage |
| Unhealthy yeast | Fresh temperature and nutrient conditions produce no renewed activity | Prepare and acclimatise a fresh rescue culture |
| Bacterial dominance or pH imbalance | Vinegar, solvent, harsh acidity, ropey texture or abnormal surface growth | Don't treat as a routine yeast restart. Assess safety and discard when indicated |
Temperature is the easiest fix to overuse. A sluggish ferment at a low temperature can respond well to controlled warming, but warming a high-pH batch with a suspicious aroma may just make bacterial activity more vigorous.
Nutrient addition also requires restraint. Australian restart guidance recommends a dedicated rescue process when the simple starter option isn't appropriate. Its technical thresholds distinguish a ferment with less than 10 g/L residual sugar and alcohol below 12% v/v, where active yeast or fresh yeast lees may be a first option, from a more difficult case requiring racking and a staged rescue culture. See the AWRI technical guidance for that severity-based logic.
Layer interventions in a sensible order
For a clean, cold batch, adjust temperature first and observe. If the reading remains flat, assess nutrition and yeast health before preparing a starter. If you need to repitch, use acclimatisation rather than a cold, full-volume dump.
Kombucha and sour beer require extra caution because mixed microbial communities can be affected by acidity and competing bacteria. Adding sugar may increase activity without improving the balance, while backsweetening only hides residual fermentables and can create renewed pressure in a sealed bottle. Dilution can lower intensity, but it doesn't make a contaminated batch safe.
The order matters. Measure, correct the environment, then introduce a compatible culture gradually. Combining every possible fix at once removes your ability to tell which variable helped and can worsen oxidation, contamination or over-pressurisation.
Safety Thresholds and When to Discard the Batch
“Just warm it up” is not a safety plan. It assumes the only problem is dormant yeast, but a stalled beverage can also have an unsuitable pH, microbial contamination or aromas that indicate chemical spoilage.
For fermented beverages, pH ≤ 4.2 is a key Australian safety requirement cited in the FSANZ fermented beverages outcomes paper. If kombucha remains above that level after several days of stalling, don't treat it as a normal restart candidate. Measure with a calibrated meter, consider the entire fermentation history and discard if the batch doesn't meet a safe, controlled process.
Discard rather than rescue when
- pH remains above 4.2 after the batch has stalled and the beverage has been held under conditions that could support unwanted growth.
- Mould is visible on the kombucha pellicle or liquid surface. Don't scoop it off and keep the remainder.
- Aromas stay strongly solvent-like, nail-polish-like, rotten, putrid or sharply volatile. These aren't signals to wait longer.
- The liquid shows ropey or stringy contamination, unexplained colours or an abnormal surface film.
- A high-gravity wine or mead remains nutrient-rich and suspect. A batch above 1.040 with signs of contamination shouldn't receive a warm repitch just because yeast can still ferment its sugar.
The last point involves trade-off. A clean, high-gravity ferment may be technically recoverable, but an unsafe or contaminated ferment becomes a better environment for spoilage when warmed. Re-inoculating a warm, high-pH, low-acid must can increase volatile acidity rather than restore a clean alcoholic ferment.
Discard rule: If the gravity is high, the pH is unsafe or the aroma is wrong, don't let the possibility of rescue override food safety.
Fermented beverages can also accumulate excess ethanol, which is one reason the Australian guidance treats safety and suitability as separate from a pleasing flavour. Kombucha makers shouldn't assume that “natural” or “live” means risk-free. When the evidence points to contamination, tipping out the batch protects the next one.
A reliable digital pH meter is more useful than judging acidity by taste. Calibrate and clean it according to the manufacturer's directions, and record readings alongside gravity and temperature.
Preventing the Next Stuck Fermentation
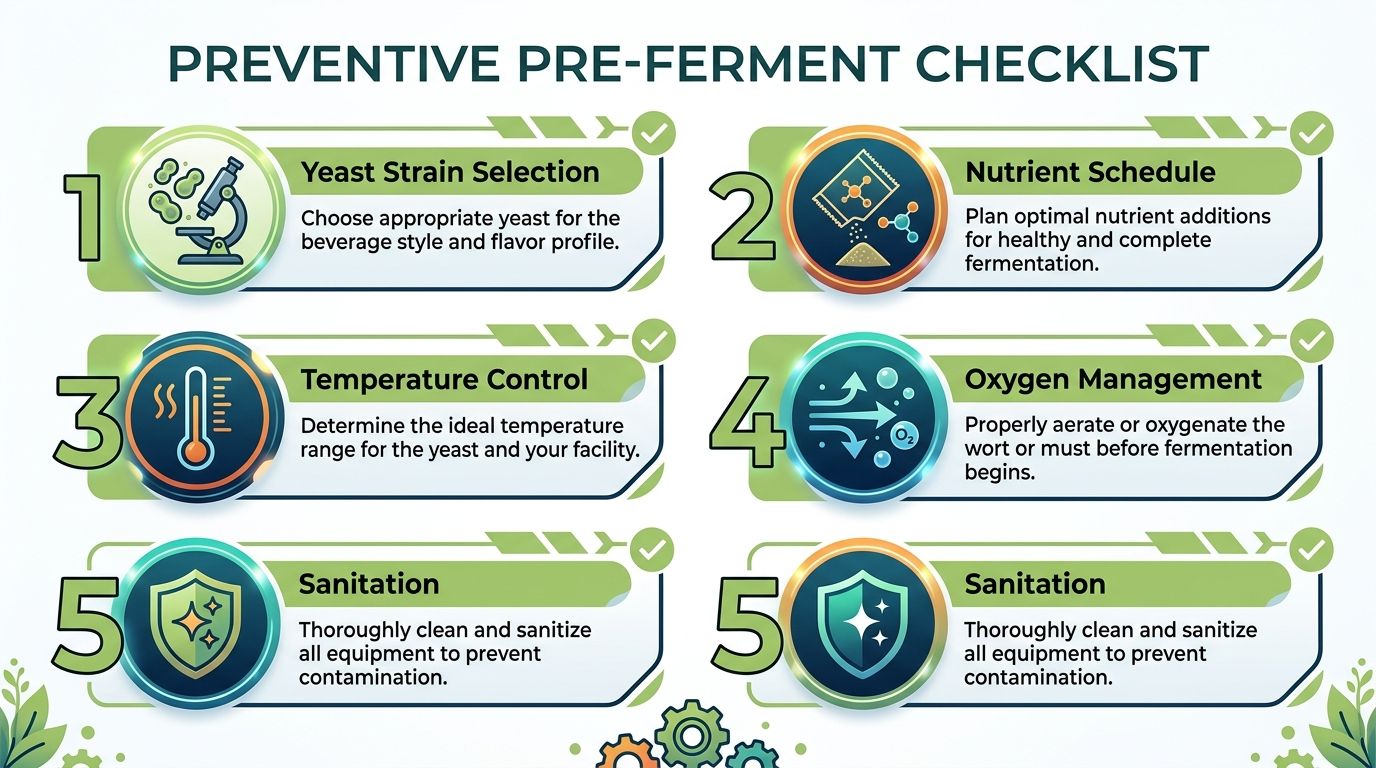
Prevention starts before the culture touches the liquid. Choose yeast suited to the expected alcohol level and temperature, prepare nutrients as part of the recipe rather than as an emergency measure, and sanitise every surface that contacts the ferment.
The Australian restart protocols make the value of planning clear. They use controlled temperatures around 20 to 24°C during restart, gradual acclimatisation and staged nutrient additions because yeast performance depends on its environment. Your normal fermentation plan should apply the same thinking before the batch stalls.
Build a repeatable log
Record the following for every batch:
- Culture choice: Note the yeast or SCOBY condition and the environment it will face.
- Starting measurements: Record gravity, pH and temperature before pitching.
- Nutrient schedule: Write down what you add and when, instead of relying on memory.
- Oxygen handling: Decide whether oxygen is appropriate at the beginning, then limit unnecessary exposure later.
- Early progress: During the first 48 hours, log temperature at two intervals, record gravity movement and inspect the cap, foam or pellicle.
The supplied prevention plan also identifies FAN above 100 ppm and dissolved oxygen at 8 to 10 ppm before pitching as useful control targets where the brewer has the equipment and process knowledge to measure them. These are not numbers to guess at with kitchen tools. If you can't measure them reliably, focus on consistent ingredients, sound sanitation and a documented nutrient plan.
Make the routine visible
Keep a one-page checklist inside the fermentation cabinet. Include sanitation, temperature windows, gravity checkpoints, pH checks and the point at which you stop attempting rescue. A written boundary prevents the common mistake of adding another intervention because the previous one didn't produce an immediate visual change.
For living cultures, the general discipline described in revitalising your living culture is transferable. Observe activity, feed with purpose and judge culture strength by performance rather than appearance alone.
For kombucha, use a clean vessel with enough headspace for the process, and keep your culture handling organised. A suitable fermenting glass jar makes it easier to inspect the surface, protect the batch from avoidable contamination and record what happens without repeatedly disturbing the ferment.
The durable lesson is simple: measure early, maintain stable conditions and treat a stall as a diagnostic event. A calm, staged response gives healthy yeast a chance. A questionable aroma, unsafe pH or visible mould deserves the bin, not another experiment.
Pep Tea offers Australian-brewed, sugar-free organic kombucha from the Hunter Valley, NSW, alongside premium organic Japanese Matcha for clean, everyday beverage routines. Visit Pep Tea to explore properly fermented kombucha, organic Matcha and practical products for brewing with confidence.