
Tag: home fermentation
Starter Tea Kombucha: A Practical Guide for Home Brewers

You've left a jar of sweet tea on the kitchen bench for a few days. A pale film is forming on top, strands are drifting through the amber liquid, and you're wondering whether the batch is progressing normally or heading for the sink. In kombucha brewing, starter tea often makes the difference between a controlled ferment and a worrying wait.
Starter tea is mature kombucha liquid reserved from an earlier batch. It brings acidity and living yeast and bacteria into fresh sweet tea, helping the new brew move quickly into a safer acidic environment. The pellicle, commonly called a SCOBY, matters too, but the liquid surrounding it is a vital part of the culture.
Australian guidance describes kombucha as sweetened tea fermented with a SCOBY, or Symbiotic Culture of Bacteria and Yeast. The practical lesson is simple: starter tea isn't just leftover drink. It's part of the brewing system, and understanding it helps you make better decisions about pH, temperature, flavour and storage.
What Starter Tea Actually Is in a Kombucha Brew
Starter tea is the mature, fermented liquid you set aside to inoculate your next batch. It contains the acids produced during fermentation, along with yeasts and bacteria that can continue working in fresh sweet tea. A new pellicle may form on the surface, but the liquid itself carries much of the biological activity needed to begin the next brew.
That distinction clears up a common beginner confusion. The rubbery disc is visible, so it often receives all the attention. Yet Australian regulatory material explains that kombucha should be inoculated with a proven commercial starter culture and that the starter system helps drive rapid acidification. The liquid isn't merely flavouring. It helps establish the conditions the culture needs.
Why acidity matters from the beginning
Fresh sweet tea can sit around pH 5, an acidity level that remains permissive for contaminant growth, according to Australian fermented-beverage guidance. Adding acidic starter tea changes that starting point before fermentation has properly gathered momentum.
Australian guidance treats reaching pH 4.2 or below as a critical control point. That threshold matters because kombucha becomes more acidic as the culture converts sugars and ethanol into organic acids. Starter tea helps shorten the period in which the new batch is relatively unprotected.
Practical rule: Think of starter tea as both an ingredient and a safety control. A healthy pellicle without enough mature liquid can leave fresh tea slow to acidify.
Choose liquid from a batch that smells clean and pleasantly sour, not one with visible mould, rotten aromas or unexplained discolouration. If you're growing or refreshing a culture, the PepTea guide to making a kombucha SCOBY can help you understand the relationship between the pellicle and the liquid culture.
How Starter Tea Drives the Fermentation
You add sweet tea to a clean jar, then wonder why mature kombucha belongs in the same batch. The answer is that starter tea, the SCOBY, temperature, oxygen and acidity form one working system. Follow their sequence and fermentation becomes easier to read.
Yeasts convert sucrose into glucose and fructose, producing ethanol and carbon dioxide. Acetic acid bacteria then oxidise ethanol into acetaldehyde and acetic acid. This handover moves the brew from sweet tea towards a tangy, acidic drink, as explained in Australian food-safety information about kombucha fermentation.
Starter tea brings an active community of organisms into the new jar, so the first changes can begin without waiting for the culture to establish from nothing. The pellicle is the visible structure at the surface. Oxygen, temperature and available sugar affect the pace, while the liquid starter helps the new tea enter the process already connected to an acidic culture.
Australian regulatory material places first fermentation commonly within 7 to 10 days, with conditions generally around 22°C to 30°C, before the SCOBY is removed once the drink reaches a pH below 4.2. These conditions appear in Australian food-regulation material on fermented beverages.
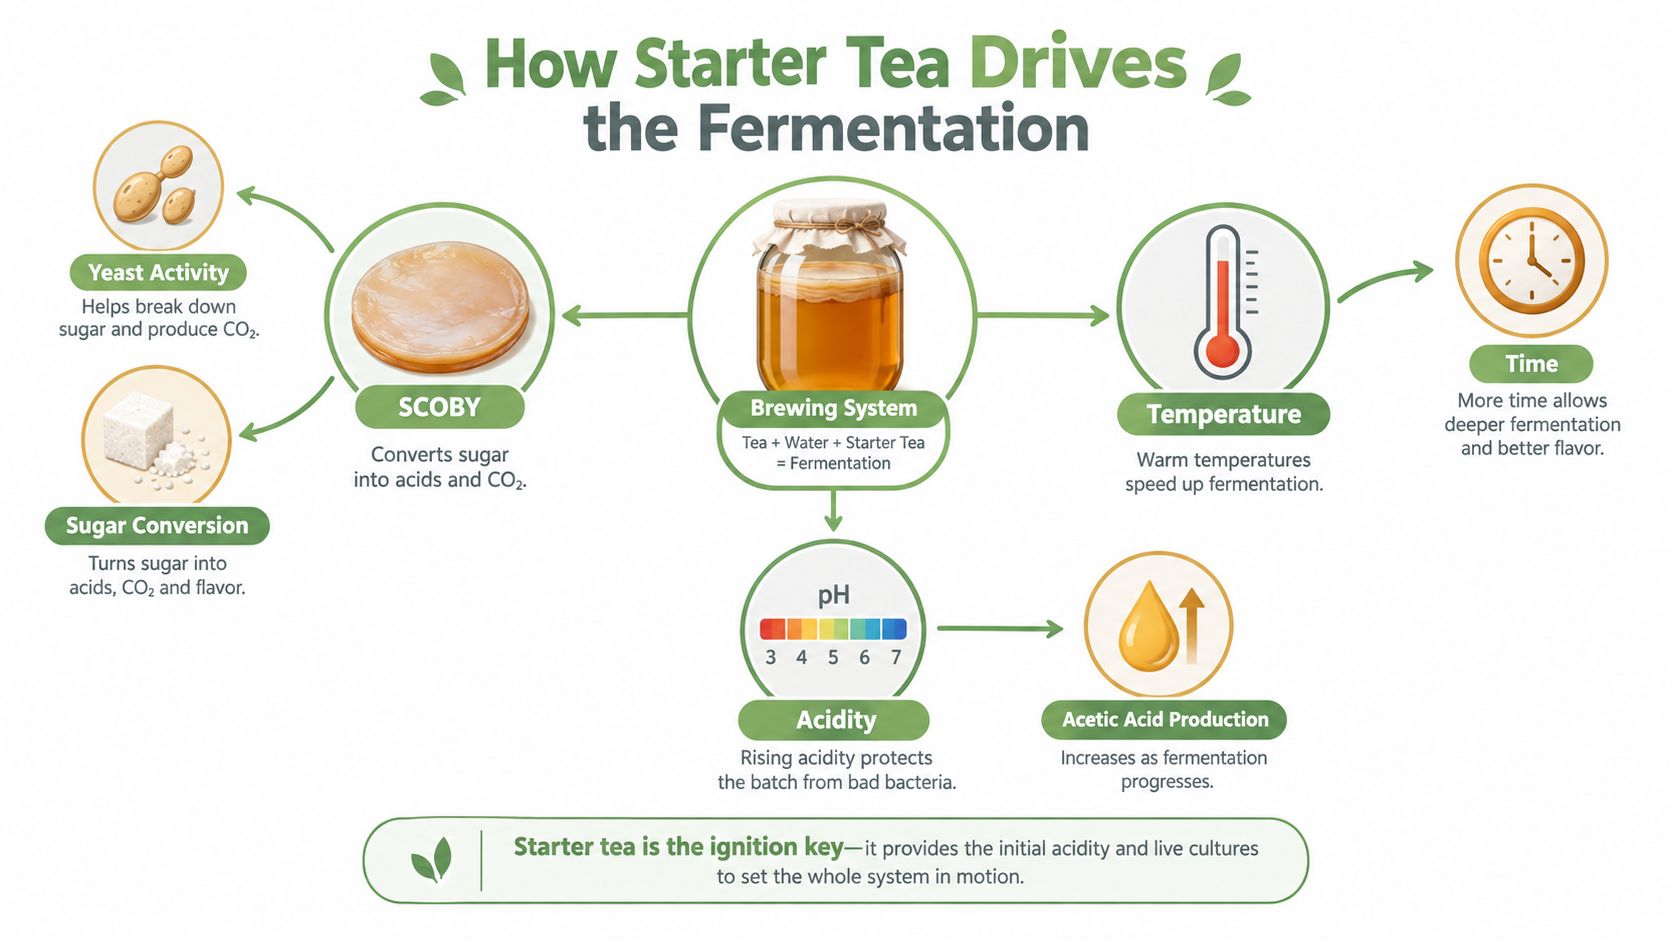
The brewing system in plain language
A small or weak starter culture can leave fresh tea slow to acidify. Warm conditions usually speed the work, while cooler conditions make it more gradual. As acidity rises, the jar becomes less welcoming to unwanted organisms and more suitable for the intended culture.
Australian health guidance recommends cooling tea from 60°C to 20°C within 2 hours, then fermenting at 20°C to 23°C for 7 to 10 days, with pH checked throughout. The finished drink should be refrigerated at 4°C, and pH 4.2 or below is identified as a critical control point. The Western Australian fermented-food safety guideline gives further detail for anyone scaling up or selling kombucha.
For the opening stage, follow PepTea's kombucha first-fermentation guide.
Making and Storing Your Own Starter Tea
The easiest source of starter tea is a clean, successful batch you've already brewed. Reserve some of the finished liquid before adding fruit, herbs or other flavourings. Plain first-fermentation liquid is generally easier to assess and less likely to carry extra particles into the next jar.
Reserve the right liquid
Use kombucha that tastes finished, pleasantly tart and clean. It shouldn't still taste like sweet tea, but it also shouldn't smell rotten or chemically harsh. Straining it through a clean fine mesh strainer can remove loose yeast strands and fragments that make the reserve harder to inspect.
A practical home routine looks like this:
- Clean your equipment. Wash the jar, funnel, strainer and your hands thoroughly. Fermentation works best when the intended culture isn't competing with avoidable contamination.
- Set aside mature kombucha. Keep enough liquid to seed the next batch, then transfer it to a clean glass jar.
- Cover it sensibly. Use a clean cover that protects the liquid from dust while allowing the culture to remain suitable for future brewing.
- Label the jar. Write the date and identify it as plain starter tea, especially if you keep flavoured kombucha nearby.
- Refrigerate the reserve. Australian guidance specifies refrigeration at 4°C for final kombucha. Cold storage slows activity, so allow the starter to return gradually to brewing conditions before adding it to fresh tea.
Inspect before every use
A reserve should look and smell like clean fermented tea. Pink or unusual coloured growth, blue-green mould, fuzzy patches, or a rotten smell are reasons to discard it rather than trying to rescue it. Don't taste a reserve that shows clear contamination.
Keep the starter separate from finished flavoured drinks. Ginger, citrus, fruit and botanicals can alter the culture and make it harder to judge whether an unusual appearance is normal fermentation or spoilage. A labelled jar prevents accidental swaps and keeps your process organised.
Comparing Starter Tea and Acidified Tea Options
Home brewers have several ways to lower the starting acidity of fresh sweet tea. They aren't interchangeable, because some options provide living cultures while others only change the liquid's chemistry.
| Option | Reliability | Flavour Impact | Best Use Case |
|---|---|---|---|
| Reserved starter tea | Strong when sourced from a clean, active batch | Balanced fermented character | Default choice for regular brewing |
| Commercial liquid kombucha starter | Consistent when supplied for brewing | Usually designed to suit kombucha | Useful when starting without a reserve |
| Distilled white vinegar | Acidifies quickly but doesn't provide a kombucha culture | Sharp, vinegary notes | Emergency acid adjustment, not a full culture substitute |
| Food-grade acidified tea | Can lower acidity without live microbial diversity | Depends on the acid and concentration | Backup when live starter isn't available |
Reserved starter tea is usually the most balanced option because it carries both organic acids and a microbial community already adapted to kombucha conditions. It can influence the next batch's aroma, sourness and fermentation behaviour, so a clean, agreeable reserve is worth protecting.
Commercial liquid starter is convenient for a first brew or after a failed batch. Check that the product is intended for kombucha fermentation and follow its directions rather than assuming every bottled kombucha is suitable.
Vinegar may help lower acidity, but it brings a strong acetic taste and doesn't replace the yeasts and bacteria supplied by living kombucha. Food-grade citric or tartaric acid can provide an acidified fallback, yet it also lacks the microbial diversity that drives fermentation and pellicle formation.
Brewing choice: Use reserved starter tea as your normal option. Keep a commercial starter or food-grade acidified tea as a backup, and treat vinegar as an emergency measure rather than the foundation of a batch.
Proportions and Ratios for Each New Batch
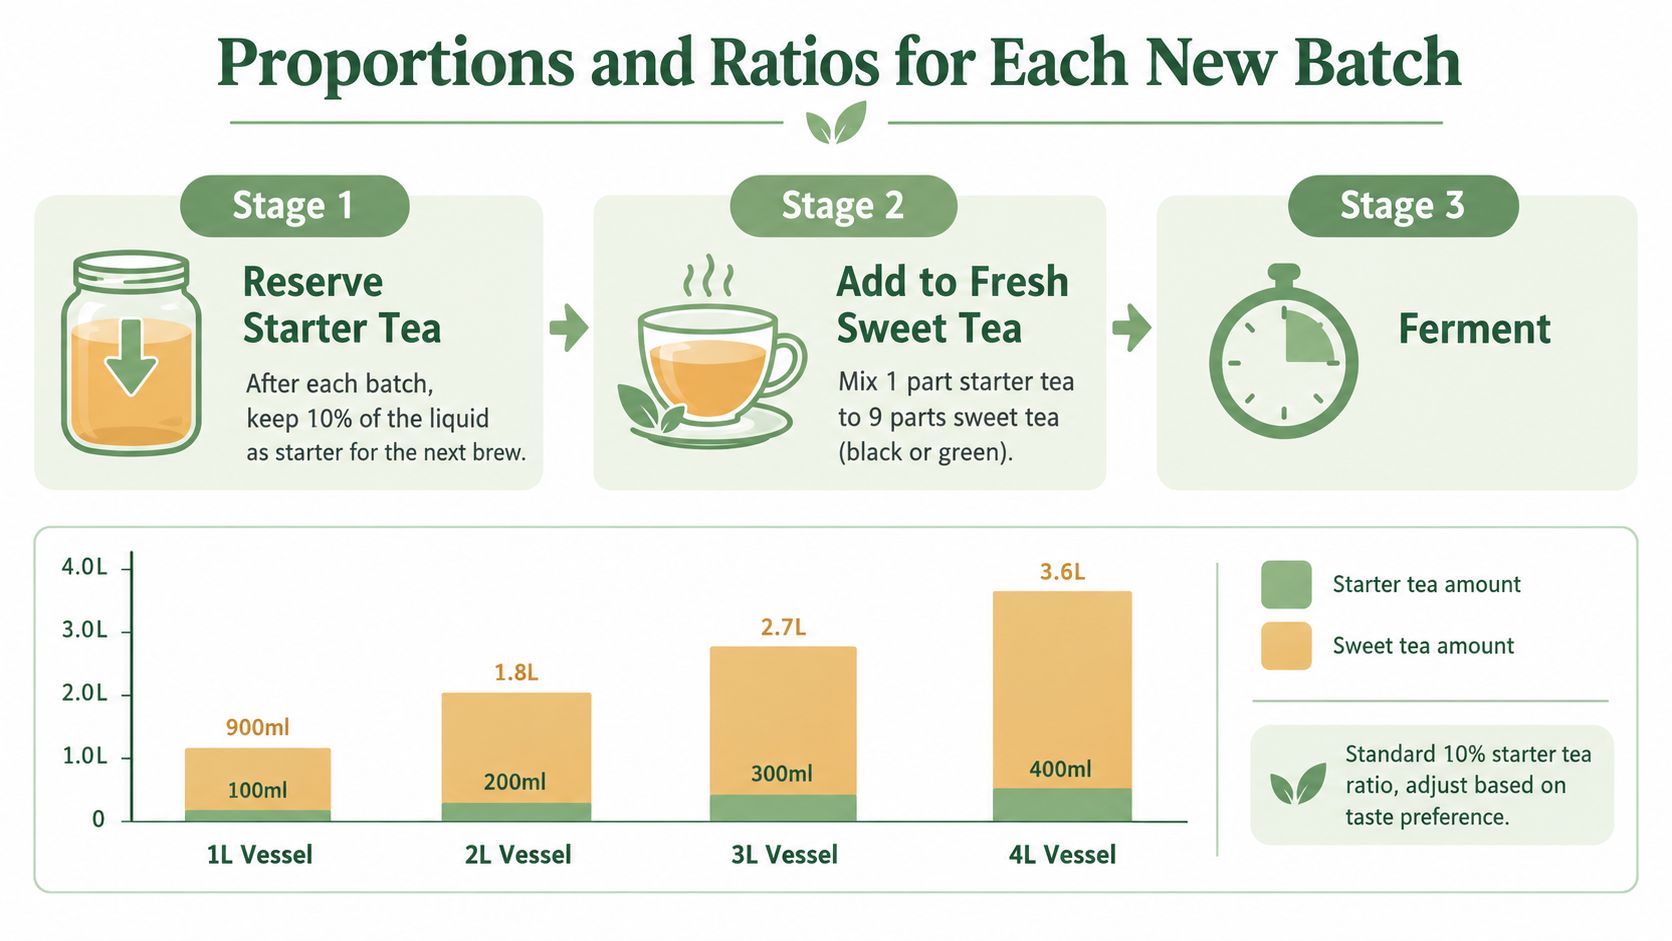
A straightforward starting point is the 10 per cent starter tea rule, meaning roughly 100 millilitres of starter tea for each litre of sweet tea. This ratio is a practical way to introduce enough acidic liquid and live culture without making the new batch dominated by old kombucha flavour.
The volume guide is simple:
- 1-litre vessel: Add 100 millilitres starter tea and 900 millilitres sweet tea.
- 2-litre vessel: Add 200 millilitres starter tea and 1.8 litres sweet tea.
- 3-litre vessel: Add 300 millilitres starter tea and 2.7 litres sweet tea.
- 4-litre vessel: Add 400 millilitres starter tea and 3.6 litres sweet tea.
These exact proportions are represented in the starter tea kombucha brewing ratios infographic.
How to manage the reserve
Before bottling or flavouring a finished batch, pour off the amount you need for the next brew. If you remove nearly all the liquid and leave only a pellicle, the next batch may start more slowly because it has lost much of its mature acidic environment.
For a continuous-brew vessel, the principle is similar but the rhythm changes. You draw finished kombucha from the lower outlet, then replace it with cooled sweet tea. Keep enough mature liquid in the vessel to maintain the established acidic environment, and watch the pH rather than relying only on volume.
Warm Australian kitchens can accelerate fermentation. Instead of changing the ratio automatically, monitor pH and taste, then adjust the next cycle if the brew becomes sharp too quickly. If the reserve has been diluted through repeated top-ups, remove some finished liquid and replenish with a stronger, clean starter reserve before continuing.
Reading the Signs of a Healthy Fermentation
A healthy ferment doesn't always look tidy. Yeast strands can hang below the surface, a new pellicle can form unevenly, and small bubbles can collect around the jar. Those signs alone don't prove that a batch is safe.
The strongest habit is to combine appearance, smell, taste and pH. Australian guidance treats pH 4.2 or below as a critical control point, so a pH reading gives you information that visual inspection can't provide.
What normal development can look like
Early in the brew, the surface may appear quiet while the culture begins working through the sweet tea. Over time, a thin new pellicle may appear across the surface, sometimes smooth and sometimes irregular. Fine bubbles or yeast sediment can also develop below it.
A sour, tea-like or lightly yeasty aroma can fit normal fermentation. A batch with fuzzy mould, blue-green growth, pink discolouration, rotten-egg odour, cheese-like smell or an unmistakably chemical character should not be treated as healthy because it fizzes.
Fizz means gas is present. It doesn't certify the batch.
Surface films deserve close attention. A smooth, wet-looking film may be part of pellicle development, while dry, fuzzy or brightly coloured growth suggests mould. When in doubt, don't scrape off the suspicious area and continue. Discard the batch and clean the equipment thoroughly.
Taste only when the batch looks and smells normal. If the flavour is intensely vinegary, the ferment may have gone further than you prefer, even if the acidity is within the guidance range. For safety decisions, use a properly calibrated pH meter or suitable test method, and remember that pH is one control, not a substitute for clean equipment and careful observation.
Troubleshooting Acidity and Contamination Issues
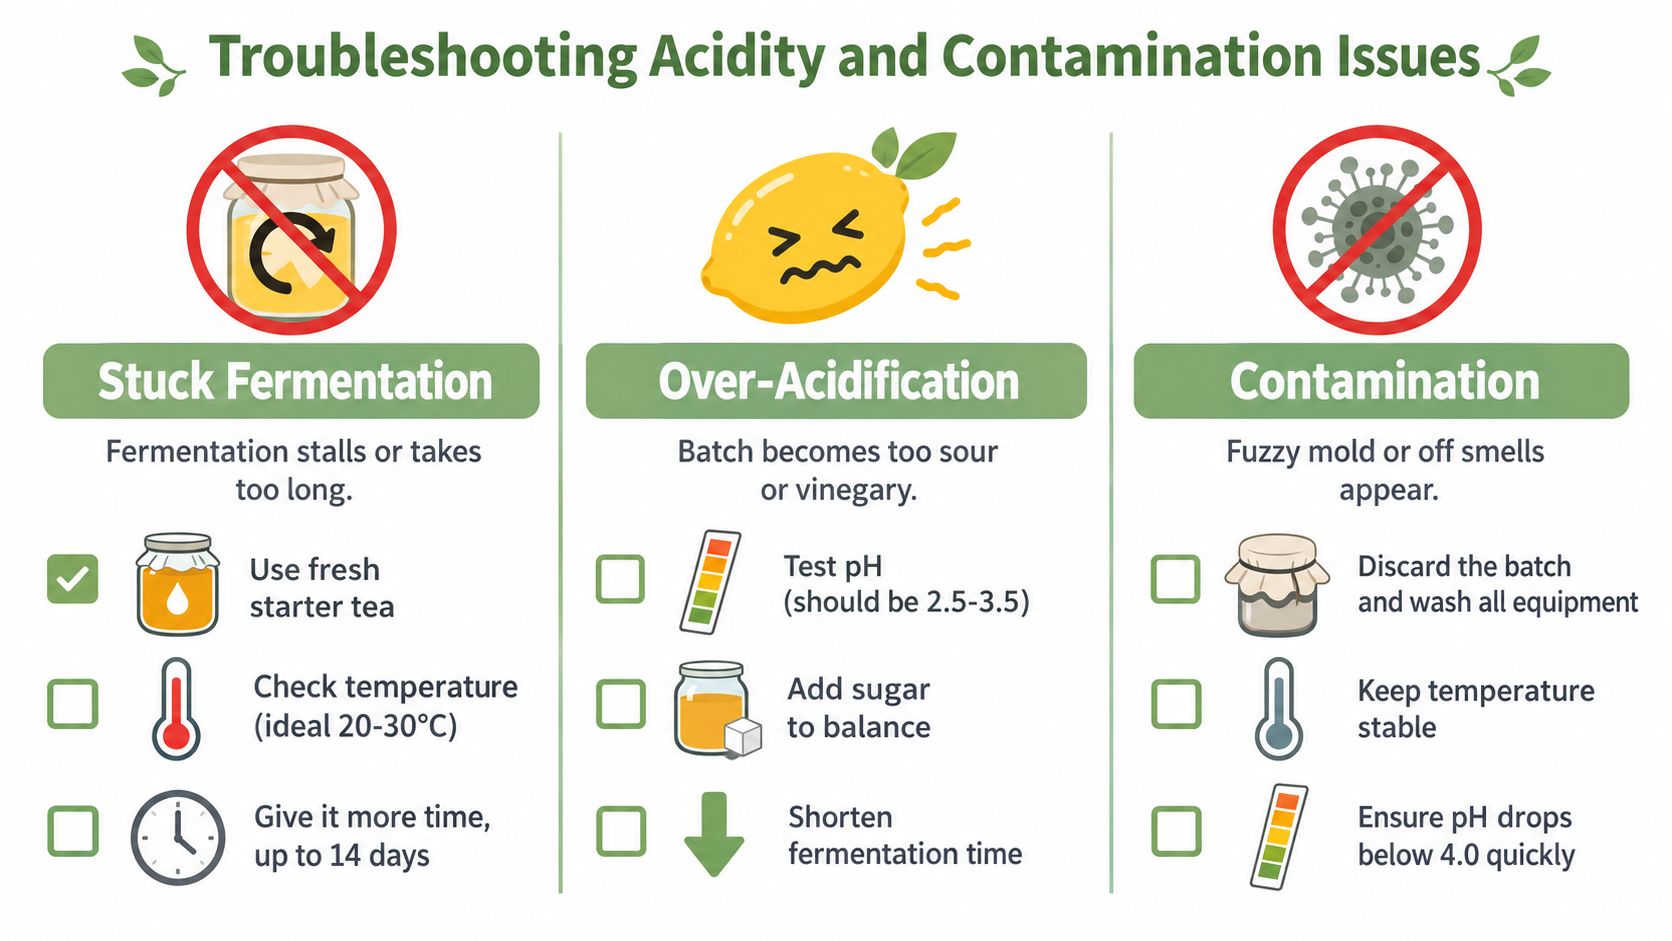
When a brew stalls or turns sharply sour, begin with the symptom and change one factor at a time. Random additions can make a questionable batch harder to assess. Measure, inspect, and record the result so the next decision rests on evidence.
If fermentation seems stuck
A brew that stays sweet with little activity may have started with weak starter tea, a cool room, or an unsuitable sugar balance. One Australian safety protocol describes fermentation around 20°C to 23°C, with the first fermentation commonly lasting 7 to 10 days. Check the room temperature with a thermometer instead of relying on how the kitchen feels.
- Use stronger starter: Add fresh, clean starter tea only when the batch has no contamination signs.
- Stabilise the environment: Put the jar in a clean, undisturbed place within the appropriate brewing range.
- Allow more time: Watch changes in aroma, acidity, and pH rather than using pellicle thickness as the progress marker.
Starter tea works like an acidic head start. If that head start is weak, the culture may need more time to establish the conditions that support fermentation.
If the batch becomes too acidic
A pronounced vinegar flavour usually means the culture has used much of the available sugar and continued producing acids. For the next batch, shorten fermentation, reserve a milder starter, or adjust the sweet-tea balance carefully.
Australian guidance notes that final kombucha typically targets pH at or above 2.5 to avoid over-acidification, as described in the Western Australian safety guideline. Taste can reveal preference, but it cannot confirm whether a batch meets a safety threshold.
If contamination appears
Fuzzy mould, unusual coloured growth, or rotten smells call for discarding the entire batch. Wash and sanitise the jar, cover, utensils, and nearby surfaces before brewing again. Yeasty strands and an uneven pellicle may be normal, yet they still need to be considered alongside smell and pH.
For closer monitoring, a PepTea digital pH meter can show how acidity changes instead of leaving you to judge by bubbles or colour. Follow its care instructions, and record each reading with the temperature and tasting notes.
Bringing It All Together in Your Brewing Routine
A reliable routine can take only a few minutes after each batch. First, inspect the surface and smell the liquid. Then measure pH, taste a small amount if the batch appears normal, and decide whether the acidity suits your preferred drinking style.
Before bottling or flavouring, reserve clean plain kombucha for the next brew. Transfer it to a labelled jar, keep the pellicle in suitable mature liquid, and refrigerate the starter at 4°C in line with Australian guidance. Clean the jar rim and cover before setting up fresh sweet tea.
Write down the room temperature, fermentation duration and pH reading. After several batches, those notes can reveal whether your kitchen runs warm, whether a particular tea ferments quickly, or whether your starter reserve is losing strength.
Ingredient quality supports the whole process. Use clean, filtered water and a suitable loose-leaf black or green tea, then allow the sweetened infusion to cool before adding the culture. If you plan to sell kombucha or offer it in a café, remember that soft-drink alcohol rules apply. CHOICE's Australian kombucha guidance notes a limit under 0.5% ABV in Victoria and Queensland, while the threshold is 1.15% ABV in other states and territories, with labelling required between 0.5% and 1.15% ABV.
PepTea offers Australian-brewed, sugar-free organic kombucha made in the Hunter Valley, NSW, alongside organic Japanese matcha and tea for everyday brewing and café service. Visit Pep Tea to explore kombucha options, quality tea ingredients and wholesale support for your next starter tea kombucha batch.
How Does a Fermentation Airlock Work

You've sealed a jar of sweet tea and a SCOBY on the kitchen bench, and now you're waiting for the first sign of life. Then it happens: bloop. That small sound is satisfying, but it isn't the airlock “making” fermentation happen. It's carbon dioxide finding a safe exit while the fermenter stays protected.
So, how does a fermentation airlock work? Think of it as the immune system of the fermenter. It releases pressure from active cultures while helping keep oxygen, airborne microbes, mould spores and insects out. For delicate probiotic cultures, including kombucha SCOBYs, that controlled environment helps you avoid turning a carefully prepared brew into an unpredictable experiment.
The First Bloop and Why It Matters
The first bloop often arrives after a quiet stretch. Your jar looks unchanged, the tea is resting, and nothing seems to be happening. Then pressure from inside moves through the airlock and sends a bubble through the liquid trap. That sound tells you gas is escaping, not that the airlock is measuring the exact health or speed of fermentation.
In a Hunter Valley kitchen, where warm days can make a ferment feel lively, that little device gives the brew a safer outlet. Australian homebrewing guidance describes a fermentation airlock as a one-way pressure release device. It allows carbon dioxide to bubble out through water or sanitiser while helping prevent outside air, oxygen and airborne microbes from re-entering the fermenter. Green Living Australia's fermentation airlock guide explains this closed-system approach in practical terms.
More than a plastic accessory
A fermenting culture produces gas as it works through available sugars. If the vessel has no controlled release path, pressure can build inside. If the vessel is left wide open, the brew has a much easier route for unwanted exposure.
The airlock sits between those extremes. It keeps the main vessel closed, then gives internal gas a narrow, controlled pathway through a liquid or silicone seal. That balance matters for kombucha because the brew contains living cultures whose environment affects flavour, aroma and texture.
The first bloop is reassuring, but the real job is quieter. The airlock protects the fermenter even between bubbles.
A visible airlock also changes how you brew. Instead of repeatedly opening the lid to inspect the liquid, you can observe the setup from outside. The less you disturb the vessel, the easier it is to maintain the conditions you created at the start.
The important distinction is this: an airlock supports fermentation, but it doesn't replace clean equipment, a suitable vessel or sensible temperature management. It's one part of a controlled process, and a small part with a very important protective role.
The Science of the One-Way Water Trap
The classic liquid airlock works through a simple pressure difference. Fermenting yeast and bacteria produce carbon dioxide. As that gas accumulates in the headspace, pressure inside the vessel becomes greater than the pressure outside.
The gas then pushes into the airlock's internal tube. It travels through the liquid chamber and escapes as bubbles. Once the pressure equalises, the liquid settles back into place, ready to resist air moving in the opposite direction.
A simple way to picture the mechanism
Think of the water trap as a doorway with a spring that only opens when pressure comes from inside. Carbon dioxide can push through because the fermenter is producing it. Outside air doesn't have the same pressure advantage, so it can't travel backwards through the liquid and into the jar.
Australian guidance commonly recommends filling the chamber with water or sanitiser, often to about half full or to the marked line. The liquid column forms the barrier. If evaporation lowers the level too far, the seal can weaken, so the airlock needs occasional visual attention. Pantry Culture's explanation of fermentation airlocks also highlights why a bubbling airlock shouldn't be treated as a calibrated fermentation meter.
The airlock must remain above the fermenting liquid. It isn't designed to touch the brine, wort or kombucha itself. Keeping it raised reduces the chance of dirty liquid travelling back into the airlock chamber and helps prevent contamination from entering through the pressure-release path.
Why low oxygen matters
A closed fermenter doesn't mean the contents are isolated from every biological process. It means you're limiting unnecessary contact with the outside environment while the culture develops.
Oxygen exposure can alter the balance you're trying to create. Unwanted airborne organisms can enter through an unprotected opening, and insects can carry contamination into a sweet ferment. The airlock creates a practical boundary, allowing the culture to release gas without leaving the vessel exposed.
That doesn't mean every kombucha process must use an airlock in exactly the same way. Vessel design, fermentation stage and recipe all matter. The useful principle is consistent: give carbon dioxide an exit while making re-entry difficult.
For readers exploring other botanical ingredients, organic hops flowers can be a useful resource when learning how different plants contribute aroma and character to fermentation-inspired drinks. Keep additions appropriate to the recipe and remember that an airlock protects the process, not the ingredients themselves.
The key sequence is straightforward:
- Fermentation produces CO2. Internal pressure begins to rise.
- Pressure enters the airlock. Gas moves through the central passage.
- The liquid barrier releases gas. CO2 bubbles through and escapes.
- The seal discourages reverse flow. Outside air and airborne contaminants remain outside.
That's the whole principle. The design is simple, but the result is a more controlled environment for your ferment.
Choosing the Right Airlock for Your Vessel
Your vessel determines which airlock will feel easiest to live with. A wide-mouth Mason jar needs a different fitting from a bucket or demijohn, and a vigorous ferment may benefit from a design that's easy to inspect and clean.
Australian suppliers describe two broad approaches: traditional liquid-seal airlocks, such as S-shaped models, and waterless silicone valves that self-seal. Nourish Me Organics' pickle pipe listing describes a silicone design that screws onto wide-mouth Mason jars and doesn't need daily burping, while S-shaped airlocks use pre-boiled water or sanitiser as the barrier.
Airlock types compared
| Airlock Type | Best For | Maintenance Level | Key Advantage |
|---|---|---|---|
| S-shaped airlock | Standard buckets, carboys and demijohns | Moderate | Simple liquid barrier and familiar design |
| Three-piece airlock | Ferments where easy disassembly matters | Moderate | Parts separate for cleaning and inspection |
| Silicone waterless airlock | Wide-mouth Mason jars and compact setups | Low | Self-sealing valve without a liquid chamber |
The S-shaped model
The S-shaped airlock is the traditional bubbler. You add liquid to the chamber, fit it into a bung or grommet, and watch for bubbles as gas moves through. It works well with common brewing vessels and makes the pressure-release process visible.
Its main drawback is cleaning the curves. Sediment or foam can collect in places you can't easily see, so you'll want to rinse it thoroughly after use.
The three-piece version
A three-piece airlock has separate components inside the chamber. That makes it easier to take apart, wash and inspect than a single curved tube. It can be a practical choice for brewers who prefer to see every surface before sanitising.
For a larger fermenter, the most important question isn't whether the airlock looks impressive. Check whether the bung, grommet and lid opening match, and whether the vessel gives active fermentation enough room.
The silicone waterless valve
A silicone valve suits a different style of brewing. It uses a self-sealing slit rather than a water chamber, which means there's no liquid level to monitor or refill. This can be handy for a small Mason jar ferment where a low-profile lid is part of the appeal.
The trade-off is that you lose the visible water-trap bubbles. You'll need to judge progress using the ferment itself and your chosen process checks rather than relying on movement in the valve.
For a suitable starting point, explore Pep Tea's kombucha brewing container and compare its vessel design with the airlock style you already use. Match the hardware to the lid, the batch size and the amount of monitoring you're realistically prepared to do.
Setting Up Your Airlock for a Perfect Seal
A good airlock can only work when the rest of the vessel is sealed properly. If the lid leaks around its rim, carbon dioxide may escape through that gap instead of passing through the airlock. The brew can still be fermenting, but the airlock may remain quiet and the vessel may have less protection from outside exposure.
Five checks before fermentation begins
Clean and sanitise the parts. Wash the vessel, lid, bung or grommet, and airlock so residue doesn't interfere with the seal or introduce unwanted organisms.
Confirm the lid opening. Australian brewing documentation commonly specifies a 13–14 mm hole for the grommet or bung used with standard airlock fittings. Pitch & Pour's first beer guide gives this practical fitting detail alongside the recommendation to use a half-filled sanitiser solution.
Fill the chamber correctly. Add water or sanitiser to the marked line, or approximately half full where the airlock design uses that guidance. Don't overfill, because vigorous fermentation can push liquid into places you don't want it.
Insert the airlock upright. Press the bung or grommet firmly into place, then fit the airlock vertically. The upright position helps the liquid remain in the intended channels.
Seal the vessel firmly. Tighten or secure the lid before fermentation becomes active. A loose lid gives gas an easier escape route and can make the airlock appear inactive.
Keep the airlock above the liquid
The airlock should sit above the kombucha, wort or brine, not down in it. That arrangement gives pressure a clear route out and reduces the risk of liquid travelling into the chamber.
Leave enough headspace for foam and movement. A vigorous ferment can send krausen or other foamy material into the airlock, particularly when the ferment is warmer and more active. If foam reaches the chamber, clean and sanitise the airlock before returning it to service.
For a dedicated vessel, Pep Tea's fermenting glass jar is another option to consider when you're choosing a container and planning how the lid, seal and airlock will work together.
Practical rule: A silent airlock with a properly sealed vessel deserves a closer look, not immediate panic. A bubbling airlock with a poorly fitted lid deserves attention too.
Reading the Bubbles and Managing Temperature
A lively stream of bubbles can be reassuring when you are watching a new ferment, but it is not a speedometer. A quiet airlock is not proof that fermentation has stopped either. The airlock is better understood as the fermenter's immune system: it helps keep fresh oxygen and unwanted microbes out while allowing pressure to escape. That protection matters especially for delicate probiotic cultures, such as a kombucha SCOBY, which can be affected by unnecessary oxygen exposure and contamination.
The airlock only displays gas passing through its liquid or valve. If carbon dioxide slips around a loose lid, a damaged seal or another leak, fermentation may continue without visible activity. Judge progress with the evidence suited to the brew, such as gravity readings, recipe timing and sensory checks, rather than bubbles alone. Pantry Culture's airlock guidance also points brewers towards gravity readings when assessing completion.
What bubbles can tell you
Bubbles show that pressure is changing inside a sealed vessel and that gas has found the intended exit. That is useful information, but it answers only one question.
They cannot reliably tell you:
- Fermentation speed. Bubble frequency shifts with pressure, temperature and seal quality.
- Completion. A quiet airlock may indicate a slower ferment, a finished ferment or gas escaping elsewhere.
- Culture health. Bubble activity cannot reveal the brew's flavour balance, acidity or wider microbial activity.
For beer, the Pitch & Pour brewing workflow keeps wort at 18–22°C, lets primary fermentation run for 10–14 days, then checks final gravity, with a suggested finishing target around 1.010–1.014. Those figures apply to that beer process, not to every kombucha recipe. The brew-day checklist emphasises checking gravity instead of repeatedly opening the fermenter.
Temperature changes the rhythm
Temperature changes how actively a culture produces gas. Australian brewing guidance commonly targets 18–20°C for ale fermentations and notes that active fermentation can raise wort temperature by about 2–4°C above ambient. Pitch & Pour's four-week fermentation plan links warmer conditions with increased CO2 production and a greater chance of krausen reaching the airlock when headspace is limited.
The same principle helps with non-beer ferments. Warm conditions can make activity more vigorous, so allow more room above the liquid and check the airlock more often. Cooler conditions can quiet the bubbling without stopping the culture.
If a ferment appears stuck, inspect the seal and temperature, then look for process evidence before changing the recipe. Pep Tea's guide on how to restart a stuck fermentation offers a practical way to work through an inactive ferment without relying on bubbles alone.
Read the ferment, not just the plastic. Use recipe timing, sensory checks and suitable measurements to work out what is happening.
Pressure fermentation uses different equipment. A spunding valve holds controlled pressure, with KegLand guidance recommending 10–12 psi for most fermentations and warning that pressure should never reach or exceed 35 psi. The guidance also says pressure may need checking and adjustment every 15 minutes while the target is being reached. KegLand's pressure fermentation guidance highlights the difference: a basic airlock vents gas, while a spunding valve controls internal pressure.
Maintenance Habits for Long-Term Brewing Success
An airlock is reusable, but it isn't maintenance-free. Liquid can evaporate, foam can enter the chamber and residue can hide in narrow channels. A quick visual check protects the function of the device and helps you catch problems before the next batch.
During active fermentation, look at the liquid level and confirm that the airlock remains upright. If the chamber is drying out or the seal has been disturbed, correct it with the appropriate water or sanitiser solution for that design.
A simple cleaning routine
Australian retailers recommend cleaning reusable airlocks between uses with warm soapy water, followed by thorough rinsing and complete drying before sanitising. Pitch & Pour's brewing checklist provides that cleaning sequence as part of its equipment care guidance.
- Rinse promptly: Remove residue before it dries inside the chamber.
- Wash carefully: Move warm soapy water through every channel and removable part.
- Rinse completely: Don't leave detergent behind.
- Dry fully: Allow the parts to dry before the next sanitisation step.
- Sanitise before use: Reassemble only after the components are ready for the new ferment.
If a sudden temperature change pulls sanitiser or water back towards the vessel, stop and assess the batch rather than ignoring it. Clean the airlock, check the liquid level and review the seal before continuing. The best response depends on what entered the ferment and the stage of your process.
A well-maintained airlock won't make every ferment identical, but it gives your living cultures a cleaner, steadier environment. Once you understand that, the bloop becomes more than a cheerful kitchen sound. It's a small sign that your fermenter has a safe route for pressure and a protective barrier against the outside world.
Pep Tea offers Australian-brewed, sugar-free organic kombucha from the Hunter Valley, NSW, alongside organic Japanese Matcha for everyday tea rituals and café menus. Visit Pep Tea to explore the range, learn more about fermentation, and choose a clean, naturally brewed drink for your next pour.