
Tag: fermentation tips
Kombucha Starter Recipe: A Practical Beginner’s Guide

You're at the kitchen bench with a clean jar, sweet tea and a new SCOBY, wondering whether the thin layer forming on top is healthy or whether something has gone wrong. That uncertainty is normal. A good kombucha starter recipe gives you more than a list of ingredients. It gives you a controlled starting point, sensible fermentation checks and clear rules for when a batch should be used, continued or discarded.
Australian guidance provides useful benchmarks for home brewers. The tea must cool before the culture is added, fermentation needs a suitable temperature range, and pH matters more than taste alone. Follow the process below as a practical framework, while remembering that home fermentation carries food-safety risks and should be approached carefully.
Why Your First Kombucha Starter Matters
Your first starter liquid becomes the acidic foundation for later batches. If it's mature and healthy, it helps the new sweet tea move into a safer acidic environment. If it's weak, contaminated or added to hot tea, the SCOBY may struggle and the brew may remain vulnerable to unwanted microbial growth.
A SCOBY is the living culture used to ferment sweet tea. You may see a rubbery pellicle floating on the surface, brown stringy material underneath or a new pale layer developing. Those visual changes can be part of normal fermentation, but appearance alone can't confirm that a batch is safe to drink.
Practical rule: Treat the starter liquid as a core ingredient, not a splash added at the end.
Australian food-safety guidance explains that the initial tea infusion can sit around pH 5 and may support contaminant growth. It recommends using a proven starter culture and cooling the tea quickly from 60°C to 20°C within 2 hours before inoculation. You can read the Australian food-safety guidance on kombucha starter culture and cooling for the reasoning behind those controls.
This guide focuses on the points that cause first batches to fail: the starter-to-tea ratio, cooling temperature, fermentation conditions, pH testing, SCOBY inspection and contamination control. You'll also learn how to respond to a slow brew, a sour brew, fruit flies or fuzzy growth without trying to rescue something unsafe.
The aim isn't to make every batch identical. Ambient conditions vary between a cool Melbourne kitchen, a warm Queensland pantry and a home near the Hunter Valley. The aim is to give you measurable checkpoints so you aren't relying on a calendar or a guess.
Ingredients and Starter Ratios for a Safe Batch
For a straightforward Australian baseline, use about 100 ml of mature starter tea per litre of sweet tea, with roughly 70 g sugar and 1 tea bag per litre, as reflected in Australian consumer brewing guidance. The Australian kombucha and kefir brewing guide also describes retaining fermented liquid for the next batch, reinforcing the importance of keeping enough mature starter aside.
For a 2-litre batch, the working quantities are:
| Ingredient | Per litre | 2 L batch | Purpose |
|---|---|---|---|
| Tea | 1 tea bag | 2 tea bags | Provides the tea base for fermentation |
| White sugar | About 70 g | About 140 g | Fuels the yeast and bacteria during fermentation |
| Mature starter tea | About 100 ml | About 200 ml | Brings acidic fermented liquid into the fresh tea |
| Water | 1 litre | 2 litres | Forms the sweet tea base |
| Healthy SCOBY | 1 culture | 1 healthy culture | Continues the fermentation |
The Australian baseline is deliberately simple. Black tea is a familiar starting point, while plain green tea can also be used. Avoid treating the sugar as a sweetener added only for flavour. It feeds the culture, and fermentation changes the balance of sweetness and acidity over time.
Use clean, filtered water where possible. Water with a strong chlorine smell may interfere with the culture, so allow treated water to stand according to your local water advice or use filtered water. Choose a clean glass fermentation jar with enough room for the liquid and surface growth, then cover it with clean, breathable cotton secured firmly with a food-safe rubber band.
You can use ordinary kitchen utensils, but avoid prolonged contact between fermenting kombucha and reactive metal. Wash your hands, jar, cover and utensils thoroughly before starting. If you need a measured source of acidic liquid, PepTea starter tea for kombucha is one option to consider alongside a mature homemade batch.
Brewing and Inoculating the Sweet Tea
Start with the tea base, not the SCOBY. Measure the water, heat it and dissolve the sugar completely while the liquid is hot. Add the tea and steep until the brew has developed a clear tea flavour, then remove the bags or strain the leaves.
Don't add the culture while the tea is warm from the kettle. Australian guidance says the tea should cool from 60°C to 20°C within 2 hours before starter culture is added, so use a clean, shallow pot or an ice bath if you need to speed cooling. The liquid should feel like room-temperature water, not warm tea.
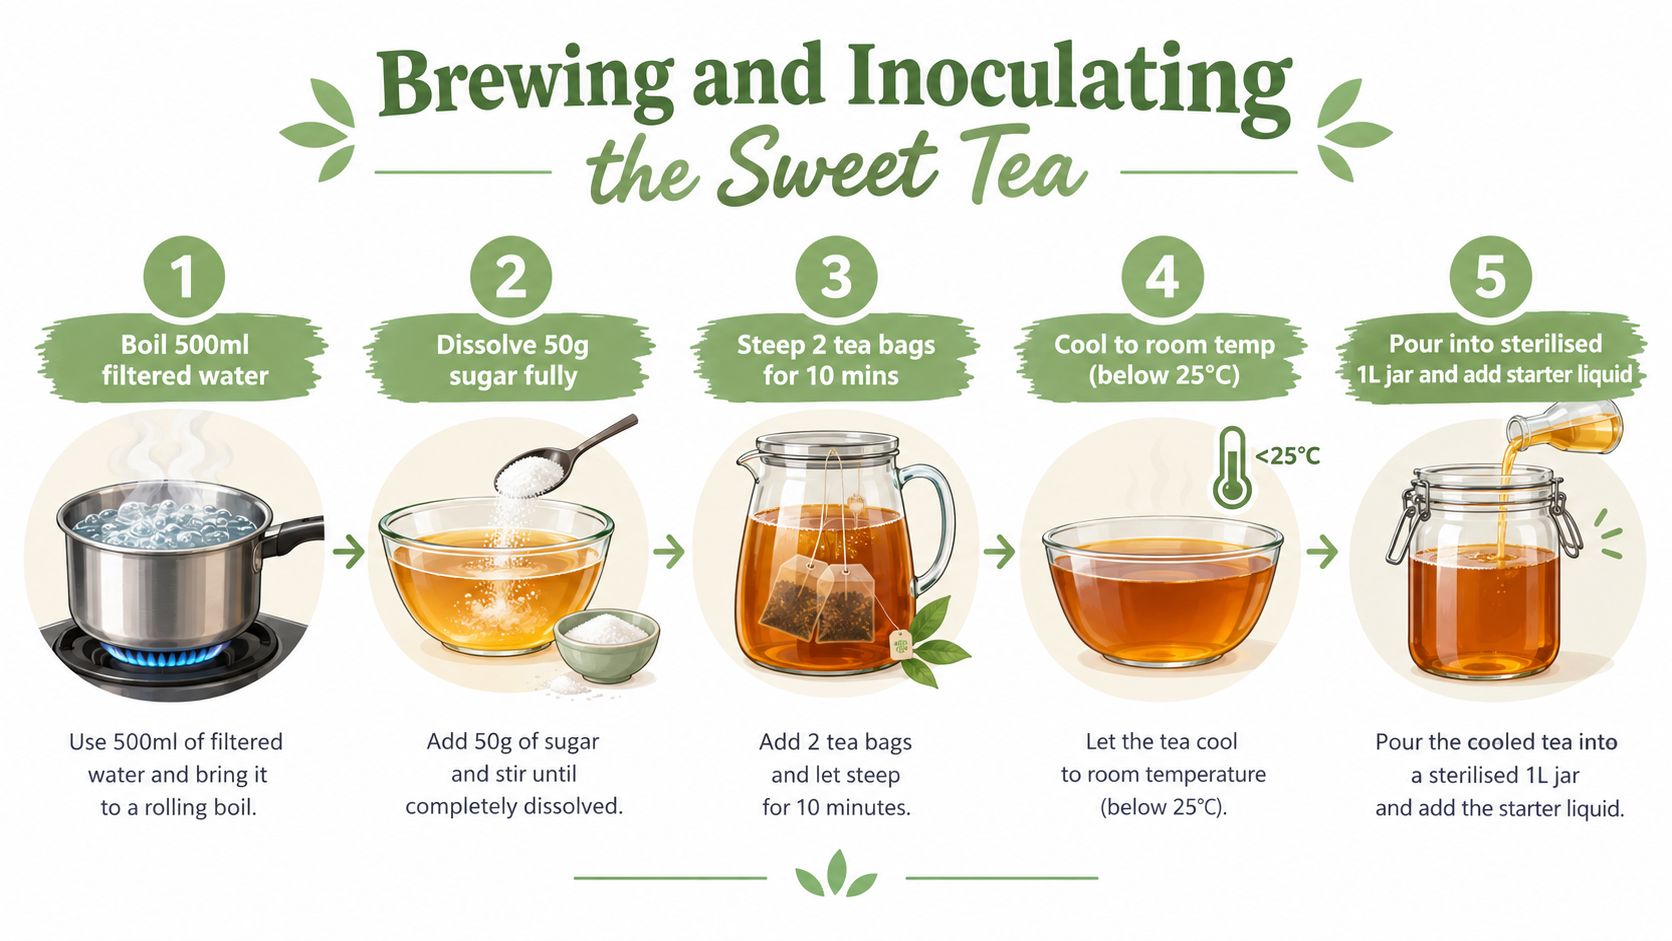
Once cooled, pour the sweet tea into your clean glass jar. Add the mature starter liquid, then place the SCOBY in with clean hands. It may float, sink or sit at an angle. That position isn't a reliable sign of failure.
Your inoculation checklist
- Cool the tea first. Don't compromise this step to save time.
- Add the starter liquid. Use about 100 ml per litre of sweet tea, giving a 2-litre batch about 200 ml.
- Add the SCOBY last. Handle it gently and inspect it before use.
- Cover the jar. Use breathable cotton or tightly woven cloth, secured so insects can't enter.
- Label the batch. Record the date, tea type and starter ratio so you can compare batches.
Keep the jar away from direct sunlight and avoid moving it unnecessarily. Don't seal it with an airtight lid during primary fermentation, because the culture needs airflow. For the first 48 hours, leave the brew undisturbed and don't taste it as a substitute for checking its acidity.
A short video can help you visualise the movement from sweet tea to inoculated jar:
Fermentation Window, Temperature and pH Checks
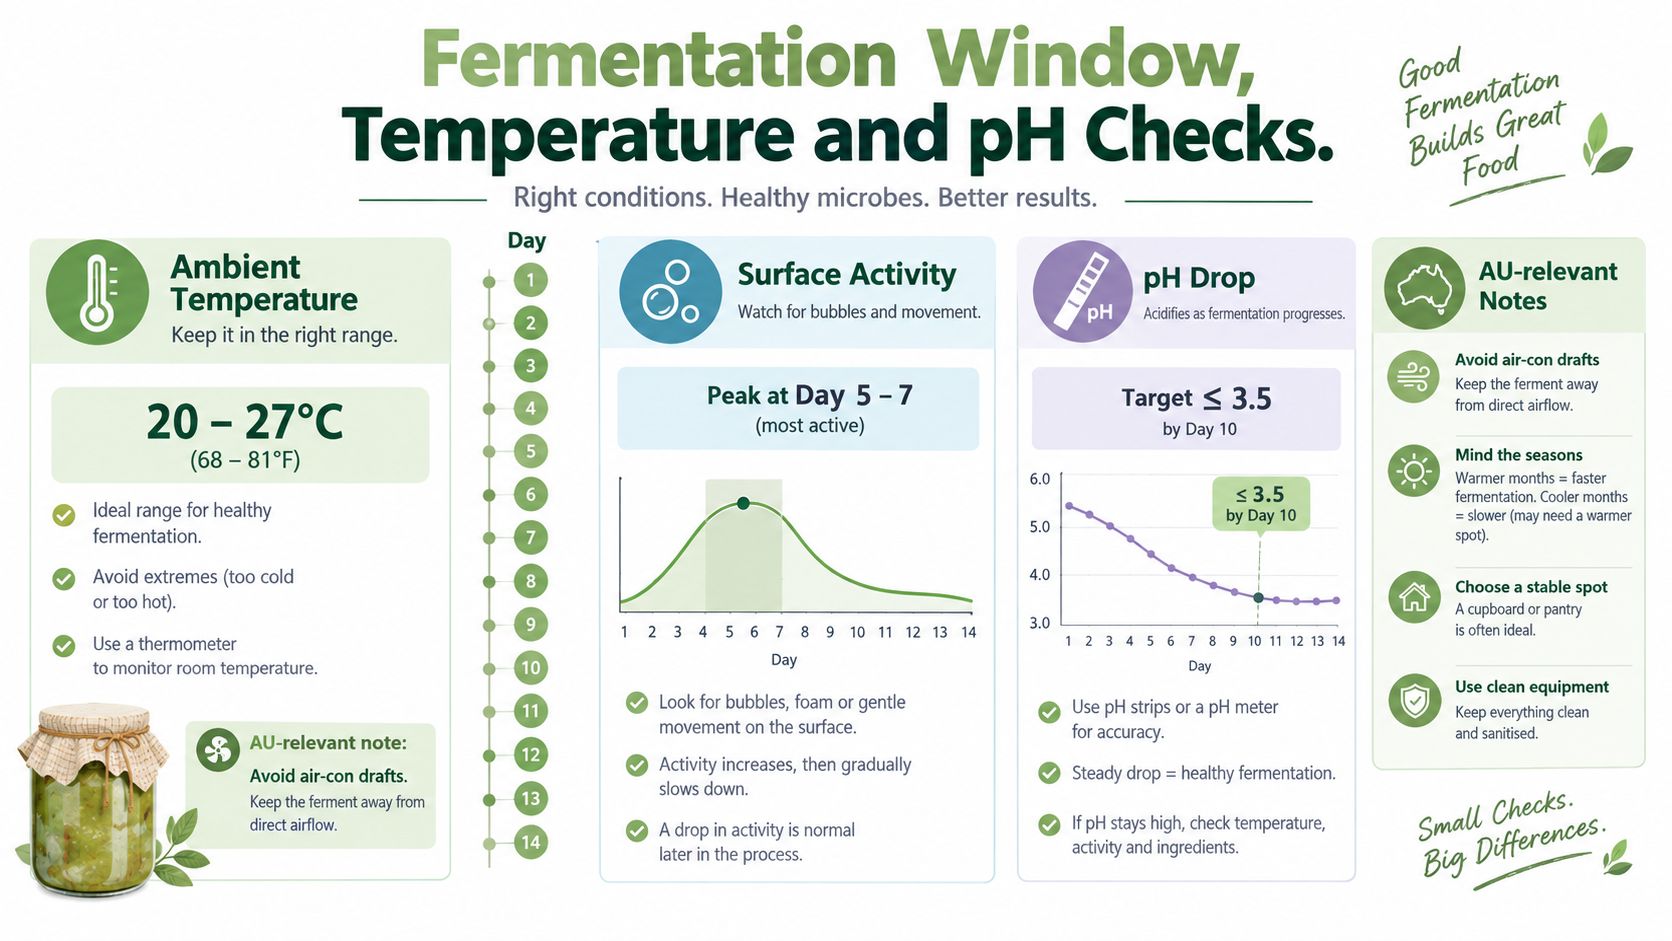
A fixed day count can't tell you whether your kombucha is ready. Temperature changes the pace, and the strength of the starter liquid affects how quickly acidity develops. Australian guidance commonly places fermentation at 7 to 10 days, with the brew held between 20°C and 23°C, and recommends checking the finished product until it reaches pH 4.2 or lower. Those benchmarks are set out in the Western Australian fermented-food safety guideline.
Use three signals together:
- Temperature: Keep the jar in a stable, moderate environment. A cold room can slow fermentation, while excessive heat can damage the culture or push the brew towards excessive acidity.
- Surface activity: A thin new layer, small bubbles or brown strands may appear as the culture works. A SCOBY that sinks isn't automatically unhealthy.
- pH: Test with fresh pH strips or a digital meter rather than judging safety by smell or sweetness.
A simple testing routine
Use a clean spoon or sampling vessel to take a small amount from the jar. Test that sample, not the whole batch, and avoid returning it to the fermentation vessel. Write the result beside the date so you can see whether acidity is changing.
If the pH remains above the Australian safety target, don't bottle or drink the batch. If the brew reaches the target, remove the starter culture and refrigerate the finished kombucha at 4°C, as described in Australian fermented-beverage safety material.
For a reliable testing setup, a digital pH meter for kombucha brewing can make readings easier to repeat, provided you clean, store and calibrate it according to the manufacturer's instructions. pH testing doesn't replace visual inspection. If you see green, white, black or grey discolouration, or notice an abnormal odour, discard the culture and the entire batch.
SCOBY Care Between Batches
A healthy SCOBY can become the reusable part of your brewing routine. After fermentation, lift it out with clean hands and keep it covered with enough mature starter liquid to prevent it drying out.
You can leave the culture in a brewing jar if you expect to start another batch soon. For a longer pause, place the SCOBY in a clean glass jar with starter tea and cover it appropriately. The liquid should be at least equal to the SCOBY's volume, so the culture remains surrounded by acidic liquid rather than exposed to air and drying.
A SCOBY hotel is a storage jar containing cultures and starter liquid. Keep it organised by labelling the jar and removing any culture that shows suspicious growth. Don't scrape mould from the surface and continue using the liquid. Fuzzy growth or unusual colours aren't cosmetic problems because contamination can spread through the batch.
When to retire a culture
- Persistent mould: Discard the culture and liquid rather than trying to clean and save them.
- No activity: If a warm, properly prepared batch shows no fermentation activity over an extended period, use fresh starter rather than repeatedly feeding the inactive culture.
- Returning off odour: A smell that remains unpleasant after cleaning and restarting is a reason to stop using the culture.
If you share a SCOBY, place it in a clean, food-safe container with enough starter liquid to keep it moist during transport. Give the recipient the tea type, approximate ratio and latest pH information, so they aren't trying to identify an unknown culture from appearance alone. Guidance on how to make a SCOBY can help a new brewer understand what they're receiving.
Troubleshooting Common Starter Problems
A slow brew doesn't always mean the SCOBY is dead. Before changing several variables at once, check the room temperature, water, starter strength and cleanliness of the vessel. Australian food-safety material warns that low temperatures can slow acidification, while excessive heat can harm the culture, so temperature drift is often the first place to investigate.
The six problems beginners see most often
- Slow fermentation: Move the jar away from cold drafts and check whether the starter liquid is mature and acidic. Don't compensate by adding random ingredients.
- Weak starter liquid: Use mature, unflavoured starter from a healthy batch. Australian consumer guidance warns against using previously fermented foods as a starter because back-slopping can reduce effectiveness and allow unwanted bacteria to grow. The Australian fermented-beverages issues paper provides the regulatory context for treating kombucha as a fermented sweetened tea rather than an ordinary cold drink.
- Under-pitched culture: Confirm that the SCOBY looks normal and that enough starter tea was included. A large pellicle alone doesn't guarantee a strong liquid culture.
- Chlorinated water: If your water smells strongly of chlorine, use filtered water for the next batch and keep your process consistent.
- Fuzzy mould: Blue, green, black, white or grey fuzzy growth means discard the entire batch, including the SCOBY. Don't scrape the patch away.
- Overly sour kombucha: The brew has gone further than your preferred drinking point. Shorten the next fermentation by checking pH earlier, and reserve a balanced batch as starter rather than using vinegar-like liquid.
Flat kombucha needs a separate check. Confirm that fermentation took place, test the pH and look for remaining sweetness. Carbonation develops later and can vary, so a flat first ferment isn't automatically evidence of contamination.
Fruit flies usually indicate that the cover isn't tight enough. Use a clean, tight-weave cloth secured with a rubber band, and never use an airtight lid during primary fermentation. If the smell is rotten, musty or otherwise abnormal, discard the liquid and restart with clean equipment and a healthy starter.
Safety-first decision: If you can't confidently identify the problem, throw the batch out and begin again.
Flavouring Your Starter Brew and Next Steps
Flavouring belongs after primary fermentation, not in the starter tea. Once the brew has reached the appropriate acidic endpoint, remove the SCOBY and reserve mature liquid for the next batch. Add flavourings to the finished kombucha in pressure-safe bottles, leaving room for carbonation and handling the bottles cautiously.
For a 2-litre batch, you can divide the liquid between flavour combinations such as:
- Ginger and lemon: Add sliced ginger and a small amount of lemon zest for a sharp, warming profile.
- Berry and mint: Use crushed berries with fresh mint, then strain before serving if you prefer a clearer drink.
- Native lemon myrtle: Add a modest amount of culinary lemon myrtle and taste carefully, because its aroma can become prominent quickly.
The provided Australian flavouring benchmark also lists passionfruit pulp, mint leaves, ginger slices, lemon zest and a cinnamon stick as practical additions. Keep additions clean, use food-safe bottles and monitor pressure. If a bottle becomes unusually hard or sprays when opened, chill it thoroughly and open it slowly over a sink.
Build a repeatable brewing rhythm
Reserve starter liquid before flavouring the rest of the batch. Start the next brew with the same tea, sugar and starter proportions, then change only one variable at a time. That approach helps you understand whether a change in flavour, speed or acidity came from the tea, the room or the fruit.
Not everyone wants to maintain a SCOBY between batches. A ready-made starter culture can be a practical shortcut when you want a consistent starting point without first growing or storing your own culture.
Pep Tea offers Australian organic tea and sugar-free organic kombucha, including flavours such as Ginger, Lime & Ginger and Mango, for readers who'd rather enjoy a finished fermented drink than manage a starter jar. Visit Pep Tea to explore the kombucha range and find a convenient option for your next glass.