
Tag: diy kombucha scoby
Your Guide to Fermentation: How to Make Kombucha Scoby

You've probably done it yourself. You crack open a really good bottle of kombucha, take that first tart, lively sip, and think, “How on earth do they make this at home?”
Then someone mentions a SCOBY and suddenly it all sounds a bit strange. A floating blob in sweet tea? It doesn't exactly scream “refreshing kitchen project”.
But once you understand what's happening, making your own SCOBY feels far less mysterious. It's the living starter culture that helps turn sweet tea into real kombucha. If you want to avoid rough, inconsistent “cowboy kombucha” and brew with a bit more care, learning how to make kombucha SCOBY properly is one of the best places to begin.
The Magic Behind the Brew
A few years back in the Hunter, a customer asked me why one kombucha tasted clean and balanced while another tasted flat, sharp, or just plain odd. The answer usually comes back to the culture. A healthy brew starts with a healthy starter.
That's what a SCOBY is all about. The term stands for symbiotic culture of bacteria and yeast, but in everyday brewing talk, people often mean the soft pellicle that forms on top. It might look unusual at first, yet it's the heart of authentic kombucha brewing.
The good news is that you don't need a laboratory or fancy gear. You need clean equipment, decent tea, the right starter liquid, and patience. That's it. Once you understand the rhythm of the ferment, it becomes a very satisfying kitchen craft.
A good SCOBY isn't magic. It's the result of warmth, clean handling, and giving the microbes the conditions they need.
Tea matters more than many beginners realise. Kombucha isn't made from flavoured water with a culture tossed in at the end. The tea is part of the feed. If you want the deeper reason kombucha depends on real tea in the first place, Pep Tea explains it well in this guide on why kombucha needs tea.
Once that clicks, the whole process starts to make sense. You're not growing a weird kitchen science experiment. You're building a living starter for future brews.
Gathering Your Supplies and Starter Liquid
Before you brew anything, get your setup organised. That alone prevents a lot of beginner mistakes.
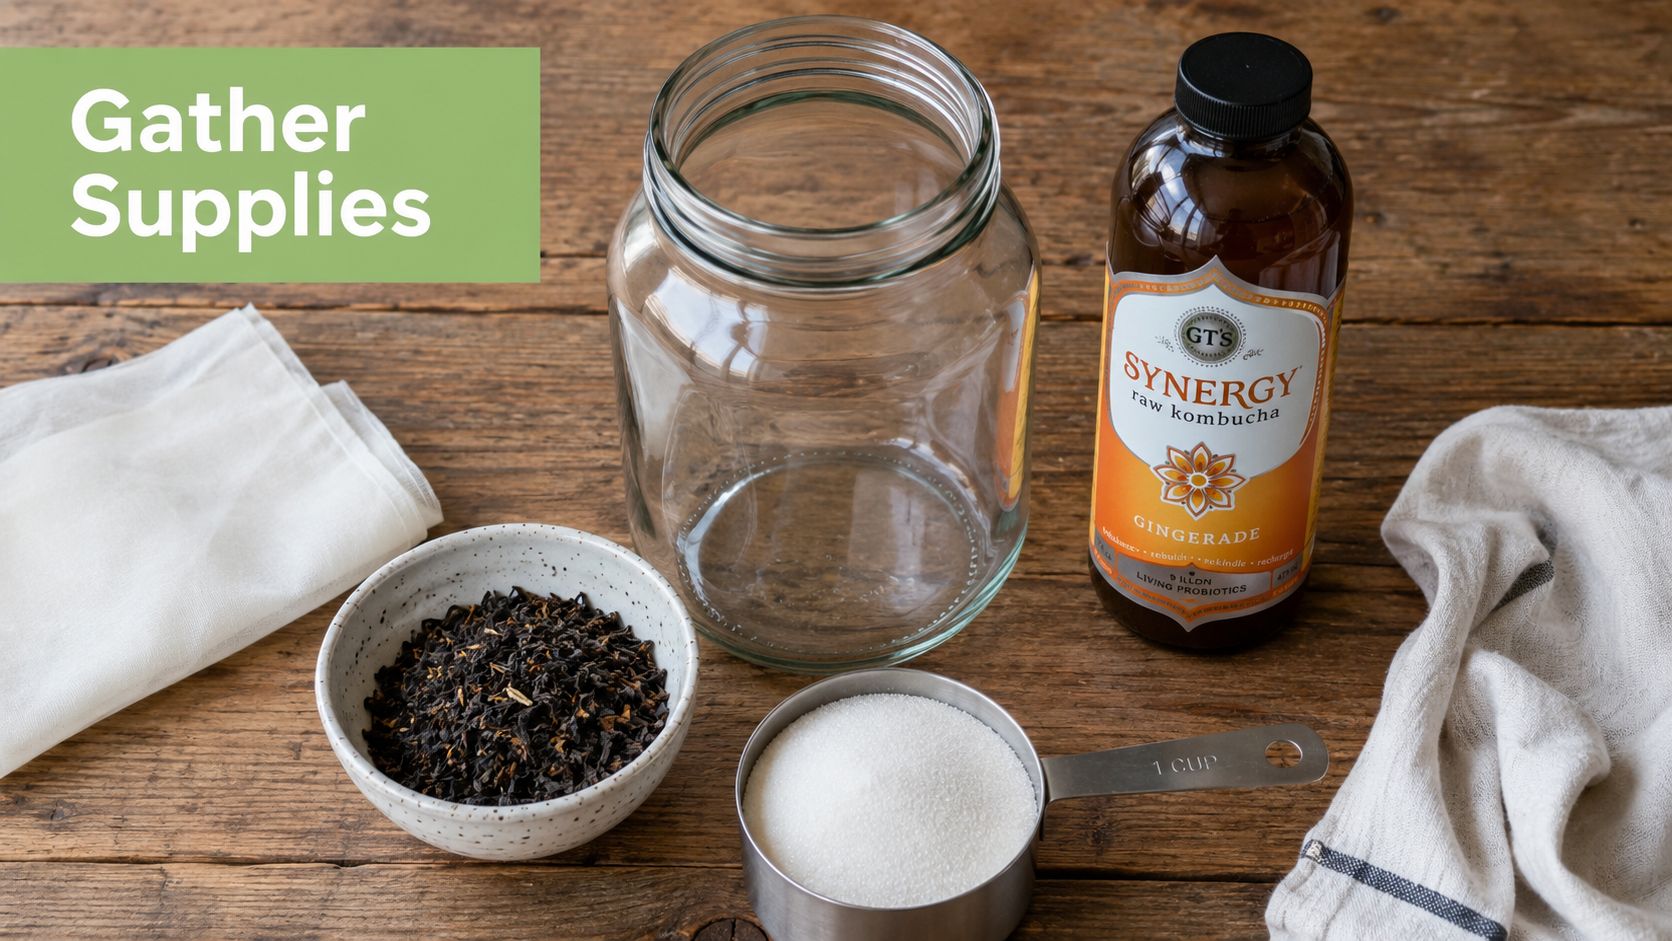
What you need on the bench
Keep it simple:
- A glass jar. Glass is non-reactive and easy to keep clean.
- A breathable cover such as clean cloth or a paper coffee filter.
- A rubber band to secure the cover.
- Water for brewing the tea.
- Tea to feed the culture.
- Sugar because the microbes need it as food.
- Starter liquid from raw, unpasteurised kombucha or an existing kombucha culture.
If you want everything in one place, a kombucha tea kit can be one practical option, especially if you'd rather skip the hunt for bits and pieces around the kitchen.
The base recipe that keeps things reliable
A standard kombucha base uses about 5 g of tea and 50 g of sucrose per 1 litre of water, according to the American Homebrewers Association kombucha guide. That balance matters because it gives the bacteria and yeast enough fuel without making the brew unnecessarily complicated.
If you're making a SCOBY from scratch, that same source notes it can take up to a month to grow a usable pellicle, although warmer conditions can speed things up.
Choosing the tea
For a first SCOBY, stick to plain tea. Black tea is the classic choice. Plain green tea can also be used, but beginners usually get the most predictable results by keeping the ingredients basic and clean.
Look for tea without added oils, heavy flavourings, or extras. The more straightforward the input, the easier it is to tell whether the ferment is healthy.
Choosing the starter liquid
You've got two common paths:
Use raw, unpasteurised kombucha
Pick one with visible sediment or “floaties” if possible. That sediment is often a good sign that live culture is still present.Use starter from an existing brew
If a friend brews kombucha successfully, some mature starter liquid from their jar can give you a stronger beginning.
A starter culture works best when it acidifies the batch early. That lowers the chance that unwanted microbes get comfortable before your kombucha culture does.
Practical rule: Your starter liquid should be live and unpasteurised. If it's been heat treated, it won't give you the same foundation.
A note on ingredients and patience
People often ask whether fancy sugars or unusual teas make a better SCOBY. Usually, they just make troubleshooting harder. If your goal is to learn how to make kombucha SCOBY with confidence, plain tea, sugar, water, and a strong starter are the safest route.
Your Step-by-Step Brewing Guide
The process itself is straightforward. What matters is doing the simple things carefully.
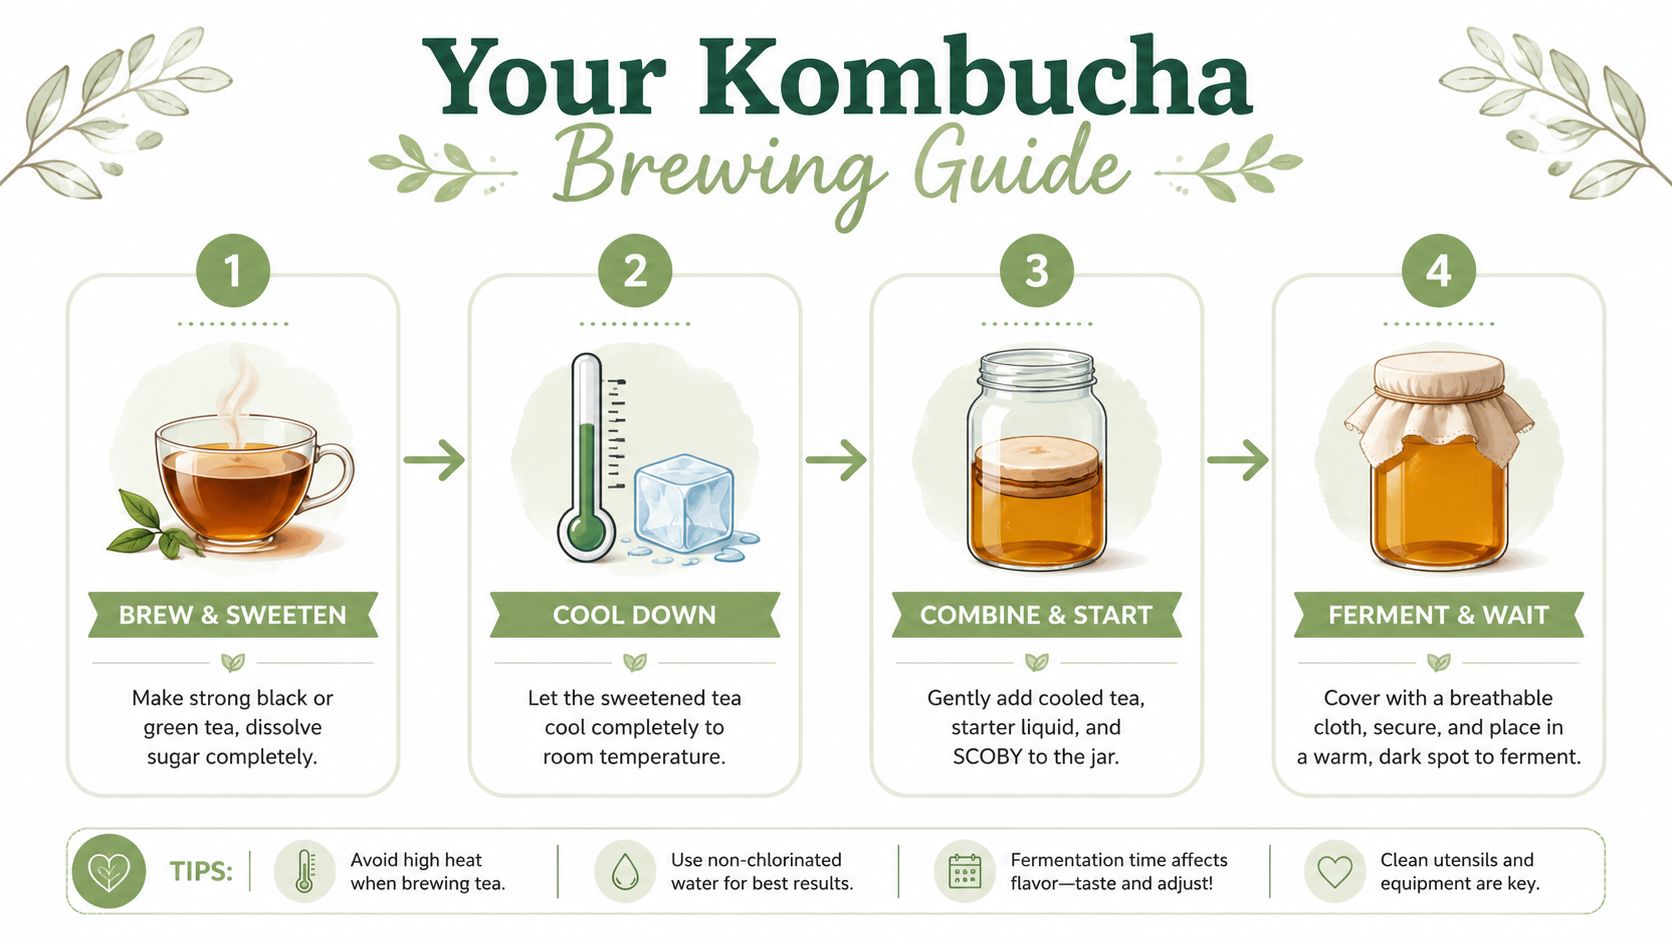
Brew the sweet tea properly
Start by making a strong sweet tea. Dissolve the sugar fully while the tea is still hot. You don't want gritty sugar sitting at the bottom of the jar.
A simple way to think about it is this: the tea feeds the culture, and the sugar feeds the microbes that will build the new pellicle.
Cool it before you add the culture
This is the step people rush, and it's one of the easiest ways to ruin a batch.
For SCOBY growth, fermentation is best kept in a stable 21 to 27 °C range, and a new pellicle can form in 10 to 12 days in those conditions. Before adding the live culture, the sweet tea should be cooled to below 32 °C, as explained in this Brod and Taylor SCOBY guide.
If you enjoy the science behind it, this overview of food safety and bacteria temperature gives useful background on why temperature control changes microbial behaviour so much.
Hot tea can damage the live microbes. Let it cool first, even if you're in a hurry.
Add the starter and set up the jar
Once the tea is cool:
- Pour the sweet tea into your clean glass jar
- Add the starter liquid
- Cover the jar with breathable cloth
- Secure it firmly with a rubber band
Don't screw on an airtight lid. Kombucha culture needs oxygen while the pellicle forms.
Here's a quick visual walkthrough if you like seeing the process in action.
Find the right spot in an Australian home
Where you leave the jar matters almost as much as what's in it.
In warmer parts of NSW or Queensland, a sheltered pantry can often stay in a useful range for fermentation. In southern winters, indoor temperatures can dip enough to slow things down noticeably. The culture will still work, but you may need more patience and a steadier location.
A good spot is:
- Warm but not hot
- Out of direct sunlight
- Undisturbed
- Away from fruit bowls, rubbish bins, and busy splash zones in the kitchen
What not to fiddle with
Once the jar is covered and parked, leave it alone. Don't keep lifting the cloth. Don't swirl it for fun. Don't move it from bench to pantry to windowsill because you're second-guessing yourself.
A forming SCOBY often starts as a thin film. If you keep disturbing the surface, that early layer struggles to knit itself together.
Is It Ready? Monitoring Your SCOBY's Growth
A new brewer usually gets nervous around day three or four. Nothing dramatic seems to be happening, so the temptation is to poke, tilt, and inspect. Resist that urge.

What healthy growth looks like
A normal SCOBY often begins as a thin, pale film across the surface. At first it may look patchy, translucent, or slightly uneven. That's fine.
As time passes, it usually becomes more solid and more opaque. You may also notice:
- Small bubbles trapped under the surface
- Brown stringy bits hanging below, which are often yeast
- An off-white or beige disc gradually covering more of the jar
These signs can look odd if you've never brewed before, but they're commonly part of a healthy ferment.
The benchmark that matters
A SCOBY is ready for brewing when it reaches about 1/4 inch (6 mm) thick and becomes opaque. In Australian summer conditions, that often happens in 10 to 14 days, while cooler winter conditions in southern regions can push the process to 21 days or more.
That's the point where guesswork stops. You're not looking for beauty. You're looking for a culture with enough body to handle the next batch confidently.
If the top layer is still very thin and transparent, give it more time.
If you want to monitor more closely
Visual checks are usually enough, but some brewers like extra reassurance. A digital pH meter can help you track acidity more consistently, especially if you're learning your kitchen's fermentation rhythm. Pep Tea offers a digital pH meter for that purpose.
A quick readiness table
| Sign | What it usually means |
|---|---|
| Thin clear film | Early pellicle formation |
| Opaque, thicker top | Culture is maturing well |
| Around 1/4 inch or 6 mm thick | Ready for brewing |
| Brown strands below | Often normal yeast activity |
A SCOBY doesn't need to be perfectly round, smooth, or pretty. Some of the strongest ones look a bit rustic.
Troubleshooting Common SCOBY Problems
Beginners often get spooked. A strange shape is usually normal. Fuzzy growth is not.

Normal doesn't always look pretty
A healthy SCOBY can be lumpy, uneven, or full of bubbles. It can grow off-centre. It can have brown strings, creamy patches, or layers that look a bit like wet paper.
That's why appearance alone can mislead new brewers. “Ugly” isn't the same as unsafe.
Signs you should discard the batch
Some signs are clear warnings. If you see fuzzy black or green spots, discard the batch. If it smells like rotten fruit, discard it. Those are contamination signs, not a quirky stage of fermentation.
A healthy SCOBY should form a firm, pale, gelatinous disc. If parts still look paper-thin, it may just need longer.
The safety checks that matter most
A few rules make a big difference:
- Keep the vessel breathable. It should be covered with cloth or a paper filter, not sealed shut.
- Aim for an acidic start. Reaching pH below 4.5 is important for mould prevention.
- Use live starter liquid. Pasteurised starter won't protect the batch the same way.
- Clean carefully. Vinegar is commonly preferred for sanitising brewing gear because soap residue can interfere with the culture.
One important warning is worth repeating clearly. Sealing the jar airtight is a major error. A breathable cover matters because an airtight vessel can ruin about 25% of batches by inhibiting the aerobic yeast phase.
Dry, fuzzy growth on top is mould. Smooth film, bubbles, and brown strands are usually part of kombucha doing its job.
A simple normal versus problem table
| What you see | What to think |
|---|---|
| Smooth off-white layer | Usually healthy |
| Brown stringy sediment | Usually normal yeast |
| Bubbles under the pellicle | Usually normal |
| Dry fuzzy green or black patches | Discard the batch |
| Rotten smell | Discard the batch |
Two common beginner mistakes
Using soap carelessly
Soap sounds harmless, but residue can hang around on jars and tools. If you clean with soap, rinse extremely well. Many brewers prefer vinegar for final sanitising because it's simpler and doesn't leave the same concern behind.
Treating the jar like a project to supervise
A SCOBY likes stability. If you keep checking it every few hours, moving it around, or changing its home, you make life harder for the culture. Warm, covered, steady, and untouched is the rhythm you want.
Your First Brew and SCOBY FAQs
Once your SCOBY is thick enough and healthy, you're ready to start your first proper kombucha batch. Use the new SCOBY along with some of the mature liquid as starter for fresh sweet tea. That starter liquid matters just as much as the pellicle.
For a home brewer, that's where the fun really starts. For a café, it's where consistency starts to matter. If you're trialling kombucha for a menu, small controlled batches are the smart way to begin so you can learn how your space behaves before scaling anything up.
Common questions new brewers ask
Can a SCOBY sink or float sideways
Yes. That's normal. A healthy SCOBY can float, sink, tilt, or drift partway through the brew.
Can I use herbal tea
For your first few brews, it's better to stick with plain tea. Herbal blends can make fermentation less predictable, especially when you're still learning what a healthy culture looks like.
Can I swap the sugar
You can experiment later, but plain sugar keeps things simple at the start. When you're learning how to make kombucha SCOBY, consistency beats novelty.
What do I do with extra SCOBYs
Store them in a jar with enough finished kombucha to keep them submerged. Brewers often call this a “SCOBY hotel”. It's handy if your culture keeps producing new layers or you want a backup.
Do I need a perfect-looking SCOBY
No. You need a healthy one. Thickness, opacity, smell, and absence of mould matter far more than appearance.
What should it smell like
Think tart, vinegary, and pleasantly fermented. If the smell turns foul or rotten, trust your nose and don't use it.
Making your own SCOBY teaches you a lot about fermentation. Mostly, it teaches patience. Give the culture the right ingredients, the right temperature, and a peaceful corner of the kitchen, and it will usually meet you halfway.
If you enjoy learning the careful, clean side of fermentation, have a look at Pep Tea for more kombucha and tea education, along with organic products that fit naturally into an Australian wellness routine.