
Tag: vegetable fermentation
Fermenting Glass Jar Guide for Australian Home Brewers

A fermenting jar looks simple until it doesn't. One morning the brine is clear, the lid's bulging, and the top layer has gone cloudy or furry, which is usually the moment people realise the jar itself is the problem, not just the recipe.
In Australian kitchens, that problem shows up faster than it does in cooler climates. Summer heat, seasonal swings, and the wide mix of jars sold locally all change how a ferment behaves, especially when the vessel isn't matched to the food inside it. A fermenting glass jar works brilliantly when the seal, headspace, lid, and temperature all line up, but it gets unforgiving the moment one of those pieces is off.
Why Glass Jars Are the Foundation of Reliable Fermentation
The best ferments usually start with the least dramatic vessel on the bench, a plain glass jar. Glass doesn't react with the acids produced during fermentation, it's easy to clean, and it lets you see what's happening without opening the lid every few hours. That visibility matters, because the jar isn't just storage, it's the working environment where the ferment either stays calm or drifts into trouble. The chemical stability of soda-lime glass is one reason it's still the default choice for home fermentation, especially for acidic foods and drinks (why glass jars matter in fermentation).
From sealed glass to the modern home jar
The modern jar owes a lot to the practical logic of preservation. Nicolas Appert had already shown by the early 1800s that food sealed in glass and heated could keep for years, and John Landis Mason's 1858 patent for a threaded, screw-top glass jar made reusable sealed vessels practical for home use (brief history of the canning jar). Mason filed that patent on November 30, 1858, at age 26, and the design became the basis for the jars people still reach for in kitchens and small-batch ferments today.
Practical rule: if the vessel can't hold a stable seal, the ferment becomes guesswork.
That historical shift matters in Australian homes because the same jar format became the standard for preserving, then later for home fermentation culture. The jar's value comes from the airtight seal, not from glass alone, because the seal is what keeps contamination down while still allowing a controlled ferment to happen.
Why glass beats the usual alternatives
Wood and ceramic have their place in older fermentation traditions, but glass is easier to inspect and less likely to carry flavour from batch to batch. In a real kitchen, that means fewer surprises when you're tracking sourness, surface activity, or sediment. For kombucha and vegetable ferments, the jar does two jobs at once, it acts as a chamber and as a container you can move straight into the fridge when the flavour is right.
Glass also fits the way Australian home fermenters work. Home fermenters want something reusable, visible, and simple to sanitise after a batch of kraut, pickles, or kombucha. A quality fermenting glass jar gives you that without asking you to fight the vessel every time you pack, weigh, or taste.
Choosing the Right Jar and Lid for Your Ferment Type
A jar that works for kimchi can be awkward for kombucha, and a narrow bottle that suits a drink ferment can be miserable for cabbage. The shape has to suit the job, because the food needs to fit the workflow as well as the shelf. For solid vegetables, a wide-mouth jar is the practical choice because you need room to pack the food down with your hands or with a weight, and narrow-neck jars make that harder and less reliable.
Match the opening to the food
For sauerkraut, kimchi, and whole-vegetable pickles, wide-mouth jars are the right tool because the vegetables need to sit under the brine and stay there. A narrow neck makes it harder to push the food down, spread pressure evenly, or lift out a stubborn leaf floating at the top. That is why wide-mouth jars are the cleaner option for chunky vegetables, especially when you are using a weight.
Liquid-heavy ferments are different. Kombucha and water kefir do not need the same packing pressure, so the jar shape can be more forgiving, although the lid still needs to suit the stage of fermentation. For carbonated ferments, ordinary lids can be the wrong choice because pressure builds, and ordinary glass jars were not made to behave like pressure vessels. If you are buying locally, the safer question is not whether it is glass, but whether it is pressure-rated for that ferment.
Headspace, seals, and what actually works
The National Center for Home Food Preservation says active fermentation can build pressure, so jars should be filled only to the recommended headspace and should use suitable covers and weights rather than a permanently sealed lid, with the ferment kept submerged under the brine to reduce spoilage risk (suitable containers, covers, and weights for fermenting food). For vegetable ferments, that means leaving room at the top, not packing a jar so full that it spills as soon as gas activity starts.
Kilner's guidance gives home users a practical benchmark for jar choice and fill level, and its temperature advice lines up with what holds up in warmer Australian kitchens, where overflow is a common failure point. Their fermentation notes also reinforce the basics of full submersion under salt brine and moving the batch to refrigeration once the flavour is where you want it (Kilner fermentation guide).
If you are choosing between jars sold locally, the best test is simple, does the lid support controlled venting, or is it going to trap gas? For a brewing container that needs consistency, PepTea's kombucha brewing container is a useful reference point for matching the vessel to the drink instead of just grabbing whatever is on the pantry shelf. If you want a practical refresher on prep as well, the guide to how to sanitize home brewing gear is worth keeping nearby.
Sanitising and Preparation Workflow
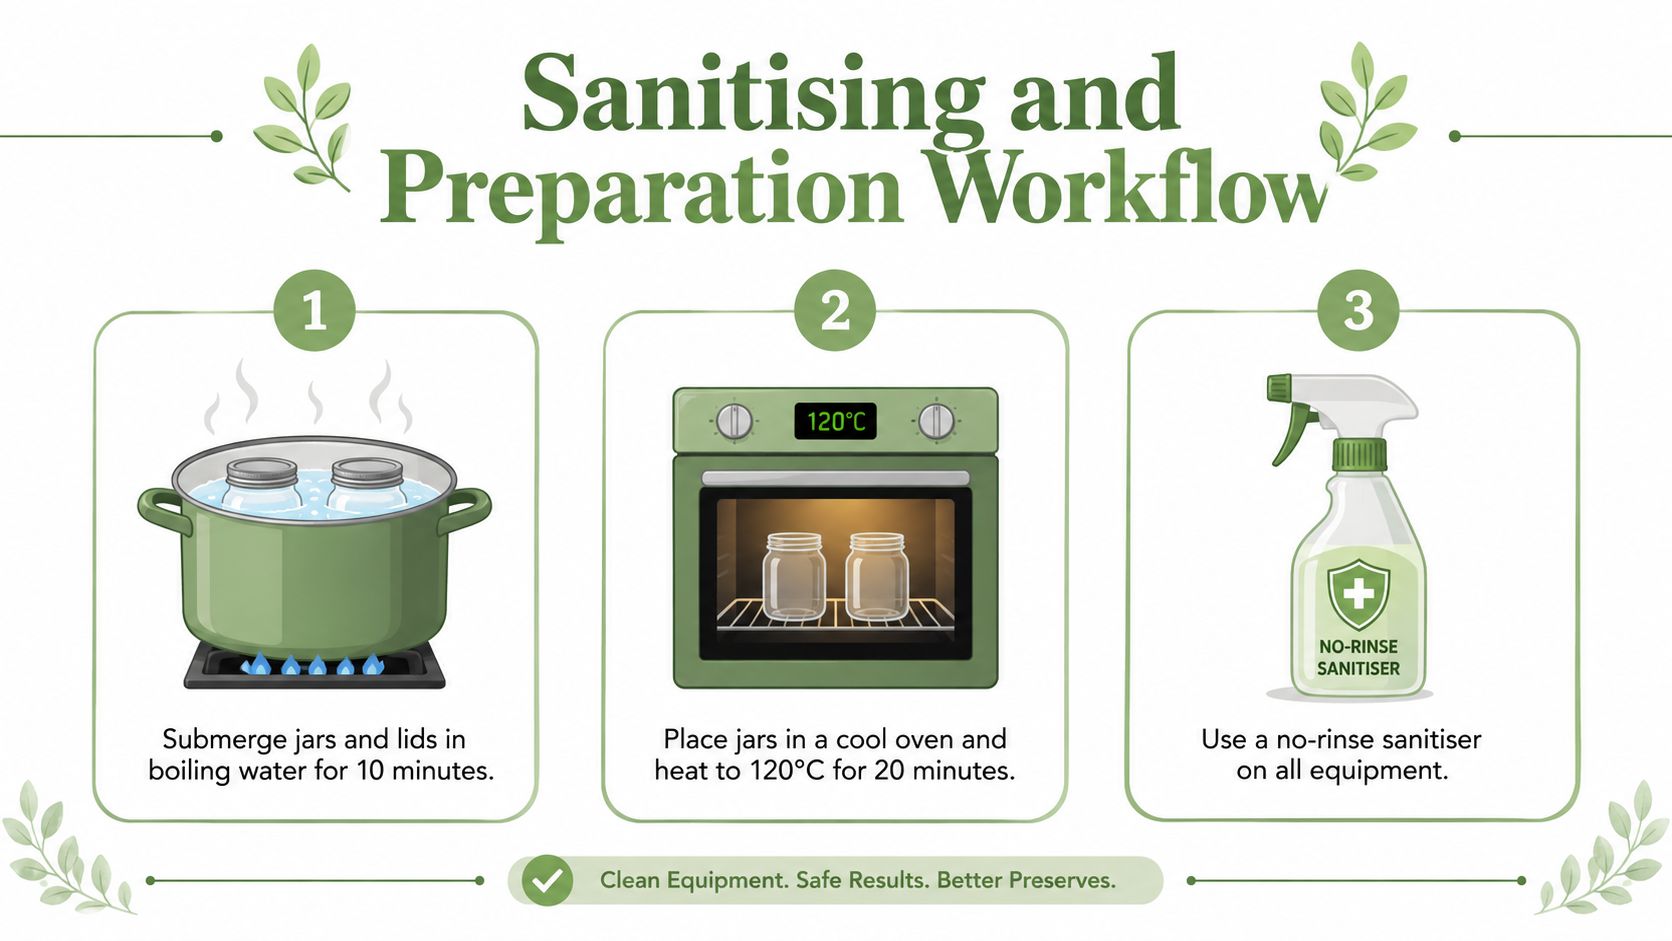
Clean gear doesn't make a ferment good on its own, but dirty gear can ruin a good one very quickly. The basics are boring for a reason, because the batches that go wrong usually fail before the ingredients even hit the jar. Soap residue, skipped sanitising, and loose seals are all avoidable problems, and they're the sort of mistakes that can turn a promising batch into a mouldy one.
A repeatable prep routine
The safest workflow is straightforward. Start with jars, lids, weights, and any tools touching the ferment, then sterilise or sanitise them properly before use. Boiling, oven heat, or a no-rinse sanitiser all work as preparation methods when they're used carefully and consistently, and the key is to keep every surface that will touch the ferment clean and non-reactive.
A practical way to think about prep is to treat the jar like food-contact equipment, not like a decorative container. If a lid has grit in the thread or a weight has detergent film on it, you're adding risk for no benefit. That's especially true with starter cultures and SCOBYs, where you want the culture doing the work, not stray residue or bacteria from the bench.
Practical rule: complete submersion under brine is your best insurance against surface spoilage.
For a clear sanitation walkthrough, the advice in how to sanitize home brewing gear is a useful companion read because it approaches hygiene as a brewing discipline, not a one-off chore. The same logic applies whether you're starting sauerkraut or building a jar for kombucha.
What not to skip
The workspace matters too. Wipe the bench, dry the tools, and check that the lid or cover fits the jar you're using before the ingredients go in. If you're handling a SCOBY, keep the transfer calm and clean, because fussing around with dirty hands or wet implements is one of the quickest ways to introduce unwanted microbes.
A simple prep check before every batch keeps the process repeatable:
- Inspect the jar: Look for chips, cracks, or damaged threads before filling.
- Prepare the lid: Make sure the seal is clean and seated properly.
- Sanitise the tools: Weights, funnels, spoons, and hands all count.
- Set the workspace: Clear clutter so the jar can be packed without rushing.
Step-by-Step Fermentation Processes for Common Ferments
A good ferment is usually the result of a few small controls, not magic. Salt, temperature, headspace, and submersion do most of the heavy lifting, and they need to be handled differently depending on whether you're making vegetables, kombucha, or water kefir. In Australian kitchens, the biggest variable is often heat, which makes the early stages move faster and less predictably than many people expect.
Vegetables need brine discipline
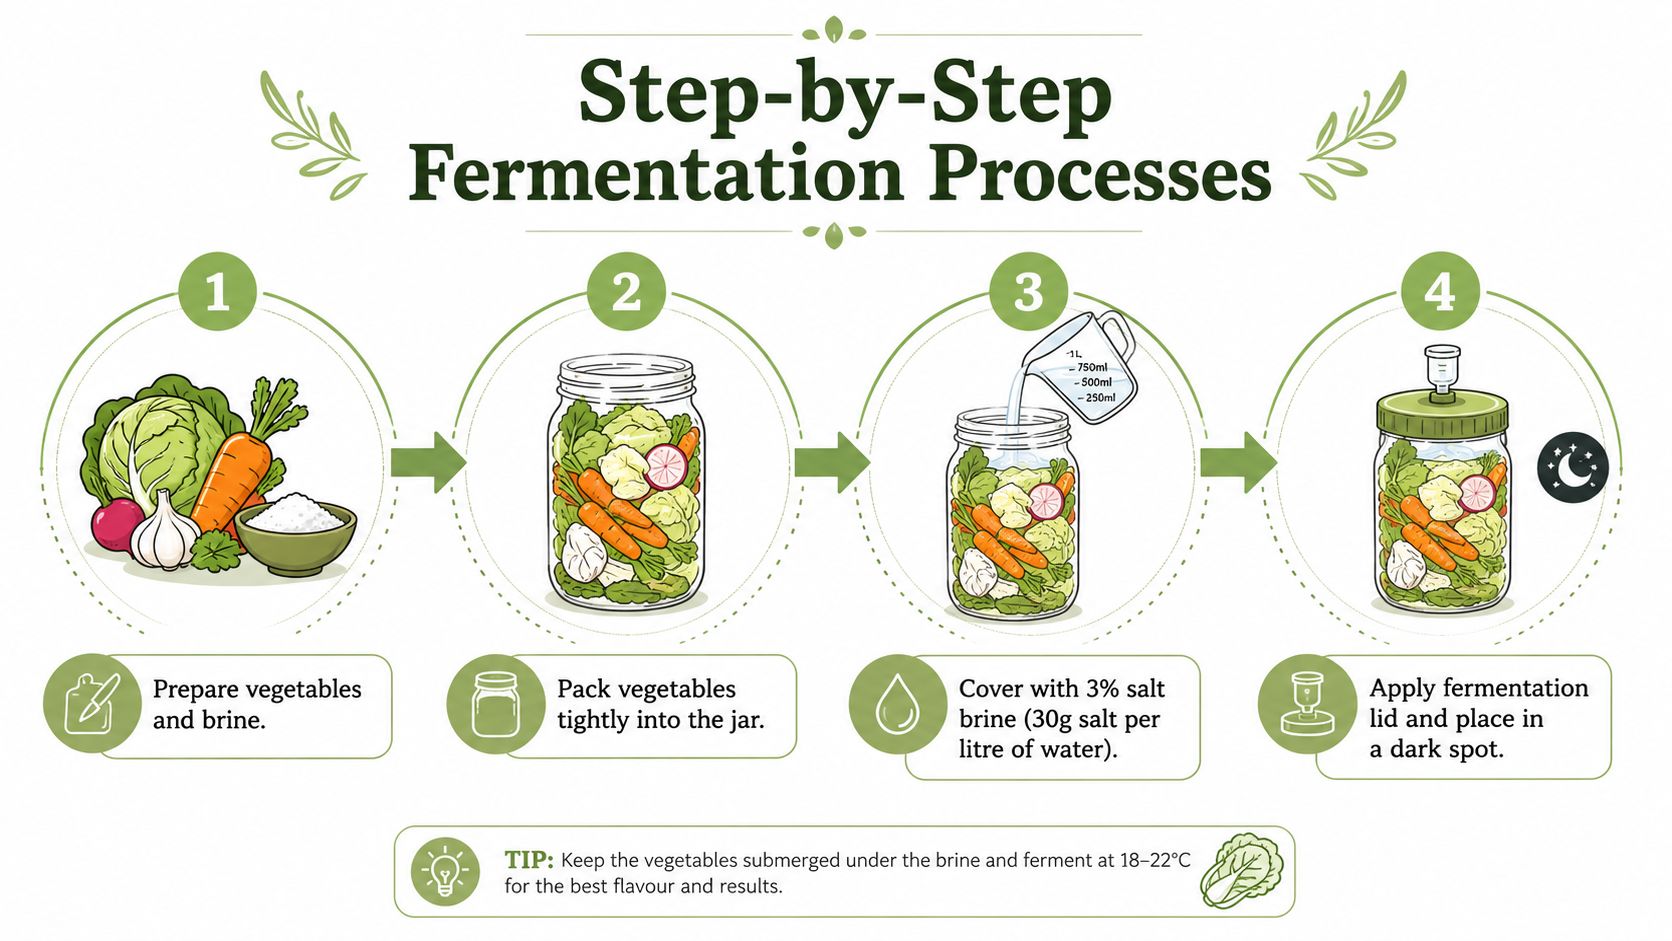
For vegetable ferments, the most reliable method is a ~3% brine, which is about 2 tablespoons salt per 4 cups water (how to ferment). Pack the vegetables into a clean jar, pour the brine over them, and use a weight or similar device to keep everything below the liquid line. If the food floats, the top layer is the one most likely to spoil.
Daily jar checks matter because active ferments can build gas quickly, and some jars need burping more than once a day to vent pressure safely. The usual timing runs from a few days to several weeks depending on cut size and recipe, so the cue is flavour and texture rather than the calendar alone. In practice, chopped vegetables move faster than big pieces, and warmer rooms accelerate the process.
Useful habit: check the jar at 48 hours, then again before you assume the ferment is stable.
Kombucha and water kefir need a gentler touch
Kombucha belongs in a vessel that gives the culture space while still keeping the environment controlled. The liquid needs room for activity, the cover needs to breathe appropriately during primary fermentation, and the jar shouldn't be pushed into a cramped spot where temperature swings are constant. Water kefir is similar in that it's a liquid ferment, but the grains and the water chemistry introduce a different rhythm, so it responds best when the jar is kept consistent and not overhandled.
For a practical compare-and-contrast on a related kitchen ingredient, the difference between sake and mirin is a handy reminder that similar-looking liquids can serve very different roles. Fermentation works the same way, the vessel and the process have to match the job.
A practical judgement rule
A ferment is ready to chill when the sourness tastes right and the texture has settled into what you want. If it's still too sharp, too bland, or too soft, leave it a little longer and keep the jar under control. If the batch has drifted into off smells or visible contamination, stop trying to rescue it.
Monitoring and Troubleshooting Common Problems
You usually spot trouble in the jar before you taste it. Surface changes, odd pressure, and a smell that does not suit the ferment are the early warnings. In a Hunter Valley kitchen, where a warm afternoon can turn a calm batch lively by evening, that early check saves a lot of food.
Kahm yeast, mould, and pressure
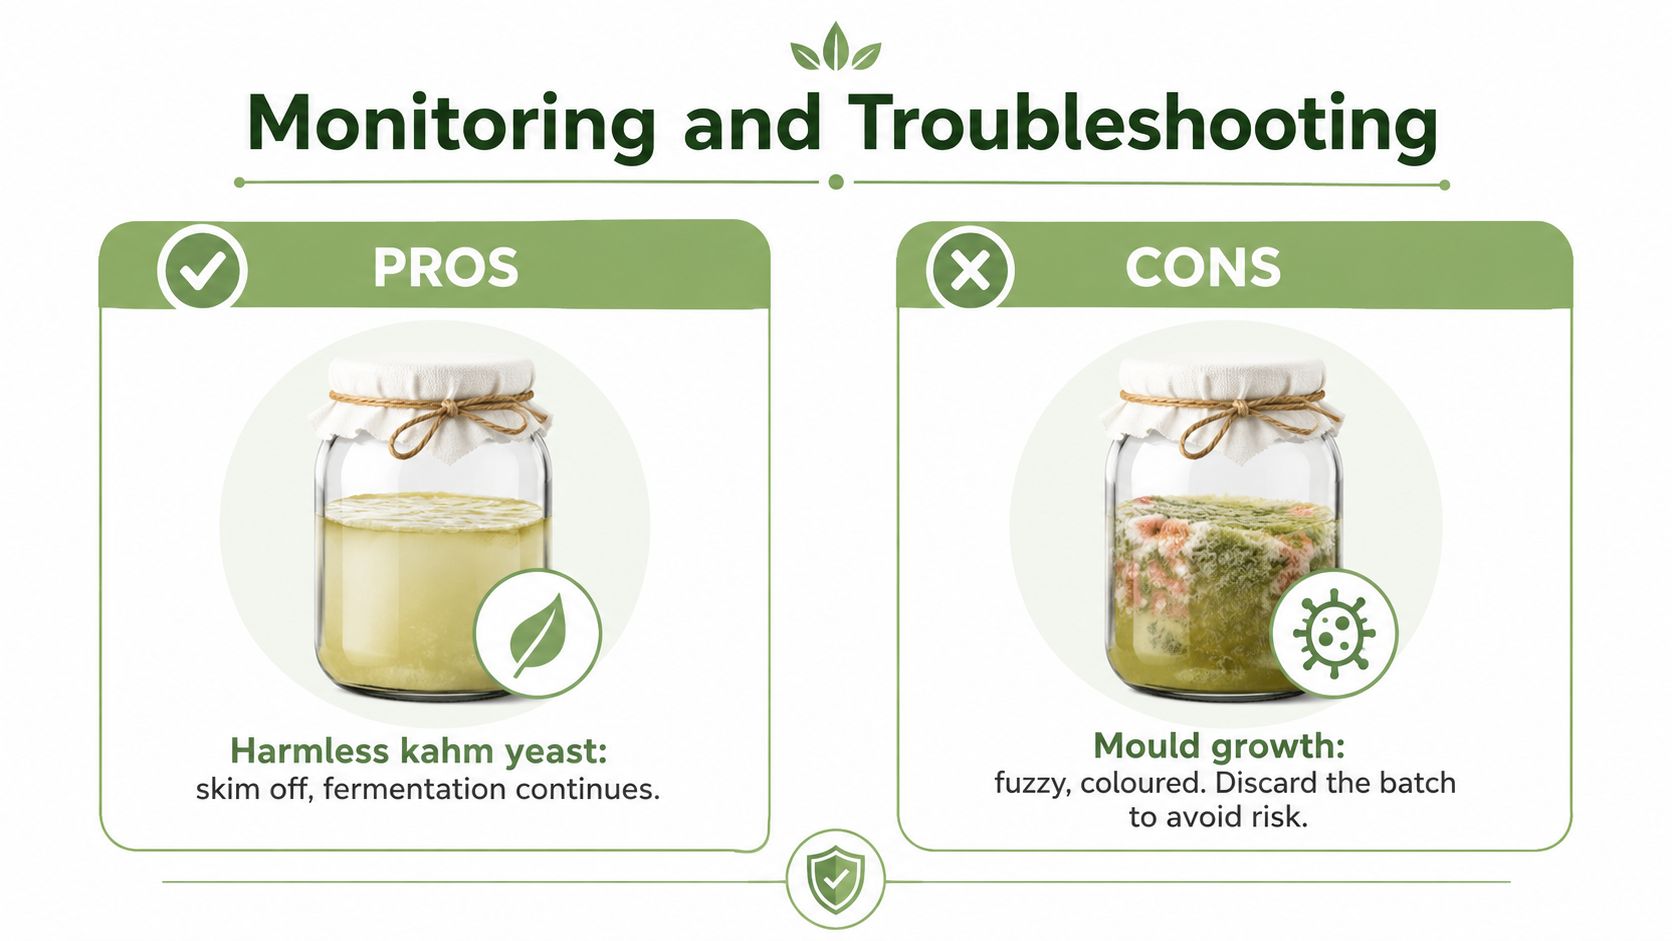
Kahm yeast usually shows up as a thin surface film. Mould looks fuzzy and may carry colour, and that difference matters because mould means the batch should go. A light film can sometimes be skimmed, but fuzzy growth is a different category. If there is any coloured fuzz, do not try to rescue it.
Pressure needs just as much respect. Sealed jars can crack or even explode when carbon dioxide builds up, especially with fizzy ferments, which is why ordinary lids are not the right choice for every batch (fermentation bottles buyer's guide). In Australian kitchens, heat speeds everything up, so overflow and pressure can arrive sooner than you expect if the jar sits on a sunny bench or near the stove.
Temperature drift and what to change
If a jar is running too hot, move it somewhere cooler. A shaded pantry, a laundry shelf, or a room that stays steady through the day usually behaves better than a bright kitchen counter. Fermentation that is allowed to swing with the weather often turns uneven, especially in summer.
Glass jars do best when the room stays in a sensible range for the culture, and you can see the difference in how quickly the surface moves and how fast the flavour shifts. If you want a clear read on what is happening inside the jar, a digital pH meter is handy because it takes some of the guesswork out of judging whether the ferment is moving in the right direction. It does not replace taste or smell, but it gives you a cleaner check on whether the batch is progressing or stalling.
For a deeper read on surface contamination, preventing mold on glass is worth a look because the same basics keep showing up, clean surfaces, dry contact points, and enough airflow control to stop problem growth from taking hold. In a fermenting jar, those basics matter even more because the contents are active and changing all the time.
Troubleshooting rule: if the smell, surface, and texture all point the wrong way, stop testing the batch. Discard it and start again with a clean jar.
Storage, Scaling, and Safety Best Practices
Once a ferment tastes right, the job shifts from active control to smart storage. Refrigeration slows the process, which protects flavour and keeps a finished batch from racing past the point you wanted. That's true whether you've made one jar for the fridge or you're keeping multiple jars moving at once for a café or household routine.
From single jar to repeatable batch work
The simplest scaling move is consistency. Use the same jar style, the same headspace, the same brine strength, and the same cooling habit each time, and you'll spot drifts much faster. If you're storing starter cultures or a SCOBY between batches, keep the container clean, protected, and easy to inspect so you're not guessing at the next round.
For practical storage guidance, PepTea's how to store kombucha is a sensible reference because storage is where many good ferments lose quality. The same principle applies to vegetables, once the jar has hit the flavour you want, chilling is what keeps it there.
Safety decisions that protect the batch and the person
Pressure-safe vessel choice matters most when the ferment is meant to be carbonated or fizzy. If you're using a jar that wasn't designed for pressure, pair it with a safe venting method or switch to a vessel that is. Airlocks can help with high-gas ferments, but they don't replace the need for the right jar and the right headspace.
HACCP-accredited production and purpose-built brewing spaces matter once you scale beyond home testing, because consistency becomes a safety issue as much as a flavour issue. If a jar looks compromised, smells wrong, or shows coloured fuzzy growth, the safest choice is to throw it out. That's not wasteful, it's disciplined.
PepTea brings that same practical care to organic Matcha and sugar-free kombucha, with products made for people who want clean flavour and a more confident routine in the kitchen or café. If you're refining your own fermentation setup, visit Pep Tea to explore the range and see how quality ingredients and good process go hand in hand.