
How Do You Make a SCOBY: Your 2026 Step-by-Step Guide

You've probably stood in the kitchen with a bottle of raw kombucha in one hand, a clean jar in the other, and thought, “How do you make a SCOBY without turning the bench into a science project?”
That hesitation is normal. A SCOBY looks odd, the process sounds fiddly, and plenty of online advice skips over the bits that matter in an Australian home, like what happens when your brew sits through a sticky NSW summer afternoon or a cold inland snap.
The good news is that making a SCOBY is very doable. Once you understand what it needs, mainly sweet tea, active starter liquid, clean gear, airflow, and patience, it stops feeling mysterious. It starts feeling like good kitchen practice.
Your Kombucha Journey Starts Here
Most first-time brewers are less worried about the tea than the SCOBY itself. Fair enough. It can look slippery, lumpy, pale, stringy, or slightly alien. But in practical terms, it's just the working culture that helps transform sweet tea into kombucha.
A lot of people get started in one of two ways. They either accept a SCOBY from a friend who already brews, or they grow one from a bottle of raw kombucha. For beginners, growing one yourself is often the clearest way to learn what healthy fermentation looks like from day one.
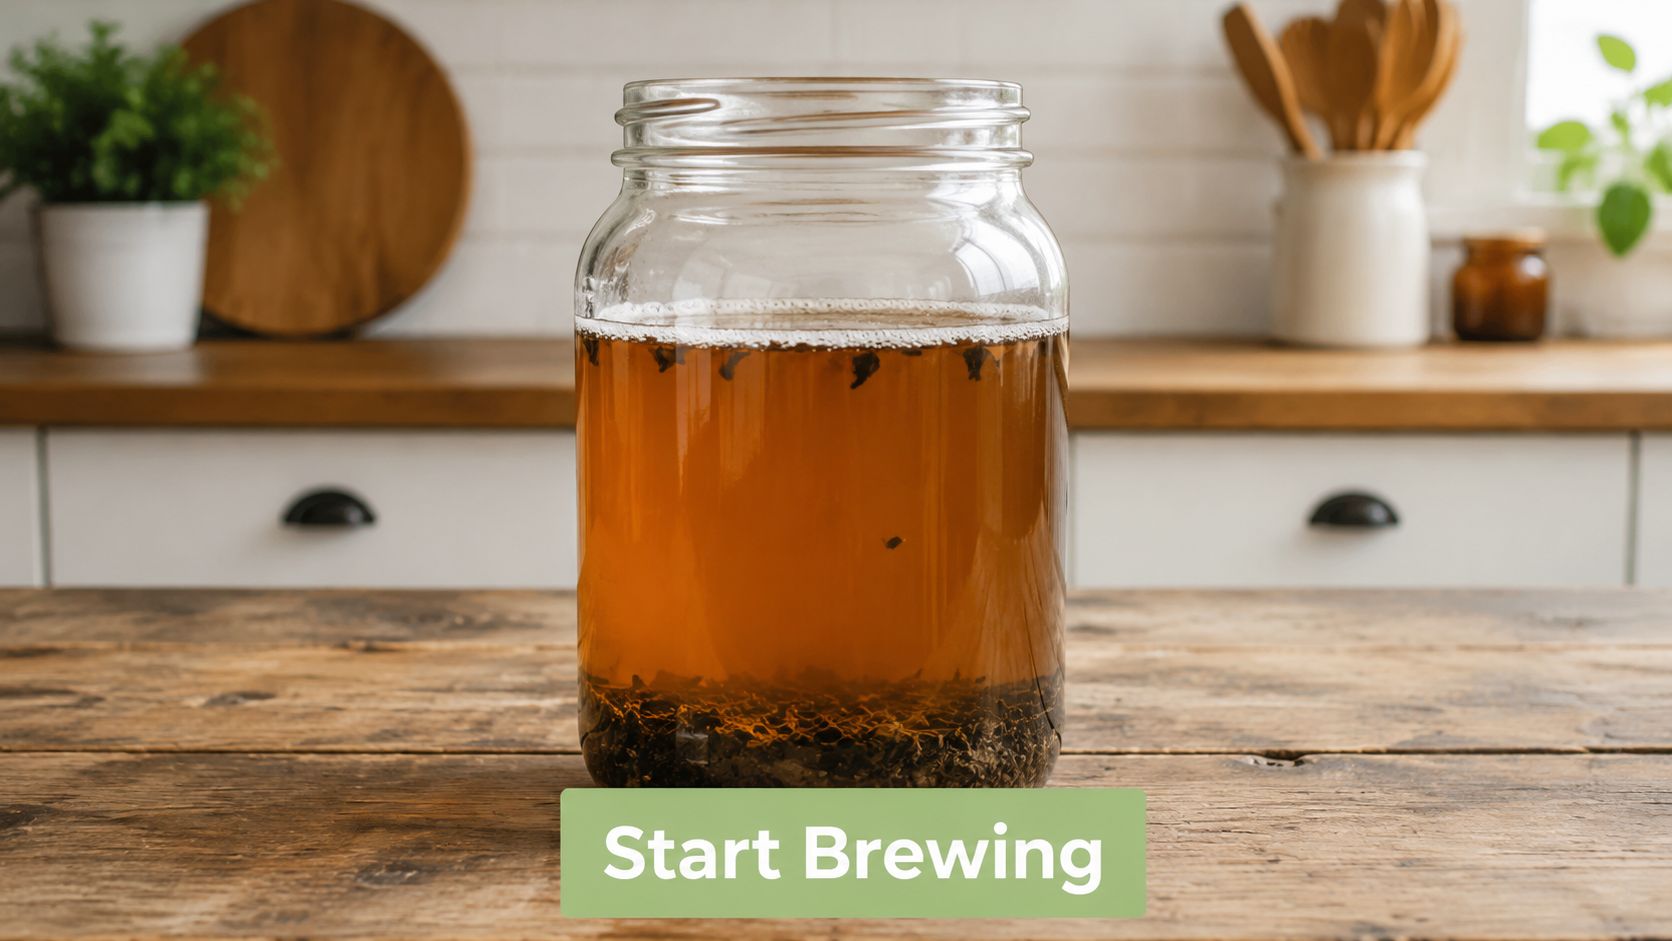
If you're brand new to brewing, it helps to first get familiar with what kombucha actually is. Once that clicks, the SCOBY makes more sense. It isn't a novelty ingredient. It's the engine of the brew.
Why beginners overcomplicate it
The biggest mistake I see is treating SCOBY growth like a lab test with a hundred moving parts. It's simpler than that. You're creating the right conditions, then leaving the culture alone long enough to establish itself.
What works well:
- Using plain, raw kombucha with visible sediment or floaties
- Starting with black tea, because it's dependable for a new culture
- Leaving the jar undisturbed in a suitable spot
- Expecting a slow process, not a weekend project
What usually doesn't work:
- Using flavoured or pasteurised kombucha
- Rushing the setup with warm tea that hasn't cooled properly
- Covering the jar too loosely
- Moving the jar around to check on it every day
Practical rule: A healthy SCOBY starts with a healthy liquid culture. The surface growth comes later.
A good first goal
Your first goal isn't to make the fizziest kombucha you've ever tasted. It's to grow a stable culture you can trust. Once you've done that, every later batch gets easier to manage.
That's where patience pays off. A calm setup in a clean kitchen corner usually beats constant tweaking. If you're wondering how do you make a SCOBY successfully, that's the heart of it. Give the culture what it needs, then let fermentation do its work.
Gathering Your Essential Gear and Ingredients
The easiest way to avoid problems later is to choose the right setup now. Good kombucha brewing doesn't require fancy equipment, but the few things you do use need to suit an acidic ferment.
Glass is the safest choice for the main vessel because it won't react with the brew. A breathable cover matters just as much. The culture needs airflow, but fruit flies love kombucha, so your cover has to protect the jar without sealing it shut.
Your basic starter kit
Here's the gear and ingredient list I'd put on the bench before doing anything else.
| Item | Quantity | Why it's important |
|---|---|---|
| Glass jar | 1 | Non-reactive and easy to monitor visually |
| Black tea bags or loose leaf black tea | 3–4 tea bags or 1 tbsp loose leaf | Black tea is the most reliable base for starting a fresh culture |
| Granulated sugar | 1/4 cup | Feeds the yeast and bacteria during early growth |
| Hot water | 2 cups | Used to brew the sweet tea base |
| Raw, unpasteurised kombucha with floaties | 1 cup | Supplies the live culture needed to start SCOBY formation |
| Breathable fabric cover | 1 | Allows airflow while protecting the jar |
| Rubber band | 1 | Keeps the cover secured tightly |
| Clean spoon | 1 | Useful for dissolving sugar before cooling |
The most dependable starter formula in the Australian context is 1/4 cup of granulated sugar, steeped with 3–4 black tea bags or 1 tbsp loose leaf in 2 cups of hot water, cooled fully, then combined with 1 cup of raw, unpasteurised kombucha containing floaties. Green tea or decaf can inhibit growth at this stage, so black tea is the benchmark for success, according to Nourish Me Organics' kombucha guide.
Why each choice matters
A few trade-offs are worth knowing before you start:
- Black tea over green tea. For a fresh SCOBY, black tea is the safer choice. Once your culture is established, you can experiment more.
- Fabric cover over cheesecloth. Cheesecloth sounds right, but it's not ideal. A tighter weave does a better job against pests.
- Raw kombucha over filtered-looking bottles. If you don't see sediment, you may not be getting an active enough culture.
- Clean over “probably fine”. Fermentation is forgiving in some ways, but not when dirty tools introduce unwanted microbes.
If you're interested in the broader hygiene mindset behind fermentation work, this guide on how to sterilize mushroom substrate is useful reading. It's from a different corner of fermentation, but the discipline around clean prep and contamination control is very relevant.
Clean doesn't mean clinical. It means organised, washed, rinsed well, and free of residues that can interfere with the culture.
One helpful shortcut
If you want a tidy starting point, a purpose-built kombucha tea kit can make the first run less fiddly. That's especially handy if you're setting up for home use and don't want to hunt down each item individually.
The Step-by-Step Process for Growing Your SCOBY
A Hunter kitchen in late summer can sit beautifully warm all morning, then swing once a storm rolls through. That kind of temperature wobble is why a good SCOBY routine matters. Order, cleanliness, and a steady resting spot make more difference than fancy gear.
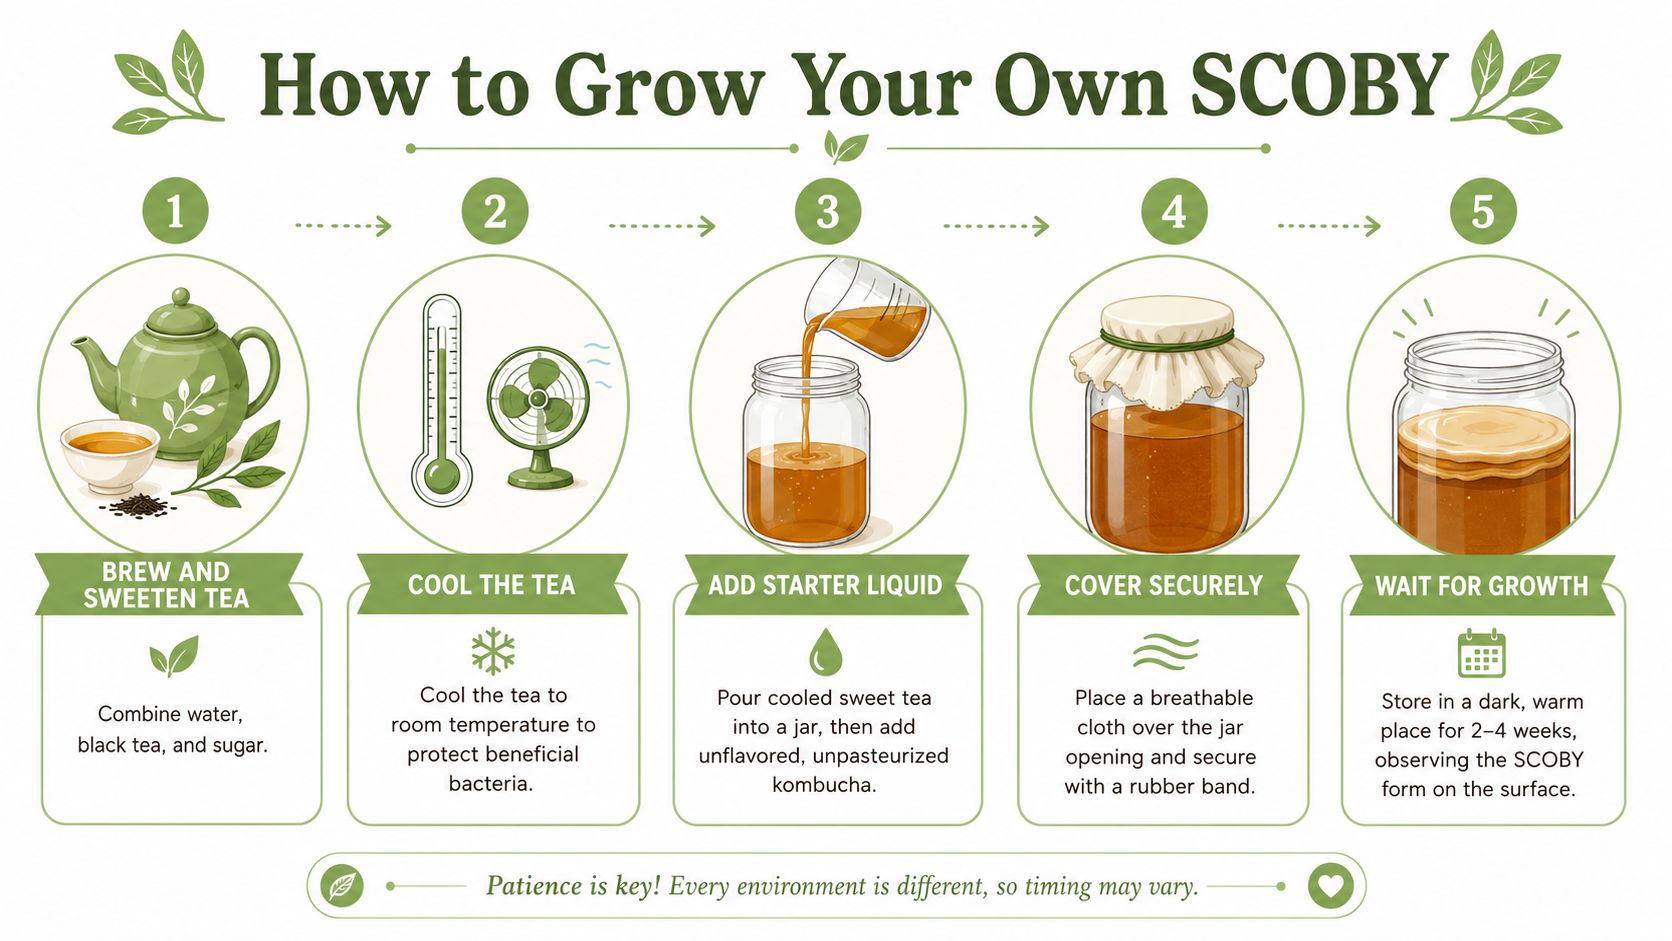
Early on, it helps to see the flow visually.
Brew the sweet tea properly
Brew the black tea first, then dissolve the sugar fully while the liquid is still hot. A clean, fully mixed tea base gives the culture an even food source and avoids gritty sugar collecting at the bottom of the jar.
Let the tea cool right down to room temperature before adding any live kombucha. Warm tea can stress the microbes and slow the start. In practical terms, if the outside of the jar or bowl still feels warm in your hand, wait longer.
Add the starter liquid and set the jar up
Pour the cooled sweet tea into a clean glass jar and add the raw, unflavoured kombucha. Tip in the sediment as well if the bottle has it. That cloudy material often carries plenty of active yeast and bacteria.
Cover the jar with a tightly woven cloth and secure it well. In Australia, especially through fruit-fly season, loose covers cause trouble fast. Cheesecloth is often too open. A clean tea towel, muslin folded over, or a paper towel under a firm rubber band does a better job.
For brewers making kombucha often, or for a cafe doing small-batch ferments in a prep area, keep your bench habits disciplined. Wash well, rinse away detergent residue, and keep ferments away from sourdough starters, compost caddies, and ripening fruit. Herbilabs has a useful guide on how to prevent lab contamination that translates well to fermentation spaces.
Choose the right spot and leave it alone
Set the jar somewhere with stable room temperature, decent airflow, and no direct sun, as described in You Brew Kombucha's SCOBY growing guide. In many NSW homes, a pantry shelf or the back corner of a bench works better than a windowsill, where daytime heat and nighttime cooling can push the culture around.
Leave it alone once it is in place.
Constant movement does not always ruin a batch, but it can interrupt that first thin layer trying to form across the surface. Avoid the top of the dishwasher, above the fridge, or any shelf that gets rattled every time someone reaches for mugs.
Good fermentation spots are dull, steady, and easy to keep clean.
This walkthrough can also help if you like seeing the process demonstrated in real time.
Know the realistic timeline
Growing a SCOBY from scratch is slow. It usually needs a generous amount of raw starter kombucha, then several weeks of patience before the new layer is thick and strong enough for regular brewing. In a warm coastal kitchen it can move along nicely. In a cool inland house, or during a NSW cold snap, it can take much longer than online tutorials suggest.
Thickness matters more than speed. Wait until you have a solid, leathery layer and a sharply acidic liquid underneath. That mature starter tea protects your first full batch far better than a thin, immature culture does.
What success looks like at the end
By the end of the process, you want two things. A formed SCOBY on top, and strong starter liquid below. Keep both.
If you want a reliable answer to how do you make a SCOBY, it comes down to this: brew sweet black tea, cool it fully, add live kombucha, protect it from contamination, then give it a stable spot and enough time to finish properly.
What to Expect While Your SCOBY Is Growing
The most reassuring skill in kombucha brewing is learning how to read the jar. New brewers often assume anything ugly is a problem. It usually isn't. Healthy SCOBY growth can look patchy, bubbly, uneven, and strange before it looks tidy.
Observation beats overreaction.
Healthy signs you'll probably see
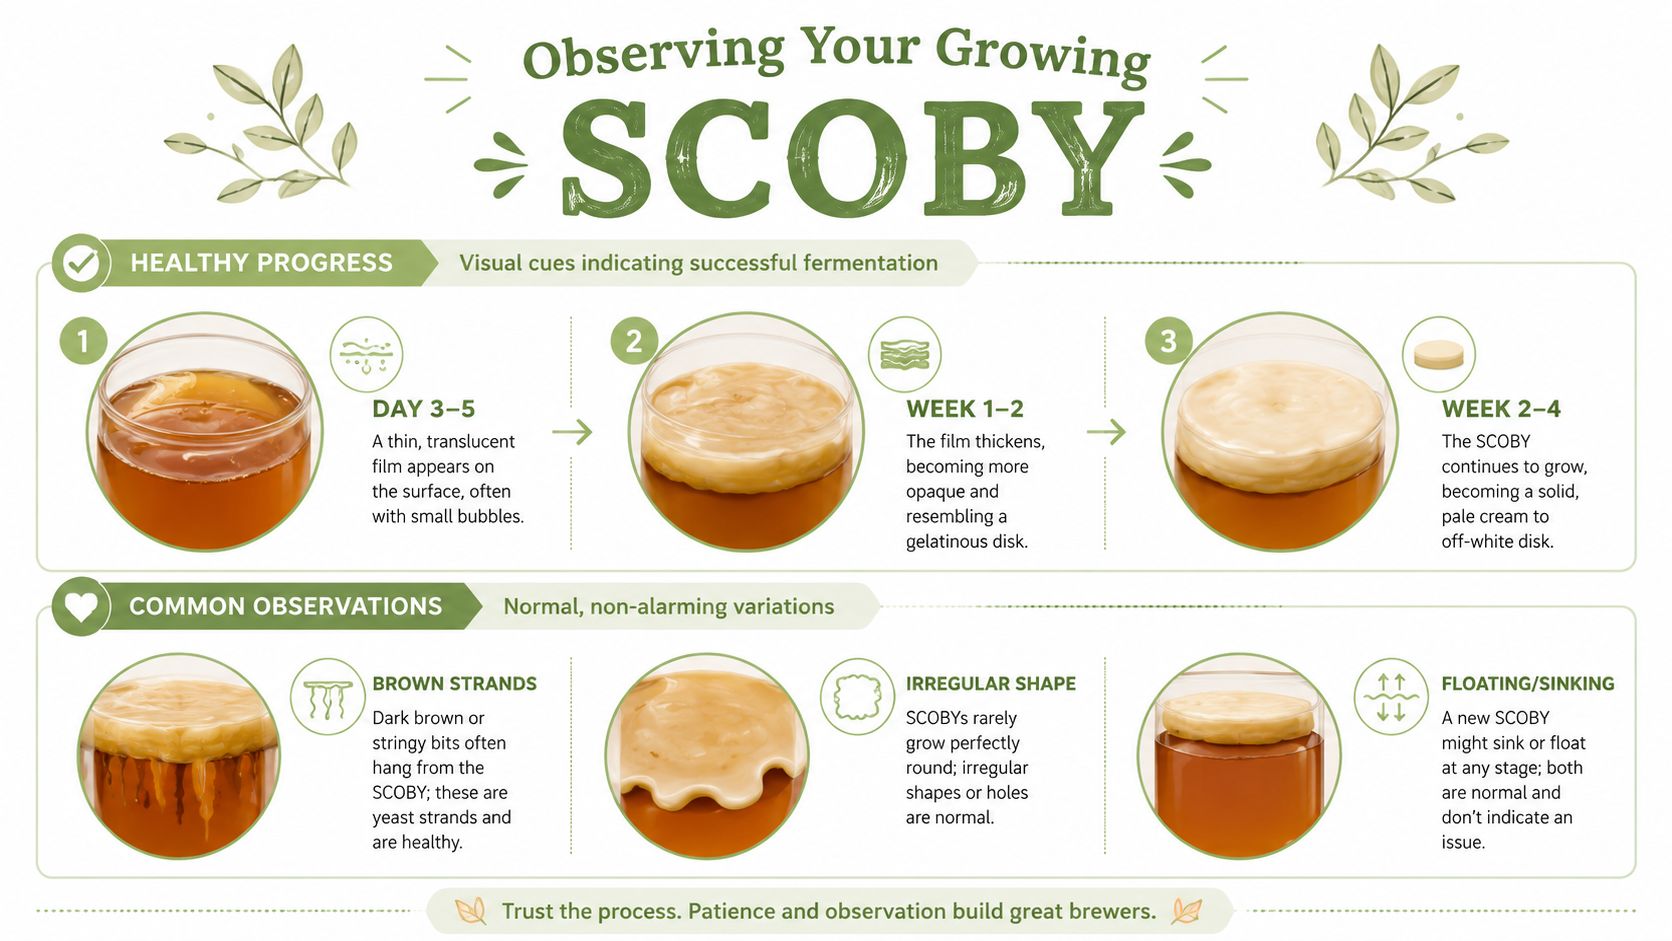
In the early stage, you may notice a thin film spreading over the surface. It can look translucent at first. Small bubbles can appear under it. That's often a good sign, not a warning sign.
As time passes, the surface layer usually thickens and turns more opaque. The colour is often pale cream to off-white. It may not form a perfect circle, and it may not look smooth.
Common normal features include:
- Brown stringy bits hanging below the layer. These are usually yeast strands.
- Uneven edges or holes in the developing mat.
- Floating or sinking at different points in the process.
- A sharp, vinegary aroma that smells fermented, not rotten.
A healthy SCOBY rarely looks pretty in the polished, social-media sense. It looks alive.
Signs that should make you stop
There is a difference between normal oddness and a genuine contamination problem. Mould is the main one to watch for. Mould typically appears dry or fuzzy, and it sits on top rather than dangling in the liquid.
Be cautious if you see:
- Green or blue growth
- Fuzzy white patches that look powdery rather than wet
- A smell that suggests rot rather than acidity
- A surface that looks dry and mould-like instead of glossy and damp
If you see mould, discard the batch and clean your equipment thoroughly before trying again. Don't try to rescue it.
A more advanced confidence check
Taste and appearance tell you a lot, but some brewers like an extra layer of reassurance. In a healthy kombucha culture, the SCOBY should be able to produce a new film within 3 weeks while the brew trends toward a pleasantly sour, faintly sweet profile, as described by Planning With Kids in their Australian kombucha guide.
That same guide also notes that a healthy culture can double in mass over time. You don't need to obsess over measuring it. What matters at home is seeing steady surface growth, increasing acidity, and no signs of contamination.
Patience is part of the process
A common mistake is interfering with the jar because “nothing seems to be happening”. Something usually is happening. It's just gradual. Lifting the cloth repeatedly, moving the jar, or changing spots every few days doesn't help.
If the brew smells clean and sour, the surface is forming a moist film, and there's no fuzz, your best move is usually to keep waiting.
Fixing Common Problems in Australian Climates
A jar that behaves perfectly in coastal Queensland can struggle badly during a cold NSW snap. That catches out plenty of new brewers. SCOBY growth is less about luck and more about keeping temperature and hygiene steady enough for the culture to stay in charge.
Winter is usually the harder season. In cooler kitchens, SCOBY growth can slow right down, and Live Eat Learn's kombucha guide notes that cold conditions are a common reason batches fail. Around the Hunter, I tell people to check the room before they blame the culture. A bench near an outside wall, a draught from a window, or a jar sitting on cold stone can be enough to stall progress.
What helps in cooler weather:
- Use the warmest stable room in the house rather than the laundry, garage, or pantry
- Lift the jar off cold benchtops with a folded tea towel or timber board underneath
- Wrap the sides lightly with a clean towel if nights are cool, while keeping the top breathable
- Leave it in one spot so the culture is not coping with daily temperature swings
- Keep it out of direct heater blasts because sharp rises and drops can stress the brew
Heat brings a different set of problems. Summer ferments can acidify fast, especially in kitchens that sit warm all afternoon. You might get a surface layer quickly, but speed alone does not mean the culture is healthy. Too much heat can leave you with harsh, overly sour liquid before the new SCOBY has built proper strength.
For hot weather, keep the jar in bright shade, away from windows, ovens, dishwashers, and the top of the fridge. Small cafes should watch this closely. Back-of-house areas often run warmer than staff realise, especially once service starts.
A few common signs worry people more than they should:
- The SCOBY sank. A fresh layer can still form on the surface
- The top looks patchy or lumpy. Early growth is often uneven
- The brew smells sharp. Clean vinegar-like acidity is normal during development
- There are strands or brown bits in the liquid. Yeast often looks messy before the culture settles
Fruit flies are the exception. In Australian summers, they can ruin a batch fast. If they are hovering around the jar, check the cloth, the rubber band, and the rim of the vessel straight away. For home brewers and small cafes, this is where good habits matter. Wash the jar well, rinse away any detergent residue, use clean hands, and wipe nearby surfaces before you start. If the cover has gaps or the jar looks compromised, discard the batch and reset.
If your culture keeps struggling, simplify the setup. One jar. One consistent spot. Clean equipment. Active starter. That solves more problems than constant fiddling.
If you end up with extra starter liquid or a backup culture while troubleshooting, this guide on how to store kombucha safely between batches is useful for keeping it in good condition.
Harvesting, Storing, and Scaling Up
Once your SCOBY reaches brewing strength, you'll notice the difference. The surface layer has enough body to handle transfer, and the liquid below is sharply acidic rather than sweet tea with a tang.
When it's ready to use
A mature SCOBY for a full batch should be at least 1/2 inch thick, and the concentrated starter tea left behind is useful for the next brew, as noted earlier in the SCOBY growth process. Handle it with clean hands or clean utensils, and keep enough strong starter liquid with it so the culture stays protected.
A simple routine works well:
- Lift the SCOBY gently and place it into the next prepared batch
- Reserve starter tea from the jar rather than using all of it
- Keep a backup culture if you plan to brew regularly
Storing extra SCOBYs well
If you end up with more culture than you need, set up a SCOBY hotel. That's a separate jar where extra SCOBYs sit in strong kombucha starter liquid. Keep it covered with breathable fabric and store it in a stable spot, just as you would an active brew.
For longer-term care and practical handling, this guide on how to store kombucha is useful if you want to keep your starter and finished batches in good condition.
What changes when a café scales up
At home, consistency comes from habits. In a café or small production setting, consistency comes from systems. The bigger the batch, the less room there is for guesswork around cleanliness, monitoring, and storage.
For commercial organic kombucha in Australia, premises must be HACCP certified, which means critical control points such as pH and temperature are monitored as part of food safety practice. That's the benchmark followed by Pep Tea in its Hunter Valley brewery, as outlined on their organic kombucha page.
That matters for cafés thinking beyond hobby brewing. A good SCOBY culture is only part of the job. Reliable process control is what turns fermentation into a dependable product.
If you're ready to move from home-brewing curiosity to reliable, well-made kombucha, explore Pep Tea for Australian organic kombucha, practical brewing guidance, and resources built for both home drinkers and hospitality teams.