
Best Kombucha Recipe AU: Brew Your Own in 2026

You're probably here because you've bought kombucha from the fridge at the shops, looked at the price, then looked at a few online recipes and thought, “That seems simple enough.” Then the confusion starts. One guide says leave it out for a week. Another says two weeks. Another was clearly written for a kitchen that doesn't swing between a sticky Hunter summer and a frosty inland morning.
That's where most Australian brewers get tripped up. Kombucha isn't hard, but it is local. A brew that behaves beautifully in a mild climate can turn sharp fast in a hot kitchen, or sit there looking sleepy through a southern winter. A good kombucha recipe AU needs to respect the basics of fermentation and the conditions within Australian homes and cafés.
The good news is that once you understand the rhythm, kombucha becomes one of the most satisfying things to make. You start with tea, sugar, a SCOBY, and patience. You finish with a tangy, living drink that suits everything from an afternoon reset to a non-alcoholic dinner pour. Done properly, it's also a far cry from overly sweet, fizzy drinks pretending to be fermented.
Brewing Your Own Kombucha in Australia
A lot of first-time brewers in Australia run into the same problem. They follow a generic recipe word for word, pop the jar on the bench, and expect the same result as the person who wrote it. But a brew in coastal Queensland won't move at the same pace as one in regional Victoria, and a Hunter Valley kitchen in January behaves very differently from the same kitchen in July.
That's why I always treat kombucha as part recipe, part observation. The ingredients matter, but so does your weather, your bench spot, and how warm the room stays overnight. If you want a kombucha recipe AU that works, the aim isn't blind precision. It's learning what a healthy ferment looks, smells, and tastes like in your own home.
Why local conditions matter
Australian brewers deal with real temperature swings. In warm weather, kombucha can race ahead, becoming tart before you expect it. In cooler weather, the same brew can take its time and leave you wondering whether anything is happening at all.
That can be frustrating at first, but it's also part of the appeal. Kombucha brewing teaches you to work with the season rather than against it. Summer rewards close attention. Winter rewards patience.
Practical rule: The calendar helps, but your palate decides. Kombucha is ready when it tastes like kombucha, not when a random internet recipe says it should.
What makes a good brew worth it
When kombucha is brewed well, the trade-off is obvious. You give up convenience, but you gain control. You decide how tart it gets, whether it stays plain or picks up ginger and lime, and whether the final drink stays crisp and dry or carries a little fruit sweetness from bottling.
A few reasons home brewers stick with it:
- You control the flavour: Brew it lighter and fresher, or let it go further for more bite.
- You control the sweetness: The first ferment changes sweet tea into something tangy and far less sugary in taste.
- You learn fast: One or two batches usually teaches more than hours of reading.
There's also a simple pleasure in lifting the cloth, checking the surface, and tasting a brew that's slowly transforming. Once that clicks, kombucha stops feeling like a trendy kitchen project and starts feeling like part of the household.
Your Essential Kombucha Brewing Toolkit
Before you brew, get your setup sorted. Most problems in kombucha start long before fermentation. They begin with the wrong vessel, weak starter, poor airflow, or equipment that makes consistency harder than it needs to be.
The true essentials
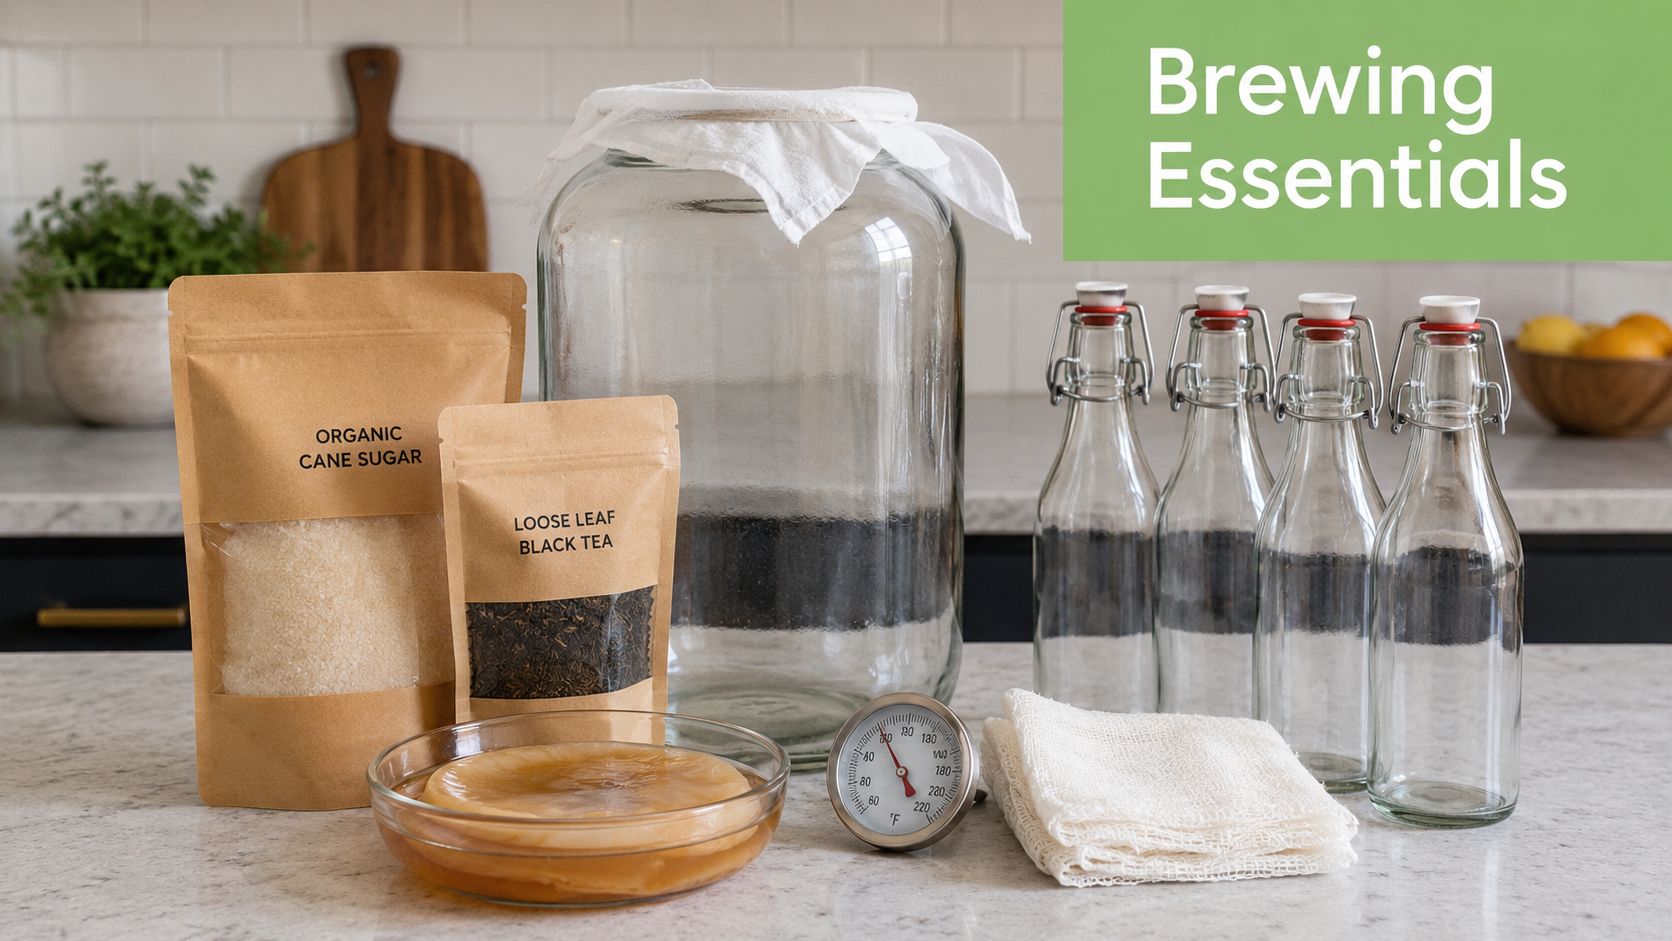
These are the items I'd call essential for a reliable kombucha recipe AU:
- A glass brewing jar: Glass is the easiest option to keep clean, monitor, and reuse. You can see the surface clearly, which matters when checking for normal SCOBY growth versus anything suspicious.
- A breathable cover and band: A clean cloth or screen cover lets the brew breathe while keeping dust and insects out.
- Tea: Black or green tea works well for home brewing. Keep it simple and avoid heavily flavoured blends while you're learning.
- Plain sugar: White or raw sugar works. In kombucha, sugar is fuel first. Fancy alternatives sound appealing, but consistency matters more than novelty.
- A healthy SCOBY and starter liquid: This is the engine room of the batch.
- Clean bottles for the second ferment: Use bottles designed to hold pressure if you want fizz.
If you want a straightforward starting point, a Pep Tea kombucha tea kit makes the setup easier because it removes some of the guesswork around matching ingredients and basic gear.
Why each piece matters
A healthy SCOBY doesn't need to look beautiful. It needs to look alive and active. New brewers often panic because the culture can be uneven, pale, wrinkled, or layered. That's normal. What matters more is whether your starter liquid smells sharp and pleasantly acidic, and whether the ferment environment stays clean and airy.
The brewing vessel matters more than people realise too. Bigger isn't always better. A manageable jar makes tasting, moving, and temperature control easier. If you're thinking about larger-volume setups for home or café prep, it's worth reading MODERN LYFE on food grade storage to understand what food-safe storage means before you scale.
Keep your first batch boring on purpose. Simple tea, simple sugar, simple vessel. The exciting part comes later, once your base brew is dependable.
Nice-to-haves that help
Not essential, but very useful:
| Item | Why it helps |
|---|---|
| A funnel | Cleaner transfers into bottles |
| A tasting glass | Lets you sample without fuss |
| A jug for mixing tea | Makes cooling and pouring easier |
| Extra jar for spare cultures | Handy if you want to keep backup SCOBYs |
Sourcing in Australia without overcomplicating it
You can often get a SCOBY from a friend who brews regularly, from a brewing supplier, or through a well-reviewed kit. The best source is usually the one that gives you an active culture with enough starter liquid to acidify the batch from day one.
Avoid cutting corners with random substitutes. A weak culture or poor starter is one of the fastest ways to end up with a stalled brew.
The First Fermentation Perfecting Your Base Brew
A Hunter Valley kitchen in January can hit kombucha hard by lunchtime. The same recipe that cruises along in Newcastle in spring can turn sharp far too quickly in a hot inland room, while a Melbourne winter batch may sit there tasting like sweet tea for days. That is why first fermentation needs a season-aware plan, not just a number on a recipe card.
Get this stage right and the rest of the process stays simple. A clean, well-acidified base brew gives you better flavour, steadier carbonation later, and far fewer surprises.
A reliable starting formula for home brewers is plain black or green tea, white sugar, and enough mature starter liquid to acidify the fresh sweet tea from the beginning. Food Standards Australia New Zealand advises keeping kombucha acidic enough to control unwanted microbes, and notes that finished kombucha is typically a low-pH product (FSANZ kombucha assessment). If you want to understand the culture itself a bit better, this guide on how to make a kombucha SCOBY gives useful background.
The method that works
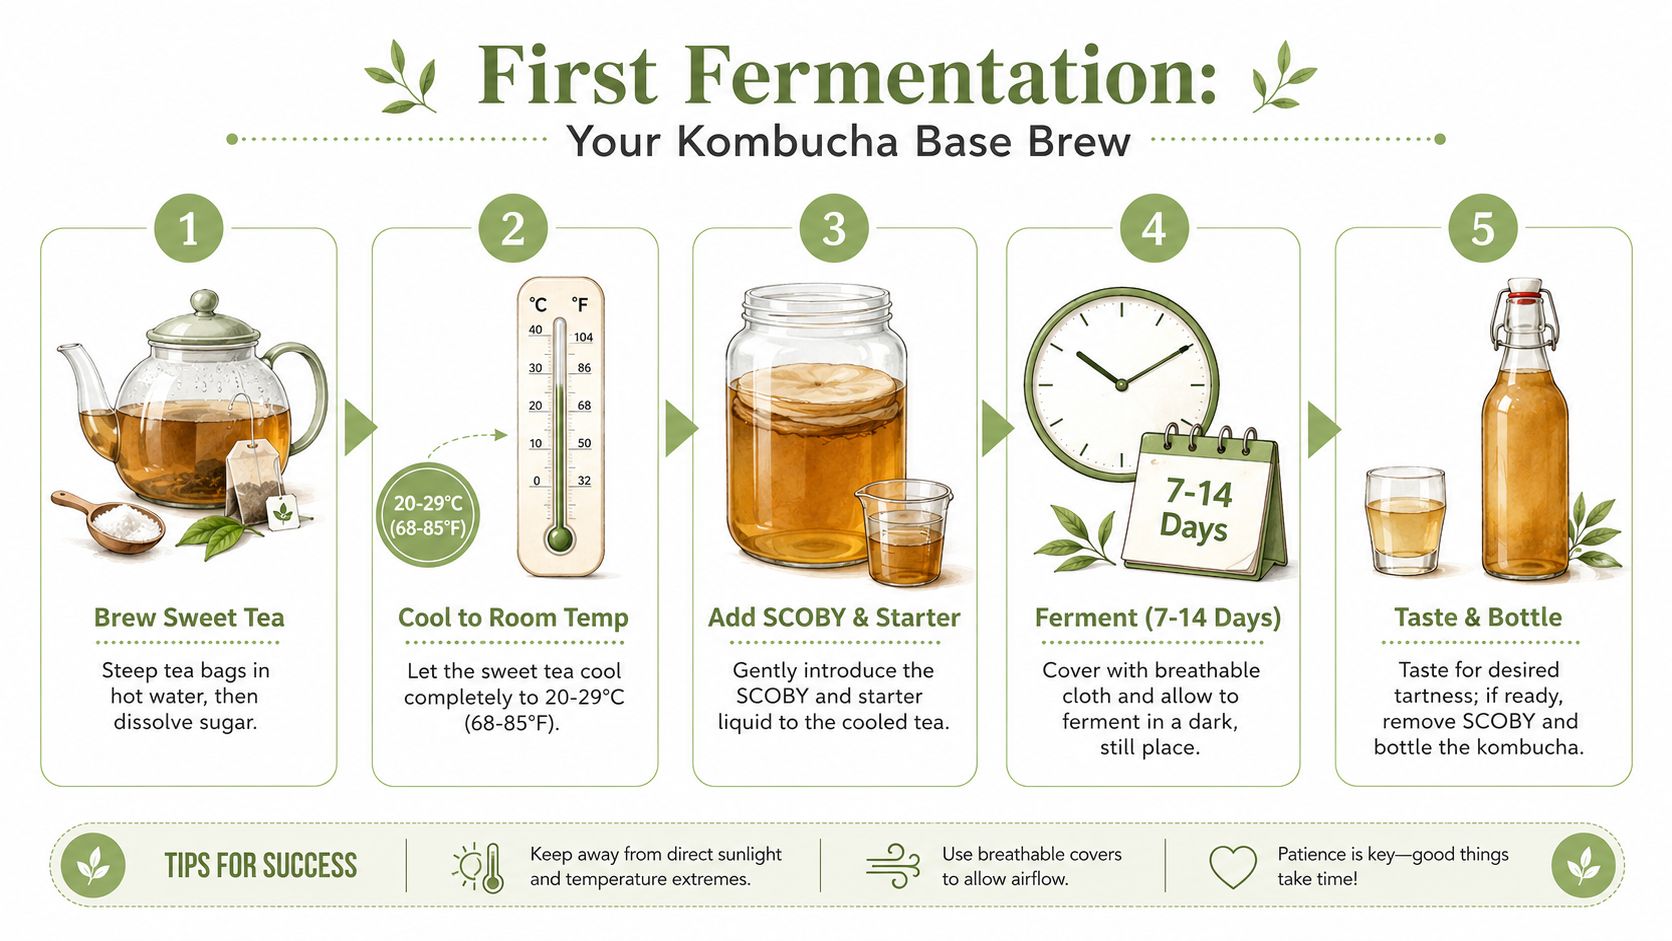
Brew the sweet tea
Steep the tea properly, then dissolve the sugar while the liquid is still hot. Fully dissolved sugar gives the culture even access to food and helps the batch ferment more predictably.Cool the tea fully
Add the culture only once the tea is at room temperature. The National Center for Home Food Preservation advises cooling sweet tea before adding starter culture so you do not stress or damage the microbes that drive fermentation (NCHFP kombucha guidance).Add starter liquid first, then the SCOBY
The starter liquid does more for safety than the pellicle itself because it drops the pH straight away. If the SCOBY sinks, tilts, or folds, leave it alone. A new layer usually forms on top anyway.Cover with cloth and give it air
Kombucha ferments best with airflow and protection from insects and dust. Don't seal the jar for first fermentation, and don't tuck it into a stuffy cupboard. The yeasts and bacteria behave differently in the presence of oxygen, and it helps to learn about bacterial types on BacteriaFAQ.com.
Timing in Australian kitchens
Australian conditions change the plan.
In a warm Queensland or Northern Rivers kitchen, the brew may move quickly and taste ready much earlier than a US or UK recipe suggests. In a cool Canberra or Tasmanian winter kitchen, it can take much longer to lose that obvious sweet-tea character. The practical answer is to use temperature and taste together.
The Kombucha Brewers International homebrewing guidance recommends fermenting in a warm room-temperature range and tasting regularly rather than relying on a fixed calendar (Kombucha Brewers International brewing basics). That matches what experienced brewers see here. Summer heat speeds acid production, but the trade-off is a narrower window between balanced and too sharp. Cooler weather often gives a rounder flavour, but you need patience and a stable spot away from cold overnight swings.
In the Hunter, I start tasting earlier in summer and later in winter. That one habit prevents a lot of disappointing batches.
Hot weather shortens the margin for error. Cold weather lengthens the wait.
Your palate determines the finish line
Time gets you in the right zone. Taste decides whether the batch is ready.
A young brew still reads as sweet tea with a bit of tang. A finished first ferment tastes bright, lightly acidic, and less obviously tea-like. If it is still cloying, leave it. If it has moved into hard vinegar territory, it has gone past the softer drinking style that suits most home brews.
Use this quick check:
| What you taste | What it means |
|---|---|
| Clearly sweet tea | Leave it longer |
| Pleasantly tart with a little sweetness | Good bottling point |
| Sharp, dry, strongly vinegary | Better for a stronger style, or reserve some as starter for the next batch |
A pH strip can help confirm you are in a safe acidic range, but flavour still matters. A batch can read acidic enough and still taste unbalanced if it has raced in high heat.
This short video gives a useful visual reference for the full process if you like seeing the steps before trying them.
A note on flavour versus speed
Australian brewers deal with this trade-off all the time. Faster fermentation gives you quicker turnaround, which is handy for a busy household or a café prep cycle. Slower fermentation usually produces a softer, more integrated flavour, but only if the brew stays warm enough to keep progressing cleanly.
So aim for control, not speed. A steady ferment nearly always tastes better than one that was pushed by a hot afternoon and forgotten overnight.
Adding Fizz and Flavour with a Second Fermentation
A lot of Australian brewers get caught here. The base brew tastes right, the bottles go on the bench, then a 32°C afternoon rolls through and the batch is flat one day or trying to climb out of the bottle the next. Second fermentation is where local conditions matter most.

This stage does two jobs. It builds carbonation in a sealed bottle, and it lets you layer in flavour. The yeast uses the available sugars, whether they come from the kombucha itself or from fruit, juice, or a little extra sweetener. More sugar usually means more fizz, but it also narrows your margin for error.
How to bottle for fizz
Strain if you want a cleaner pour, or leave the yeast and fine sediment in if you want stronger carbonation. Both approaches work. A clearer bottle looks better and tastes tidier. A less-filtered bottle often carbonates faster.
Use pressure-rated swing-top bottles or brewing bottles, and leave a little headspace rather than filling to the brim. The NSW Food Authority advice on kombucha is a good reference for safe handling and storage, especially if you are brewing regularly at home or for service.
Then leave the bottles at room temperature and check them according to the season. In a warm Hunter summer kitchen, second ferment can move quickly. In a cold southern house in winter, it can take several days longer and the flavour often stays brighter and more defined.
A practical guide:
- Hot weather, above about 28°C: check after 24 hours
- Mild weather: check after 2 days
- Cool weather: expect a slower build and allow extra time
I prefer to refrigerate as soon as the bottle has the fizz I want. That keeps the flavour closer to where I intended it, instead of letting the acidity keep pushing upward.
Flavour ideas that suit Australian palates
Keep flavouring simple at first. One strong ingredient or two complementary ones is easier to control than a crowded mix.
A few combinations that work well:
- Ginger and lime: sharp, fresh, and reliable in warm weather
- Mango: rounder and softer, but usually faster to carbonate if the fruit is very ripe
- Lemon and native mint: clean and bright, especially for a drier style
- Passionfruit: aromatic and popular, though the seeds can make a lively bottle harder to open neatly
For most home batches, a small amount of juice, fruit pulp, or finely chopped flavouring is enough. Heavy additions can muddy the tea character and push pressure up fast. That trade-off matters in Australia, where kitchen temperatures can swing hard between morning and afternoon.
Safety note: Pressure-safe bottles are necessary. Decorative glass is not designed for active secondary fermentation.
Pressure builds fast in warm Australian homes
Second ferment is the step I watch most closely. A bottle left too long in a hot room can go from pleasantly fizzy to over-pressurised in very little time, especially with sweet fruit like mango, pineapple, or grapes. The Kombucha Brewers International guide to carbonating kombucha explains why sealed-bottle fermentation needs careful bottle choice and temperature awareness.
Use these habits:
- Bottle only when first ferment is ready: too much residual sugar makes pressure harder to predict
- Keep flavour additions modest: more fruit means more fuel for yeast
- Check earlier in hot weather: tropical and inland summer conditions speed everything up
- Chill before opening: cold liquid holds carbonation better and reduces gushers
- Open over the sink: even experienced brewers do this
If you want big sparkle, accept that you need closer monitoring. If you want calmer, more controlled bottles, use less fruit, bottle a little drier, and refrigerate earlier. That is the second-ferment trade-off. More fizz often costs you a bit of flavour precision and a lot more attention.
Troubleshooting Common Kombucha Brewing Problems
A batch can look rough on day five in Newcastle, race ahead on day three in Brisbane, then crawl in a cold Ballarat kitchen. That does not always mean something has gone wrong. It usually means the brew is responding to temperature, airflow, tea strength, or timing.
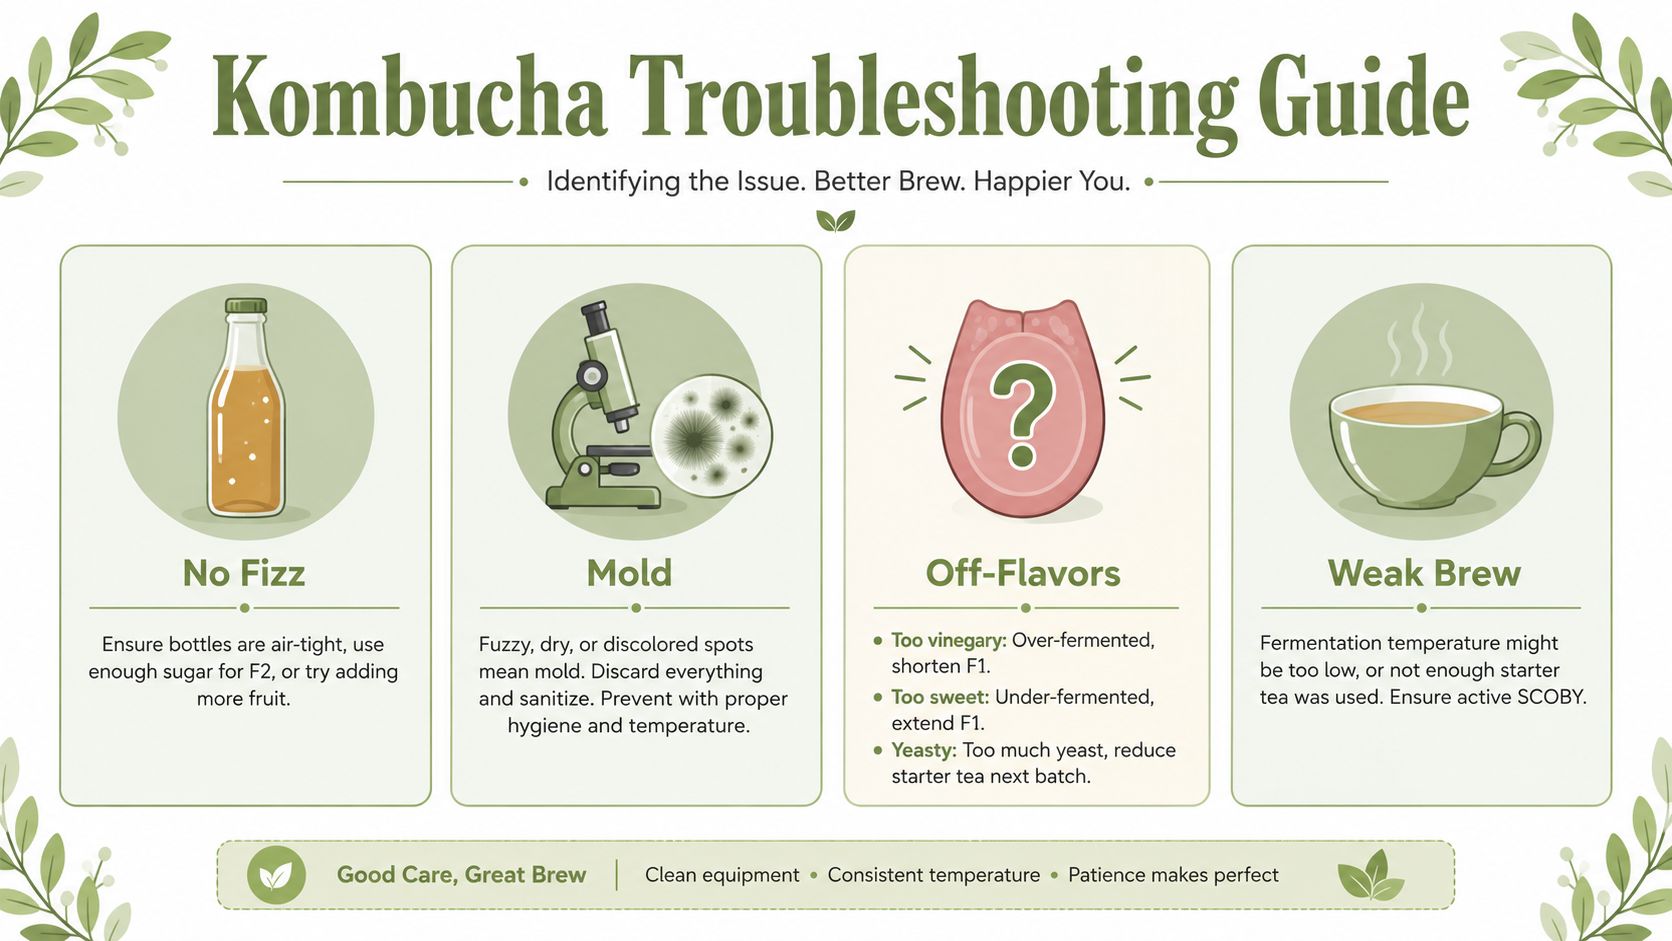
The useful skill is reading the signs early. Good troubleshooting is less about rescuing a bad batch and more about knowing what to leave alone, what to adjust next time, and when to throw a batch out for safety.
Mould or normal SCOBY growth
Healthy kombucha can look odd. New SCOBY growth is often pale, translucent, rippled, stringy, or full of brown yeast trails. Those textures can be completely normal, especially when temperatures swing between day and night.
Mould looks different. It is dry, fuzzy, and raised above the surface. White, green, blue, or black fuzzy patches are a discard signal. Do not skim it off and keep brewing. Tip the batch out and clean the vessel well.
In my experience, mould usually shows up after one of three mistakes. The tea went onto the culture too warm, the starter liquid was too weak to acidify the batch properly, or the brew sat in a stressed environment such as a stuffy cupboard or a very cold room. Hot weather creates one set of problems in Australia, but winter can also slow acid production enough to leave the surface vulnerable.
Too sour, too sweet, or just dull
Flavour faults are usually fixable, and they often come back to timing.
| Problem | Likely cause | Best fix |
|---|---|---|
| Too sour | First ferment ran too long, often in warm weather | Shorten the ferment next batch and taste earlier |
| Too sweet | Brew was bottled before acids had time to develop | Give first ferment more time and keep notes on temperature |
| Flat flavour | Tea was too weak, sugar balance was off, or culture was sluggish | Brew a stronger base tea and refresh the culture with a healthy starter batch |
If the brew still tastes mostly like sweet tea, wait and taste again the next day. If it has gone sharp and thin, you waited too long for the style you wanted.
That trade-off matters. A faster ferment in a hot Australian kitchen gets you acidity quickly, but flavour can become one-dimensional if you let it run unchecked. A slower ferment often builds better balance, but it asks for patience and a stable spot in the house.
No fizz after bottling
Low carbonation usually starts before the bottles are capped. The first ferment may have been bottled too early, the yeast may have been sluggish, or the room may have been too cool to finish the job.
Check the practical points first:
- Use bottles with a proper seal
- Bottle when the kombucha tastes finished, not sugary
- Keep some yeast in suspension instead of pouring only clear liquid
- Give bottles more time in cooler weather
- Refrigerate once the carbonation is where you want it
Cold conditions across southern Australia can make brewers think second ferment has failed when it is just slow. Tropical and inland summer conditions create the opposite problem. Pressure rises fast, so check bottles sooner. If you need a clearer plan for chilling and holding finished bottles safely, this guide on how to store kombucha after brewing is useful.
Looking after the SCOBY long term
A reliable culture likes consistency. Keep a backup jar with enough mature kombucha to cover the culture fully. Brewers call it a SCOBY hotel, but the principle is simple. Clean jar, acidic liquid, stable conditions, and no direct sun.
A few habits make a real difference over months of brewing:
- Do not pour hot tea onto the culture
- Do not let starter liquid get too weak
- Do not change tea, sugar, jar size, and timing all at once
- Do keep notes through the seasons
That last point matters more in Australia than many recipe guides admit. Summer brewing in the Top End, coastal Queensland, Sydney, or the Hunter is not the same job as brewing through a Melbourne winter. Adjust one variable at a time, taste often, and let the season tell you how quickly the batch wants to move.
Storing Serving and Sharing Your Kombucha
A good brew deserves a proper finish. Too many people spend all their energy on fermentation, then leave bottled kombucha sitting around too long on the bench or serve it without thinking about how flavour changes after bottling.
Refrigeration is part of the process, not an afterthought. Once your second ferment has the fizz you want, chill it. Cold storage slows the activity inside the bottle and helps hold flavour and carbonation in a more stable place. If you want a more detailed rundown, this guide on how to store kombucha is worth bookmarking.
How to serve it well
Kombucha is more versatile than many people give it credit for. It doesn't have to be an occasional wellness drink pulled from the back of the fridge.
A few serving ideas that work well in Australian homes:
- Straight from the fridge in a wine glass: Especially for drier batches with ginger or citrus.
- Over ice on a hot arvo: Clean, refreshing, and easy.
- As a non-alcoholic dinner pour: Works well when you want something with acidity and structure.
- As a mixer: Particularly good with fresh citrus, herbs, and soda for café-style mocktails.
Well-made kombucha has enough character to stand in for soft drink, mixer, or a light aperitif-style serve.
Why cafés should take it seriously
For cafés and hospitality venues, house kombucha can add real depth to a non-alcoholic menu. It signals care, freshness, and a more thoughtful alternative to standard sugary drinks. The challenge isn't demand. The challenge is consistency.
If you're brewing at larger volume, batch control matters. So does food safety. Clear cleaning procedures, a repeatable recipe, and proper cold storage are what separate a polished kombucha program from a risky one. If a venue wants the appeal of live fermented drinks without that operational load, buying from a trusted Australian producer is often the smarter move.
Serving kombucha well is really about respect for the brew. Fermentation makes it interesting. Storage and presentation make it enjoyable.
If you'd rather enjoy expertly made organic kombucha than brew every batch yourself, explore Pep Tea for Australian-brewed sugar-free organic kombucha and premium organic matcha from the Hunter Valley team behind the brand.